

Azure Single Sign-On (SSO) Setup: A Step-by-Step Guide
To enable Single Sign-On (SSO) for your application, we first need to register it in Azure Active
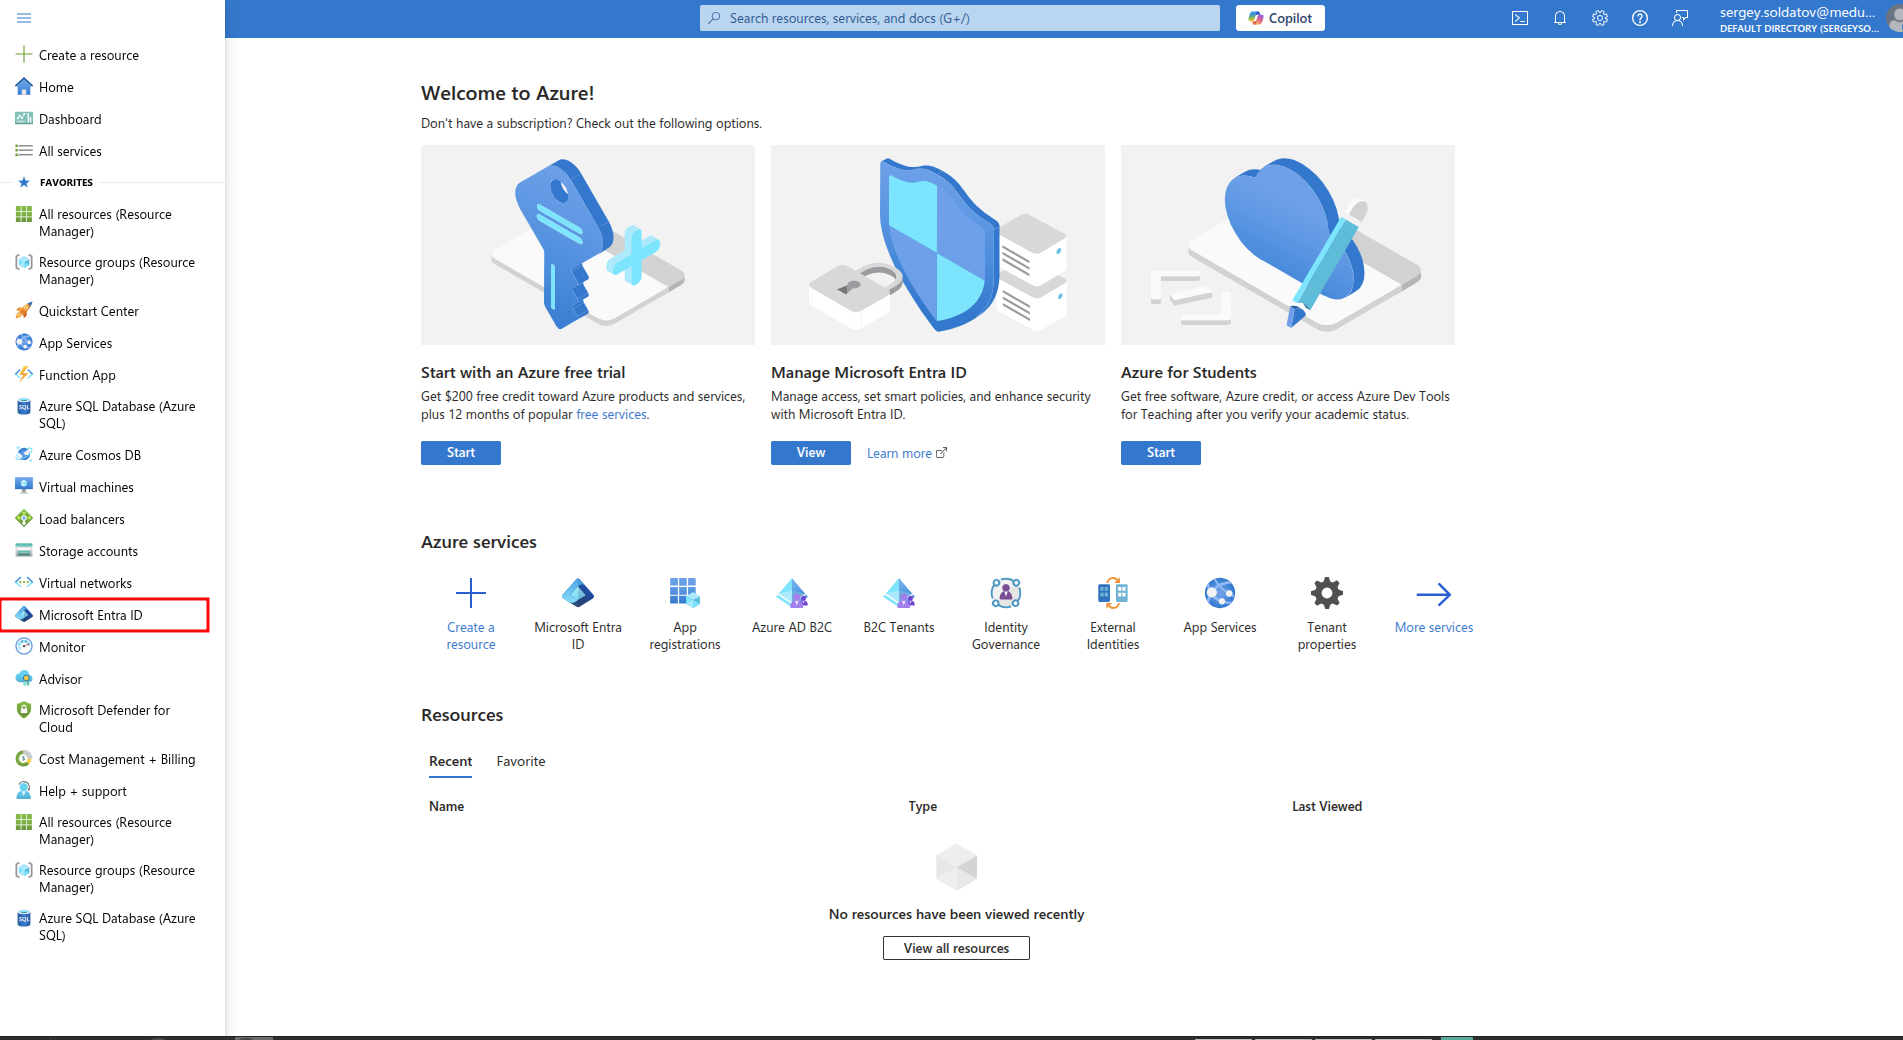
Navigate to Microsoft Entra ID:
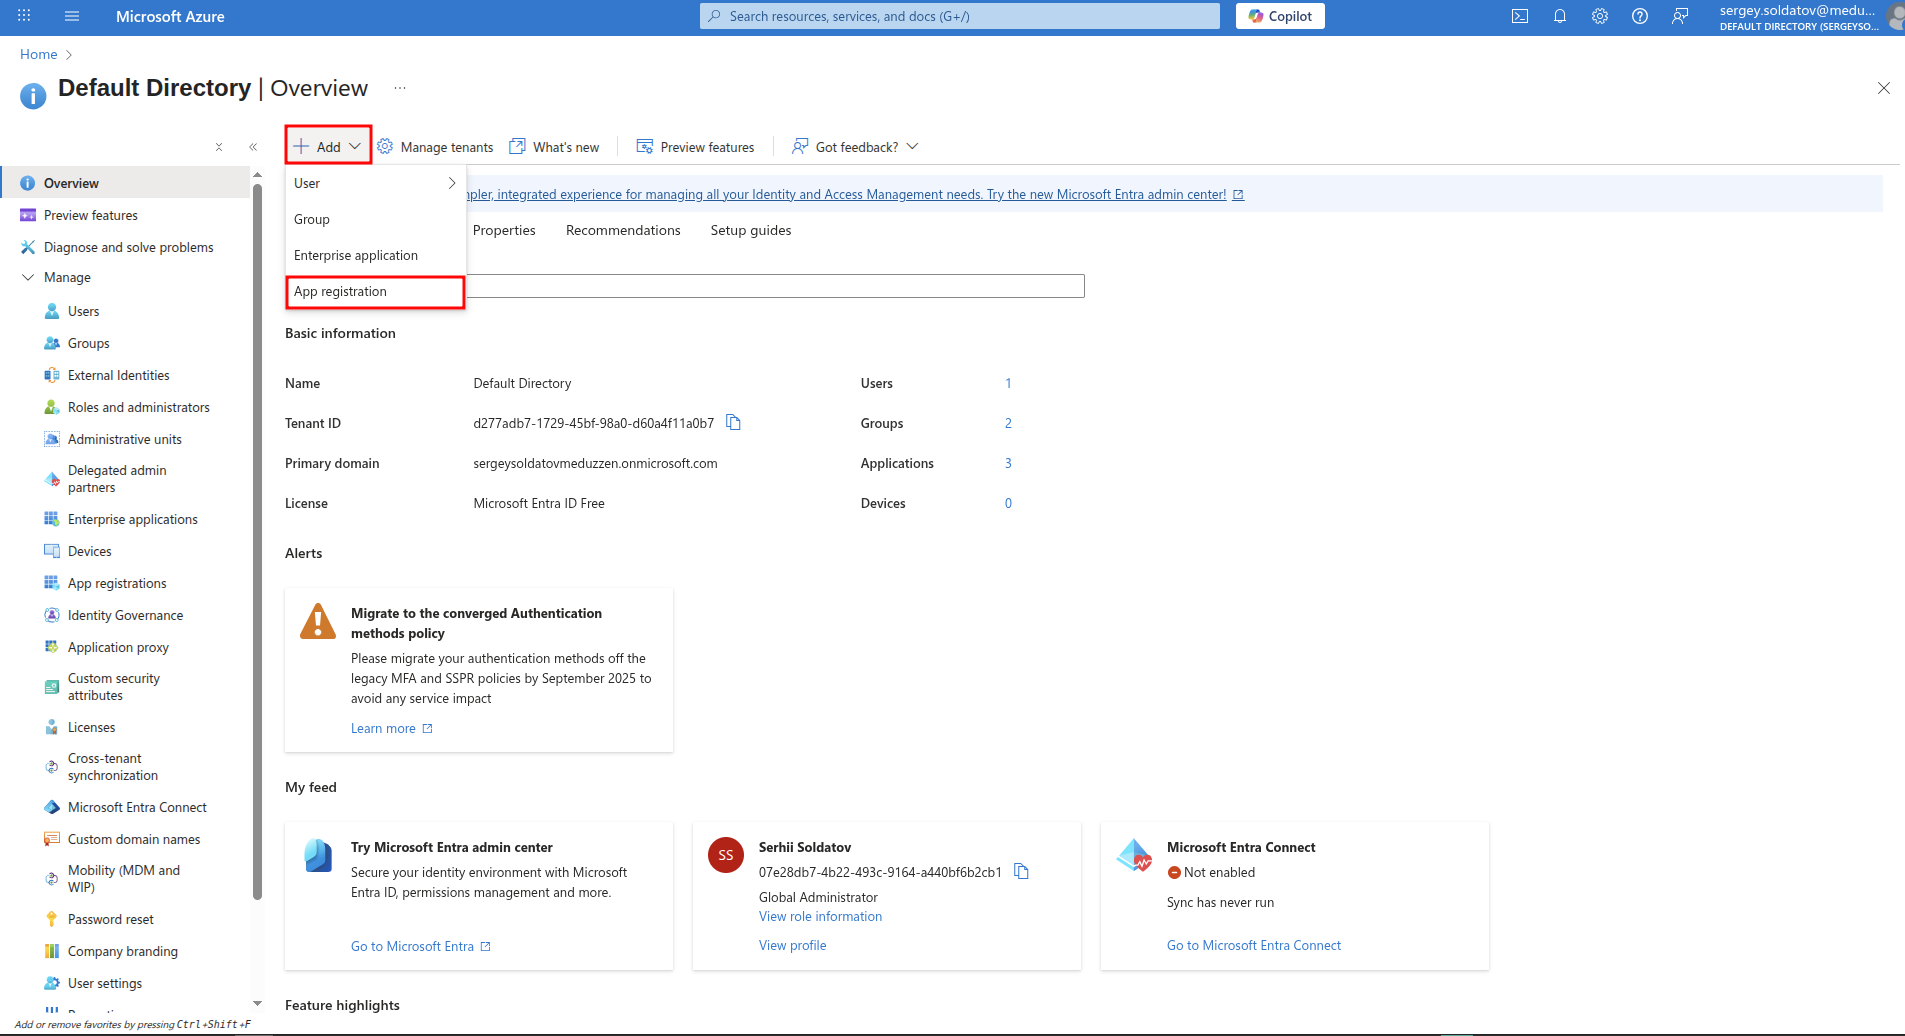
Click to Add button and select App registration:
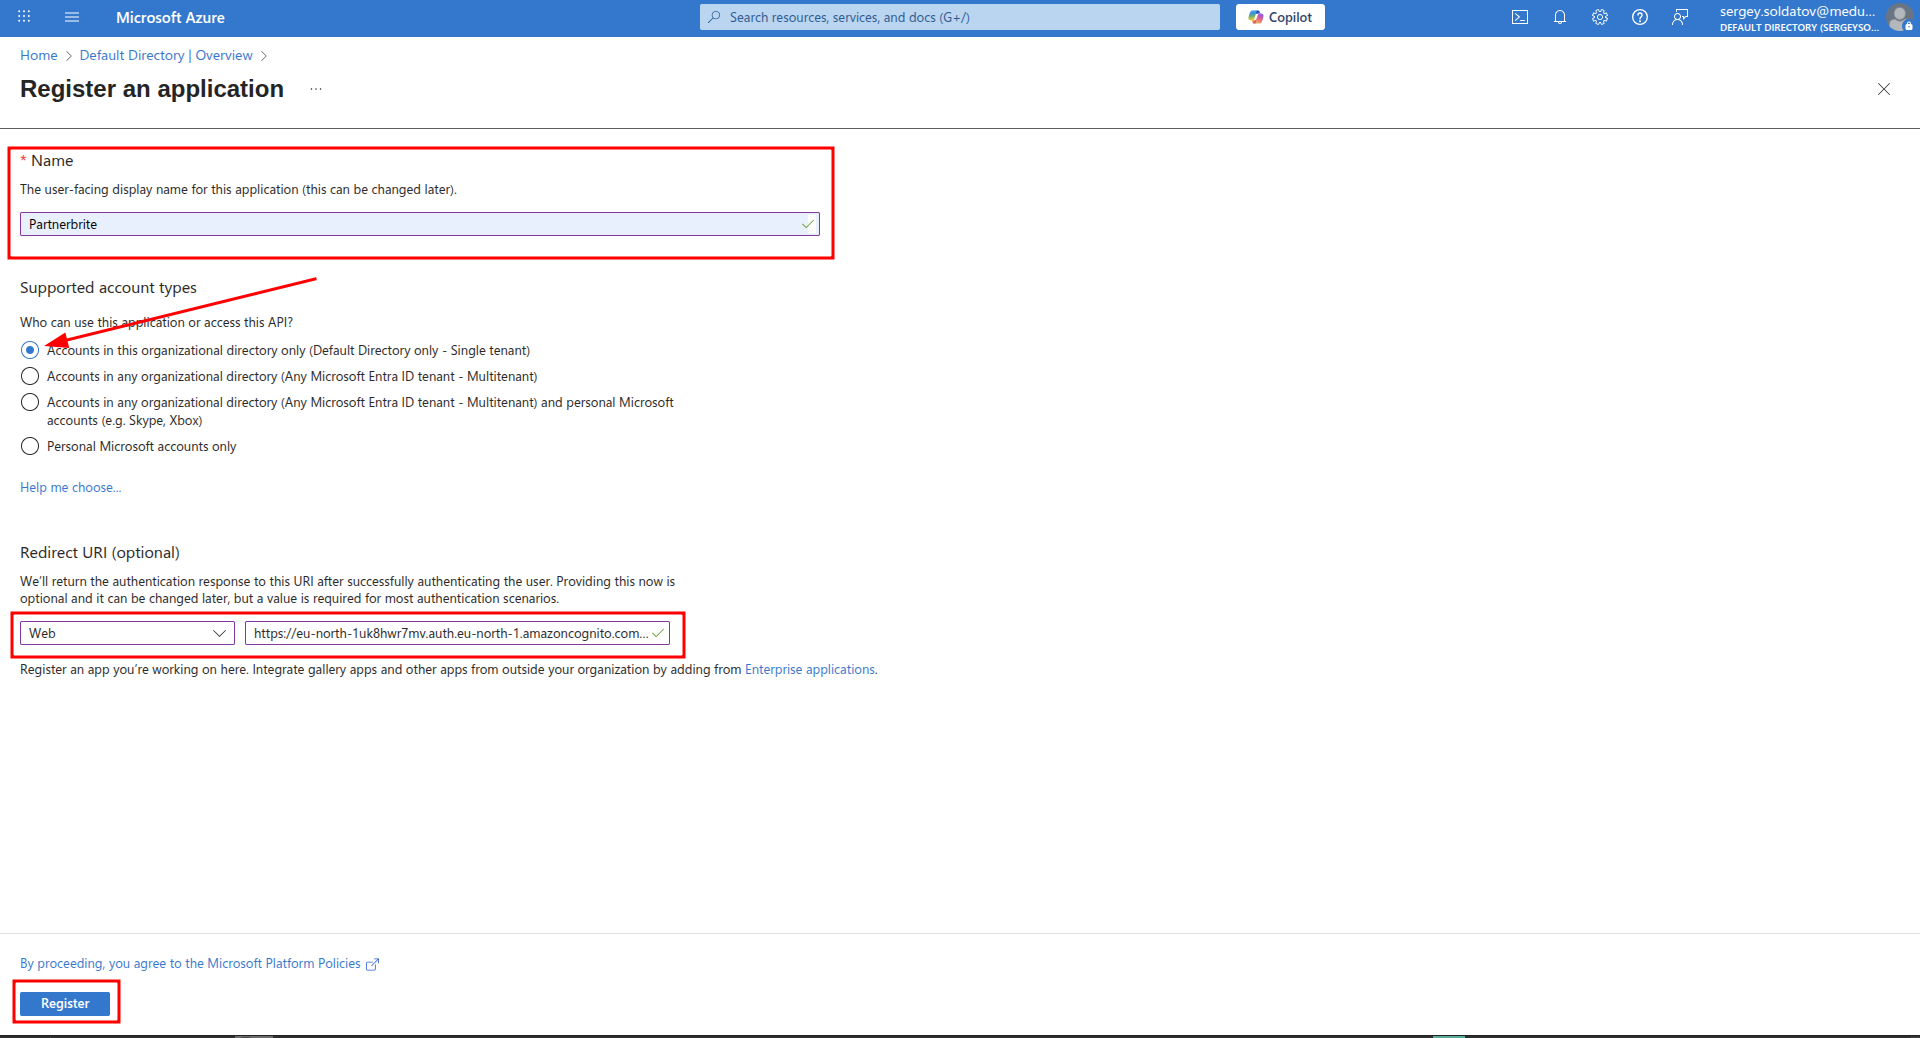
Fill in the Name field (you can choose any meaningful name).
Set the Redirect URI, which look like this:
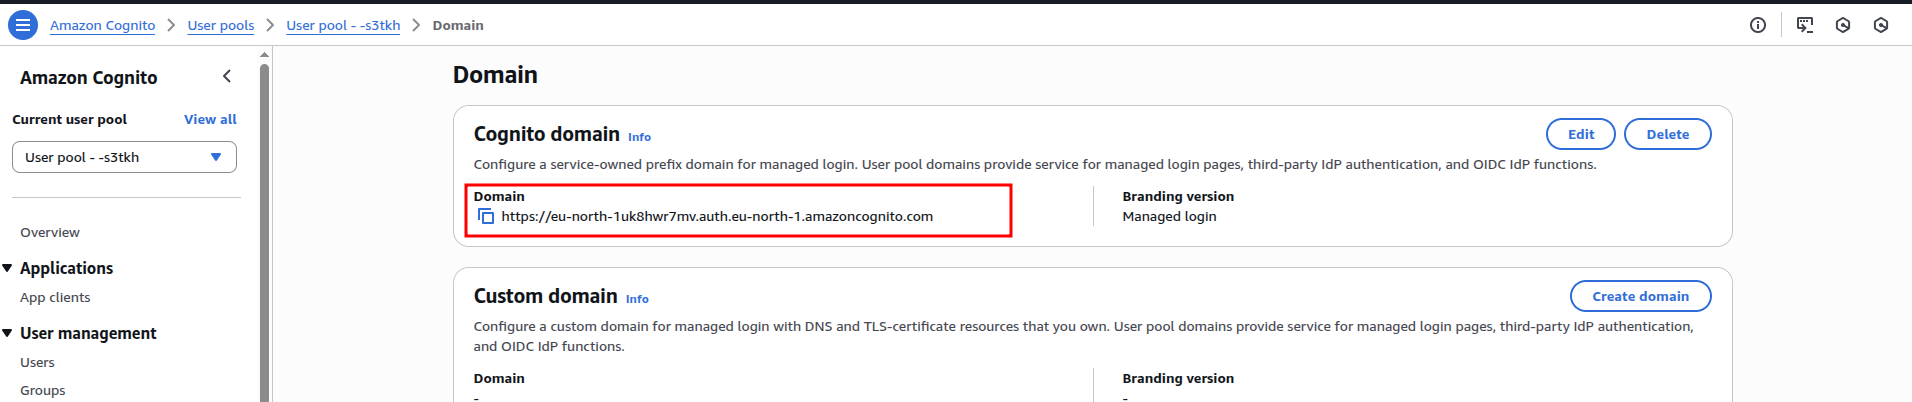
https://your-user-pool-domain/oauth2/idpresponse
where your-user-pool-domain is your Cognito User Pool Domain
(example: https://eu-north-asr1mv.auth.eu-north-1.amazoncognito.com/oauth2/idpresponse).
Other fields of this form fill as shown in the following screenshot:
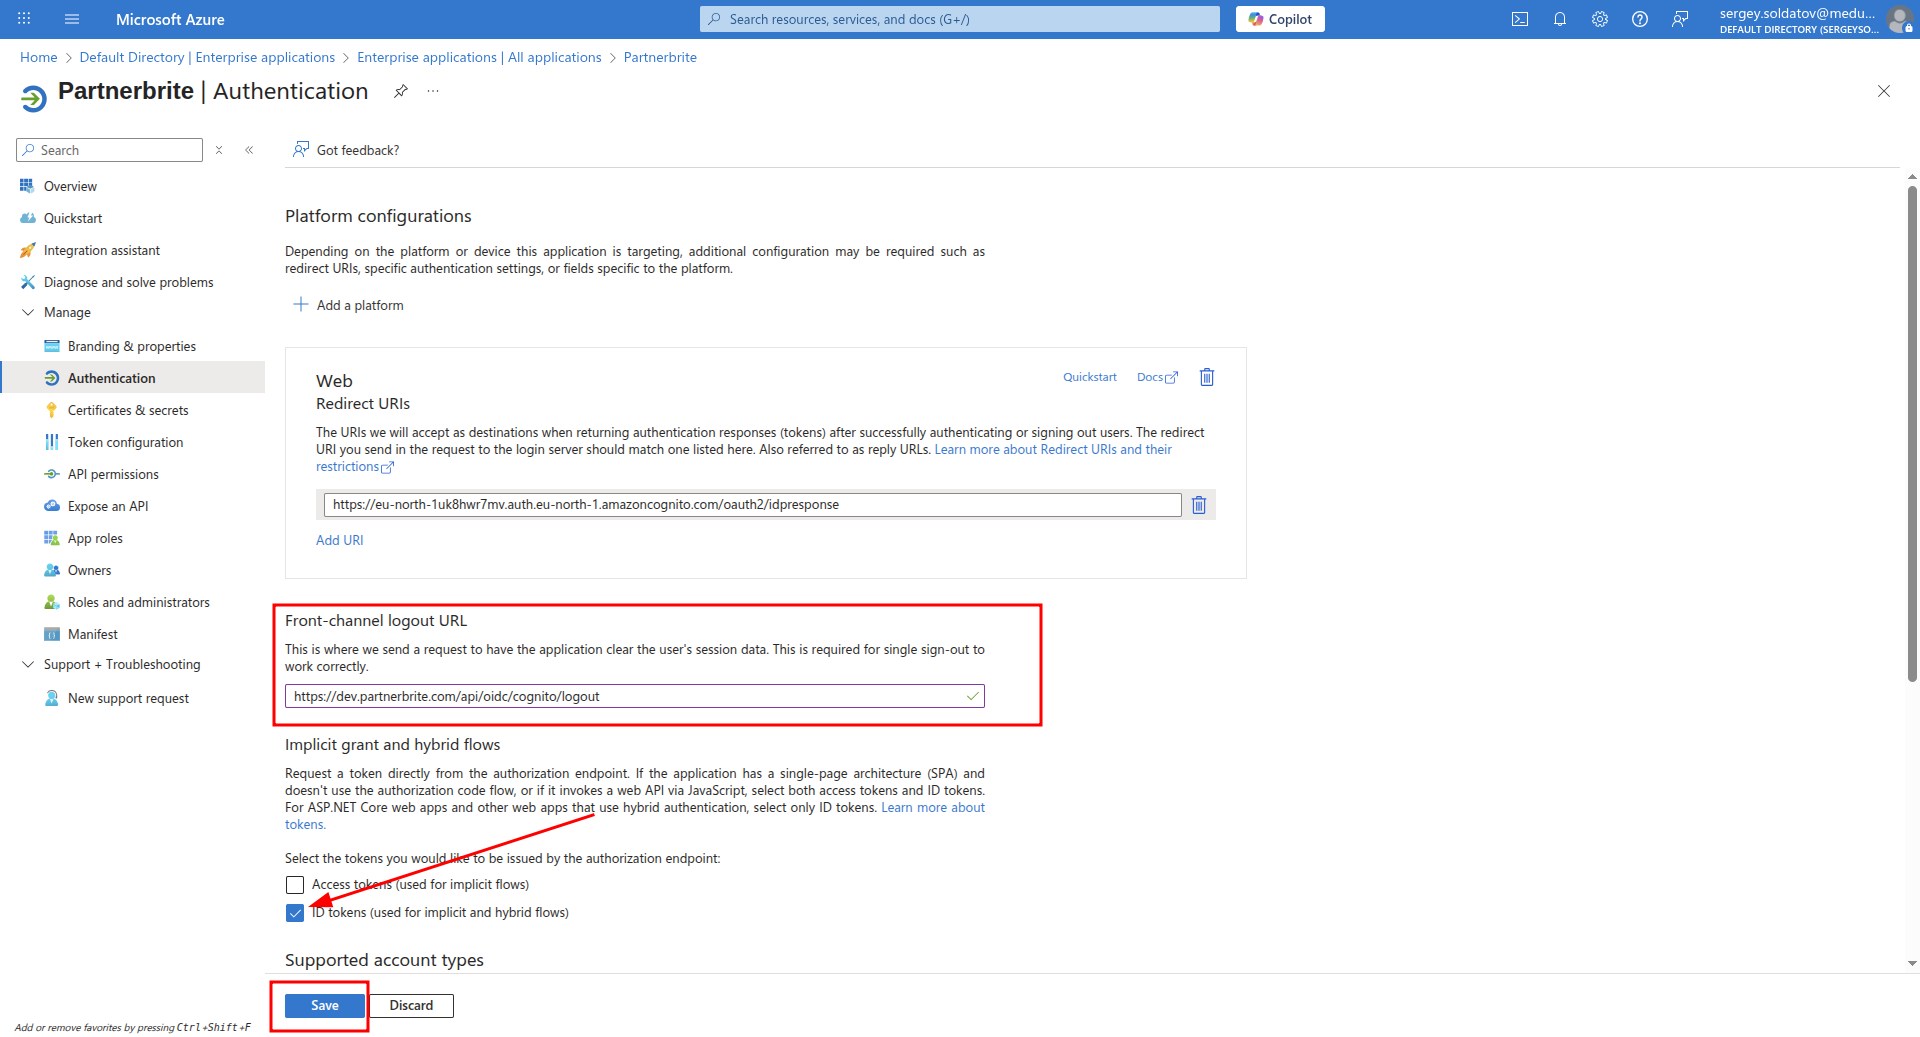
Configuring Logout URL & Enabling ID Tokens
To complete the authentication setup, we need to:
Enable ID Tokens - Since we are using OpenID Connect (OIDC) to authenticate users, ID tokens must be enabled.
Set the Logout URL - This ensures users are properly signed out when logging out of our application.
Steps to Configure:
Go to Authentication in the registered app:
Your Azure Active Directory instance -> App registrations -> < YourApp > -> AuthenticationSet the Logout URL to:
https://your-app-domain/api/oidc/logout/
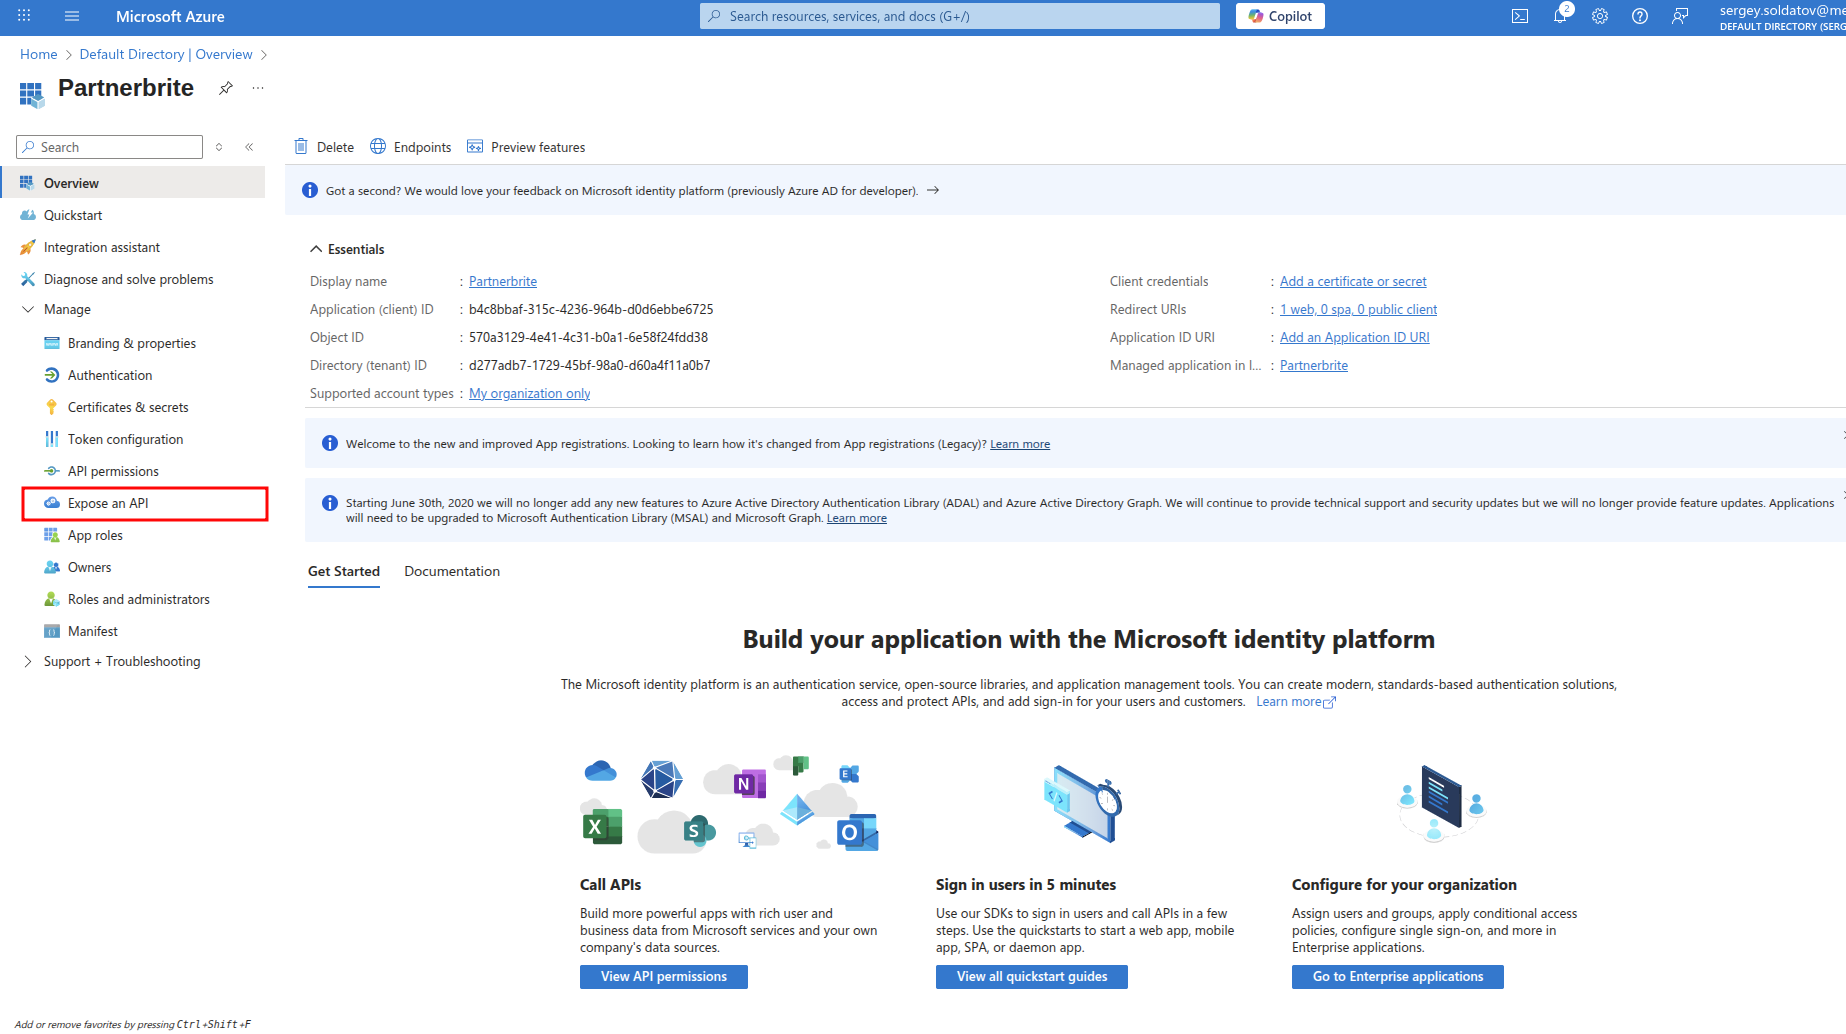
Creating scopes
After creating the application, you will be redirected to the App Overview page. Now, let's configure scopes to define the permissions our application can request.
Step 1: Navigate to Expose an API
Click on Expose an API
Step 2: Set Application ID URI
If this is your first time accessing this section, you will see a prompt asking you to add an Application ID URI before proceeding. This step is required to define unique identifiers for your API.
- Follow the prompt to add an Application ID URI (generates automatically).
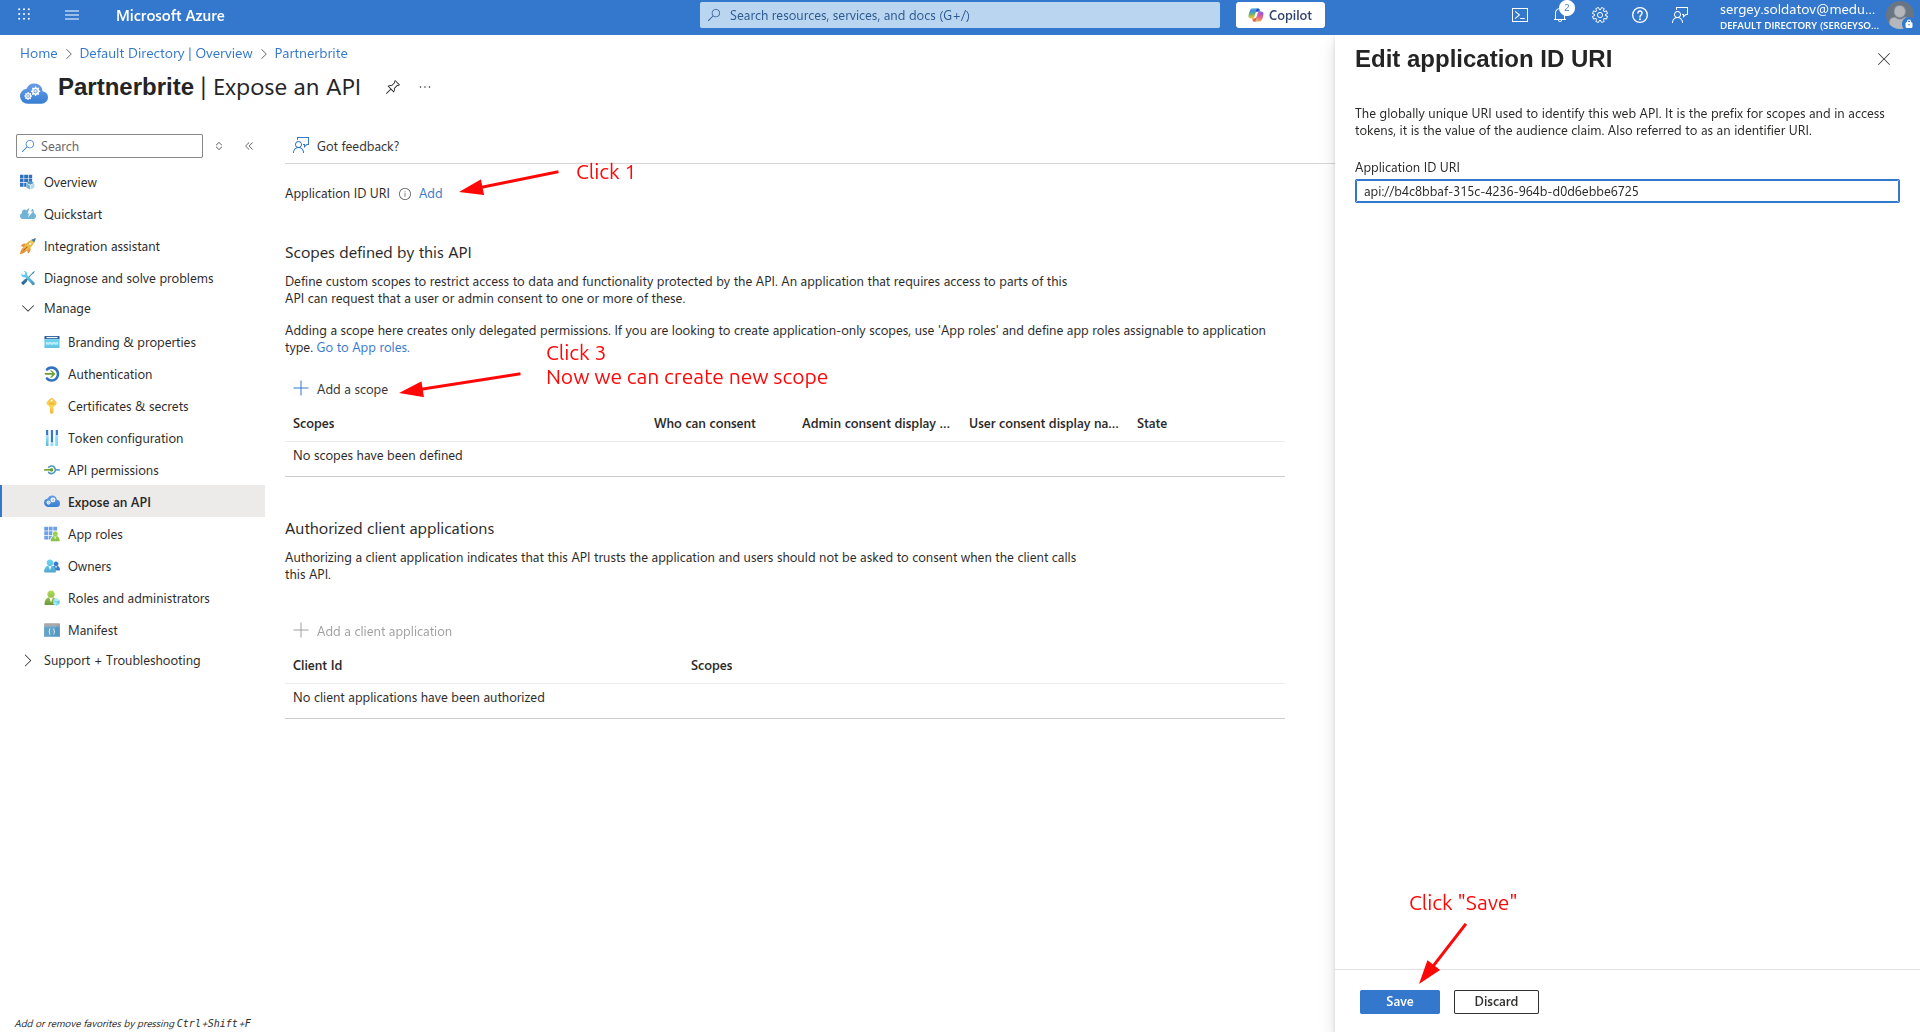
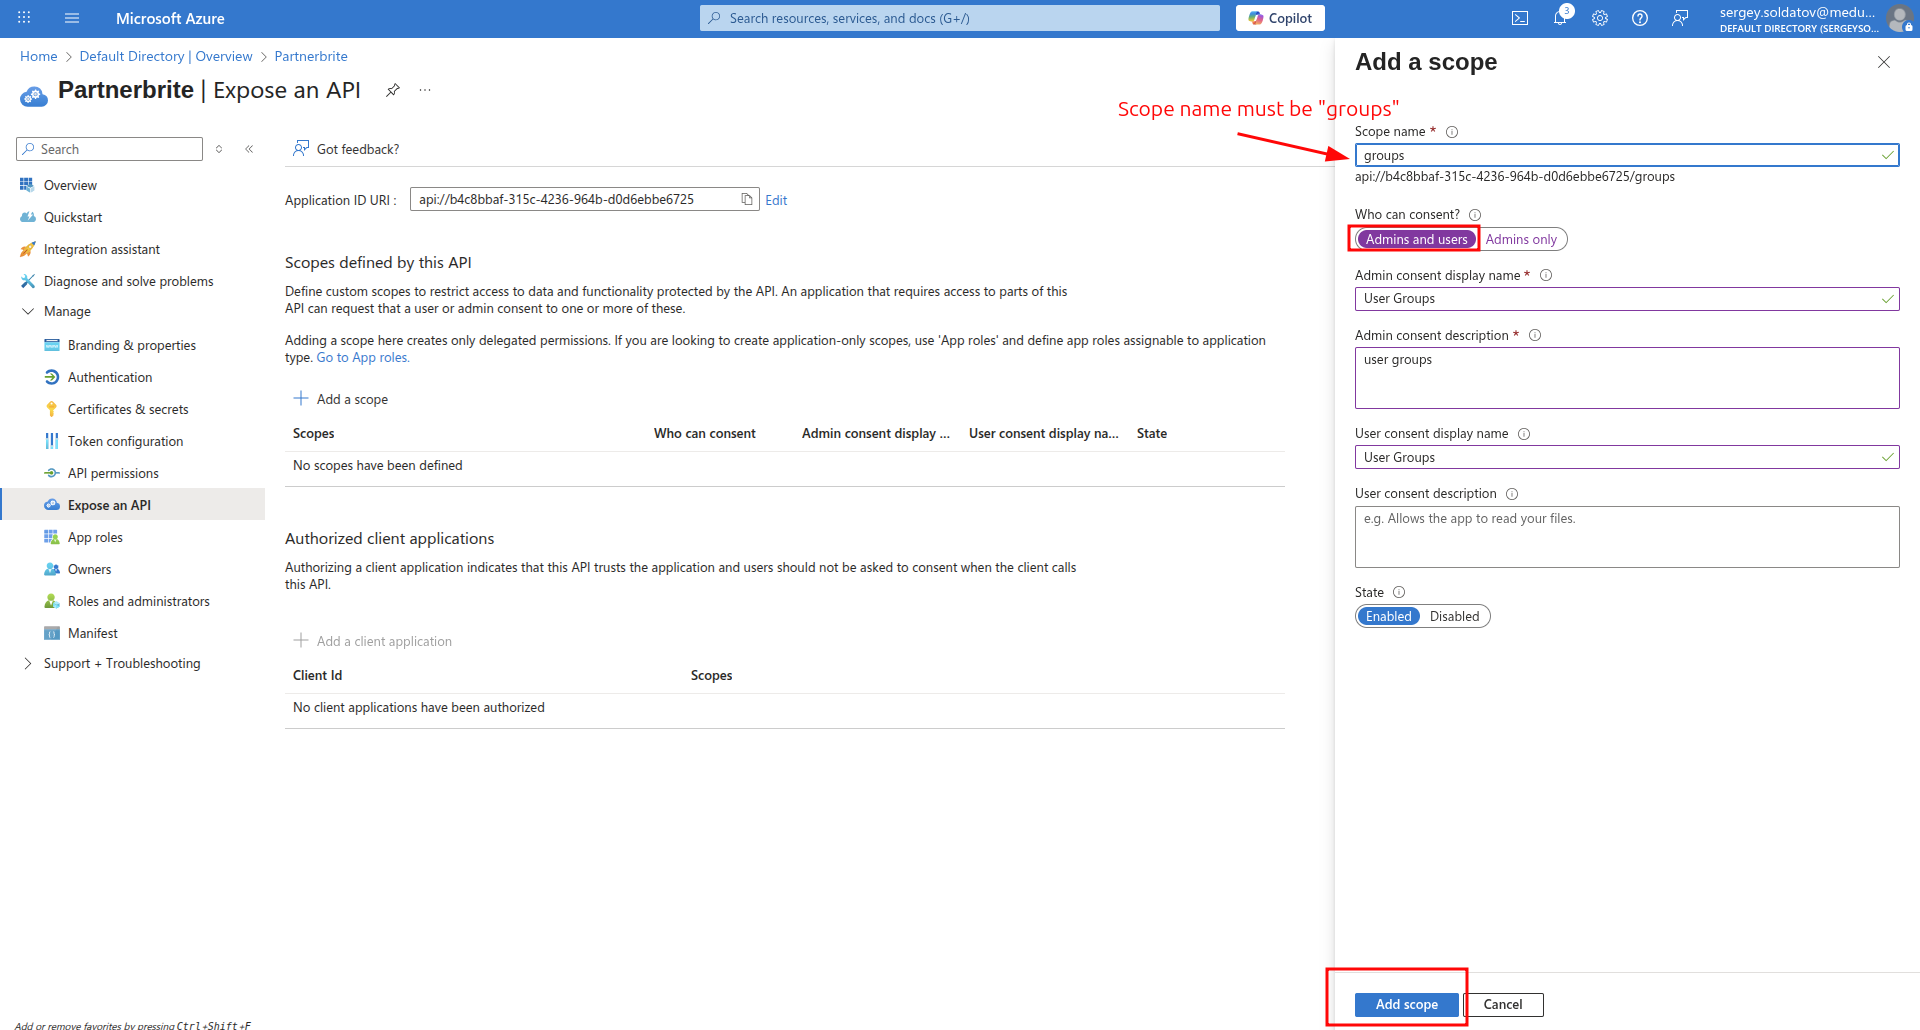
Step 3: Add a Group Scope
Now that the Application ID URI is set, we can define the scopes our application needs.
Click Add a Scope.
Scopes in OIDC determine what permissions the application can request from the identity provider. They allow access to specific user attributes, such as groups, roles, email, or profile information.
In our case, we need the group scope to retrieve user groups during authentication. This enables proper access control and permission management in our application.
Fill this form as shown in the following screenshot, then click the Add scope button.
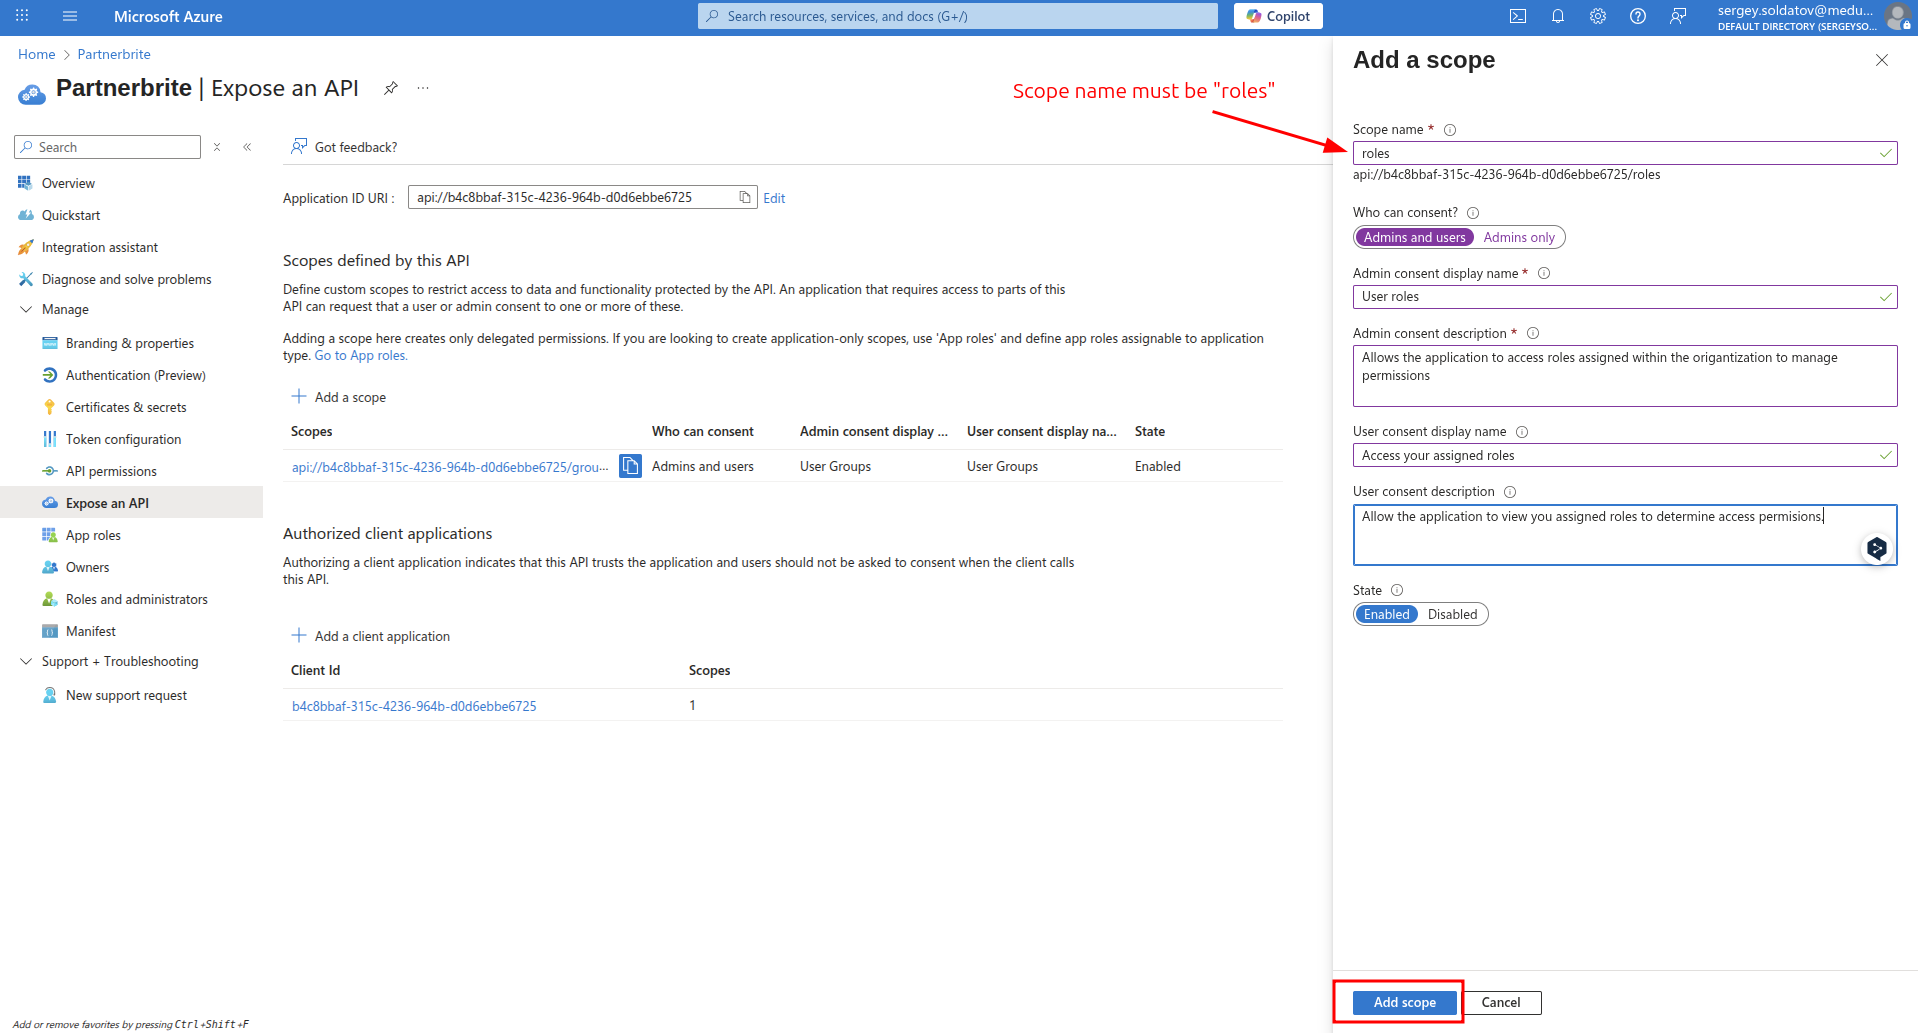
Step 3.1: Add a Roles Scope
Click Add a Scope.
Scopes in OIDC determine what permissions the application can request from the identity provider. They allow access to specific user attributes, such as roles, email, or profile information.
In our case, we need the roles scope to retrieve user roles (e.g., admin, manager) during authentication. This enables proper access control and permission management in our application.
Fill this form as shown in the following screenshot, then click the Add scope button
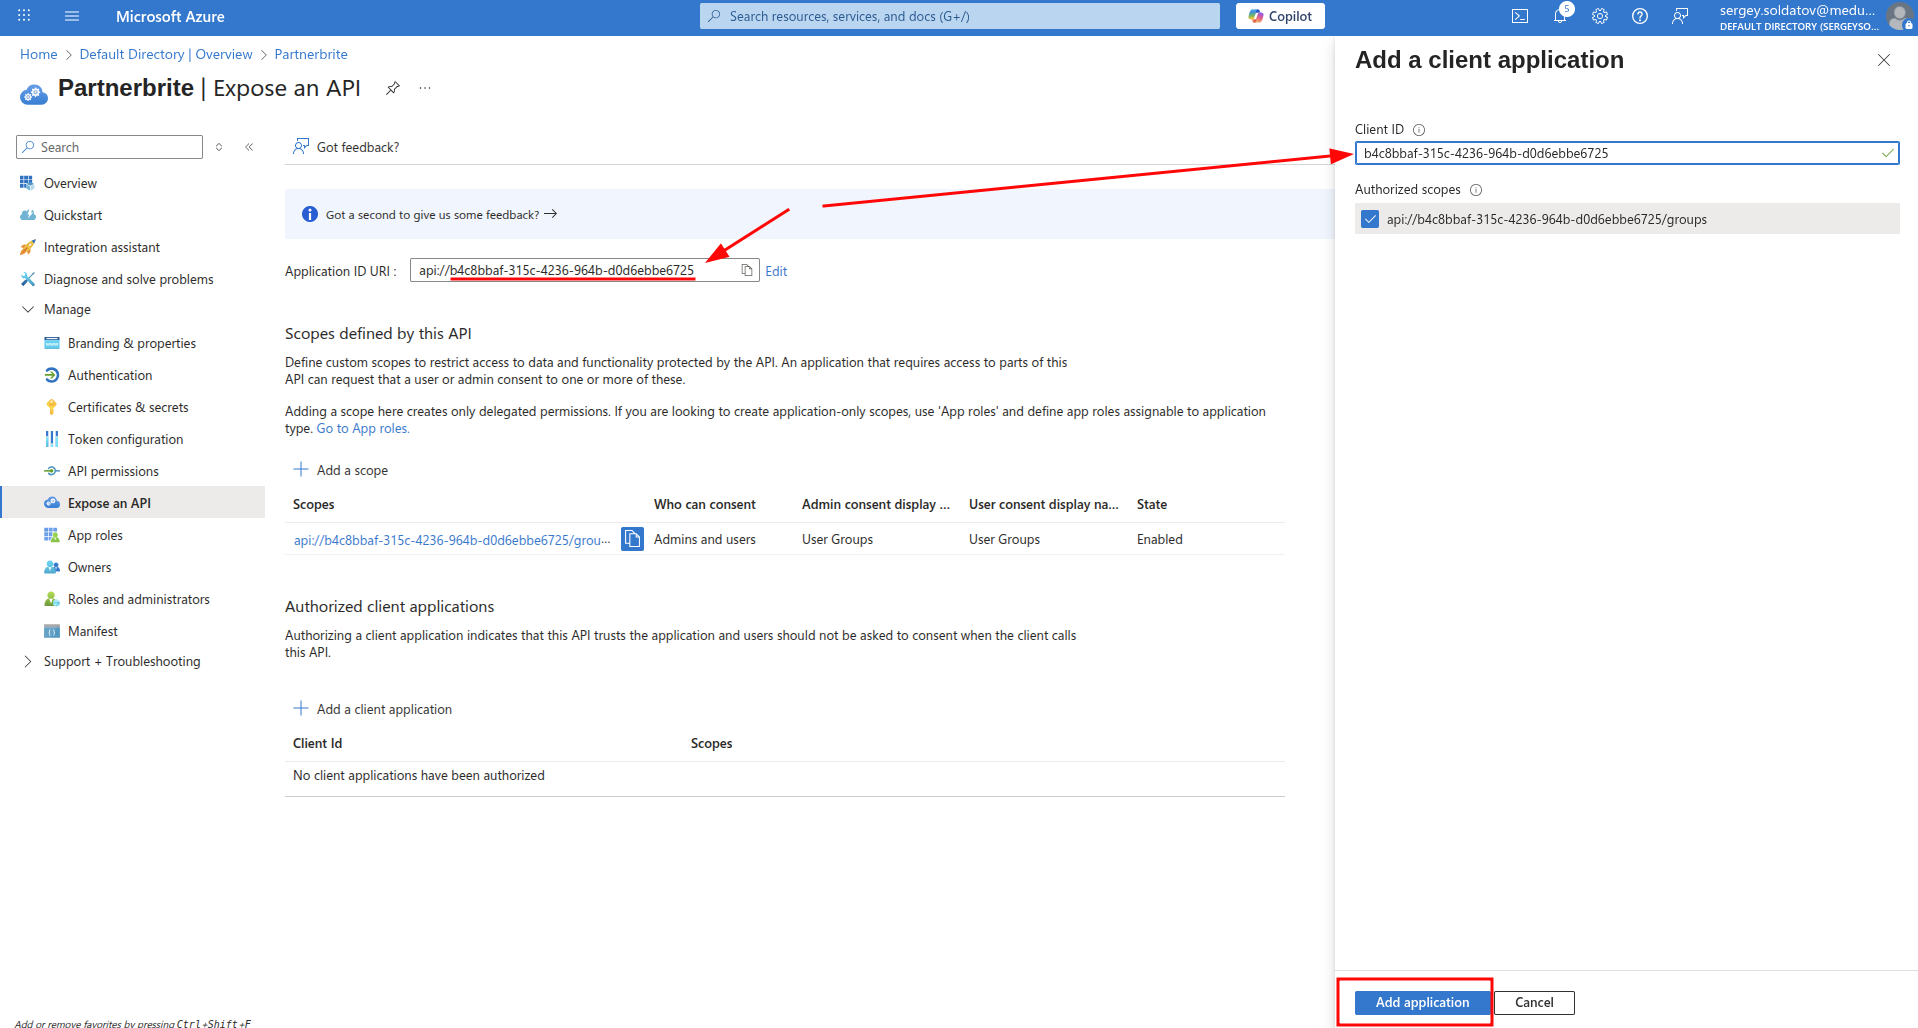
Step 4: Add a Client Application
Once the scope is created, we need to associate it with our client application.
Click Add a client application.
The Client ID can be found in the Application ID URI.
With these steps completed, our application is now set up to request and utilize user groups during authentication.
Step 5: Add a Groups to Token Configuration
After all is created we must create group claim
Click Add group claim button.
Fill the form as shown in the following screenshot, then click the Save button.
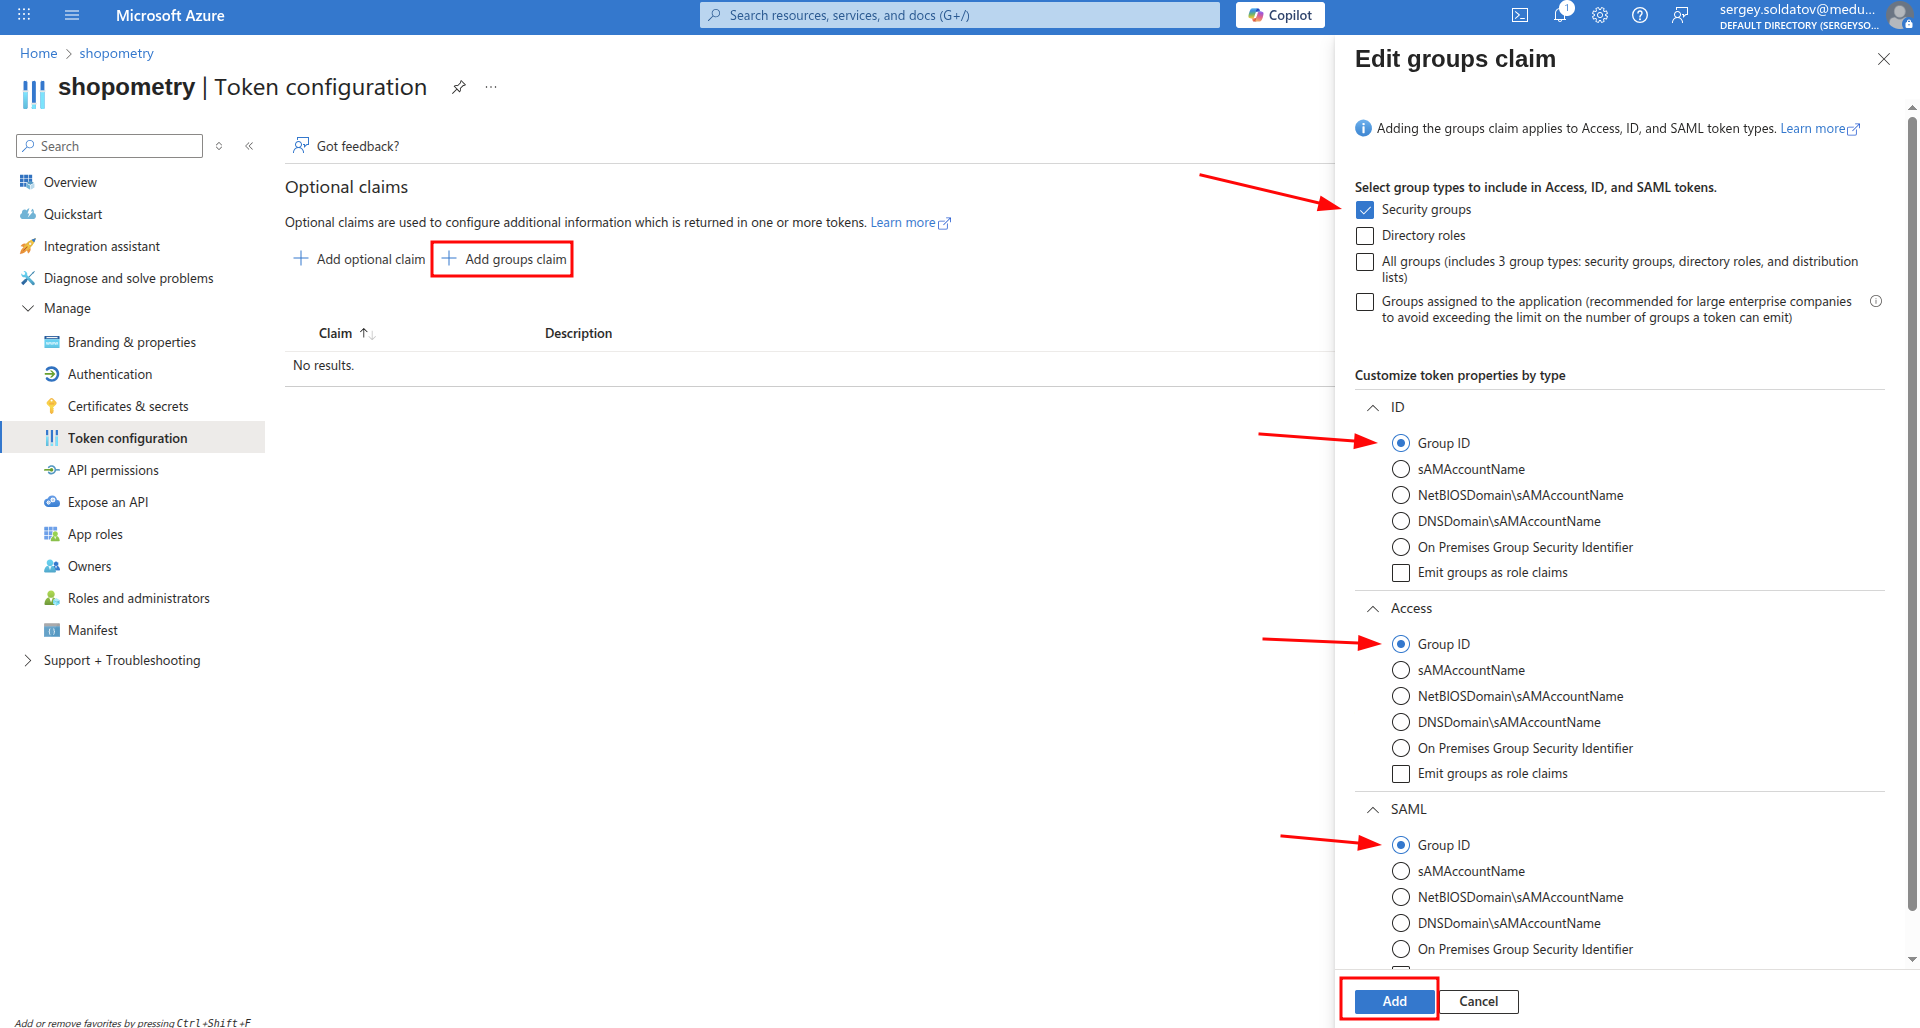
That's it, the group's scope and claim is configured.
Extending API Permissions
Retrieving the email, openid, and profile claims in the ID token, as well as creating notification subscriptions for soft delete support, requires enabling the appropriate API permissions.
- Navigate to
Your Azure Active Directory instance -> App registrations -> < YourApp > -> API Permissions
- Click Add permission.
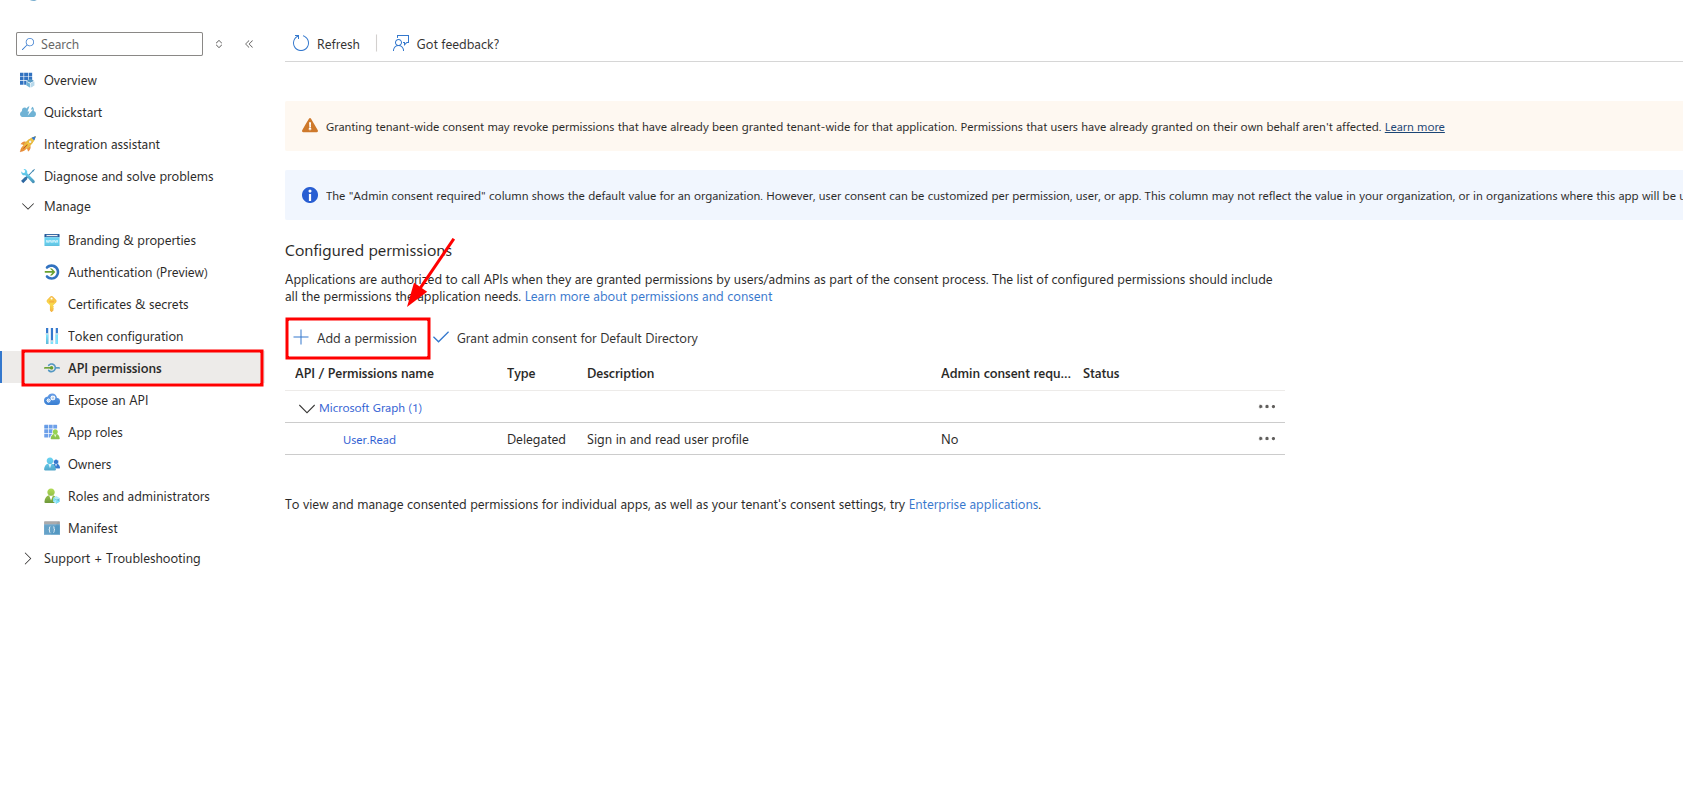
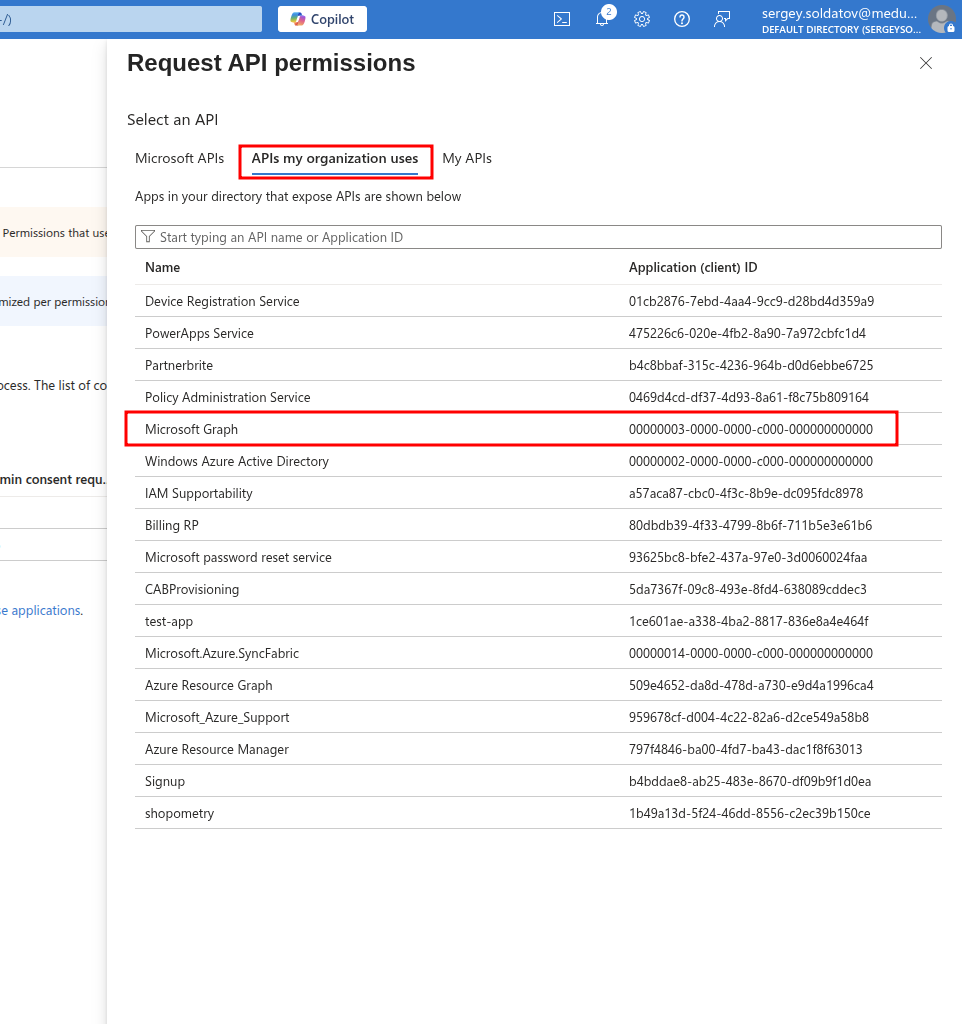
- In the sidebar that appears, select APIs my organization uses, then choose Microsoft Graph.
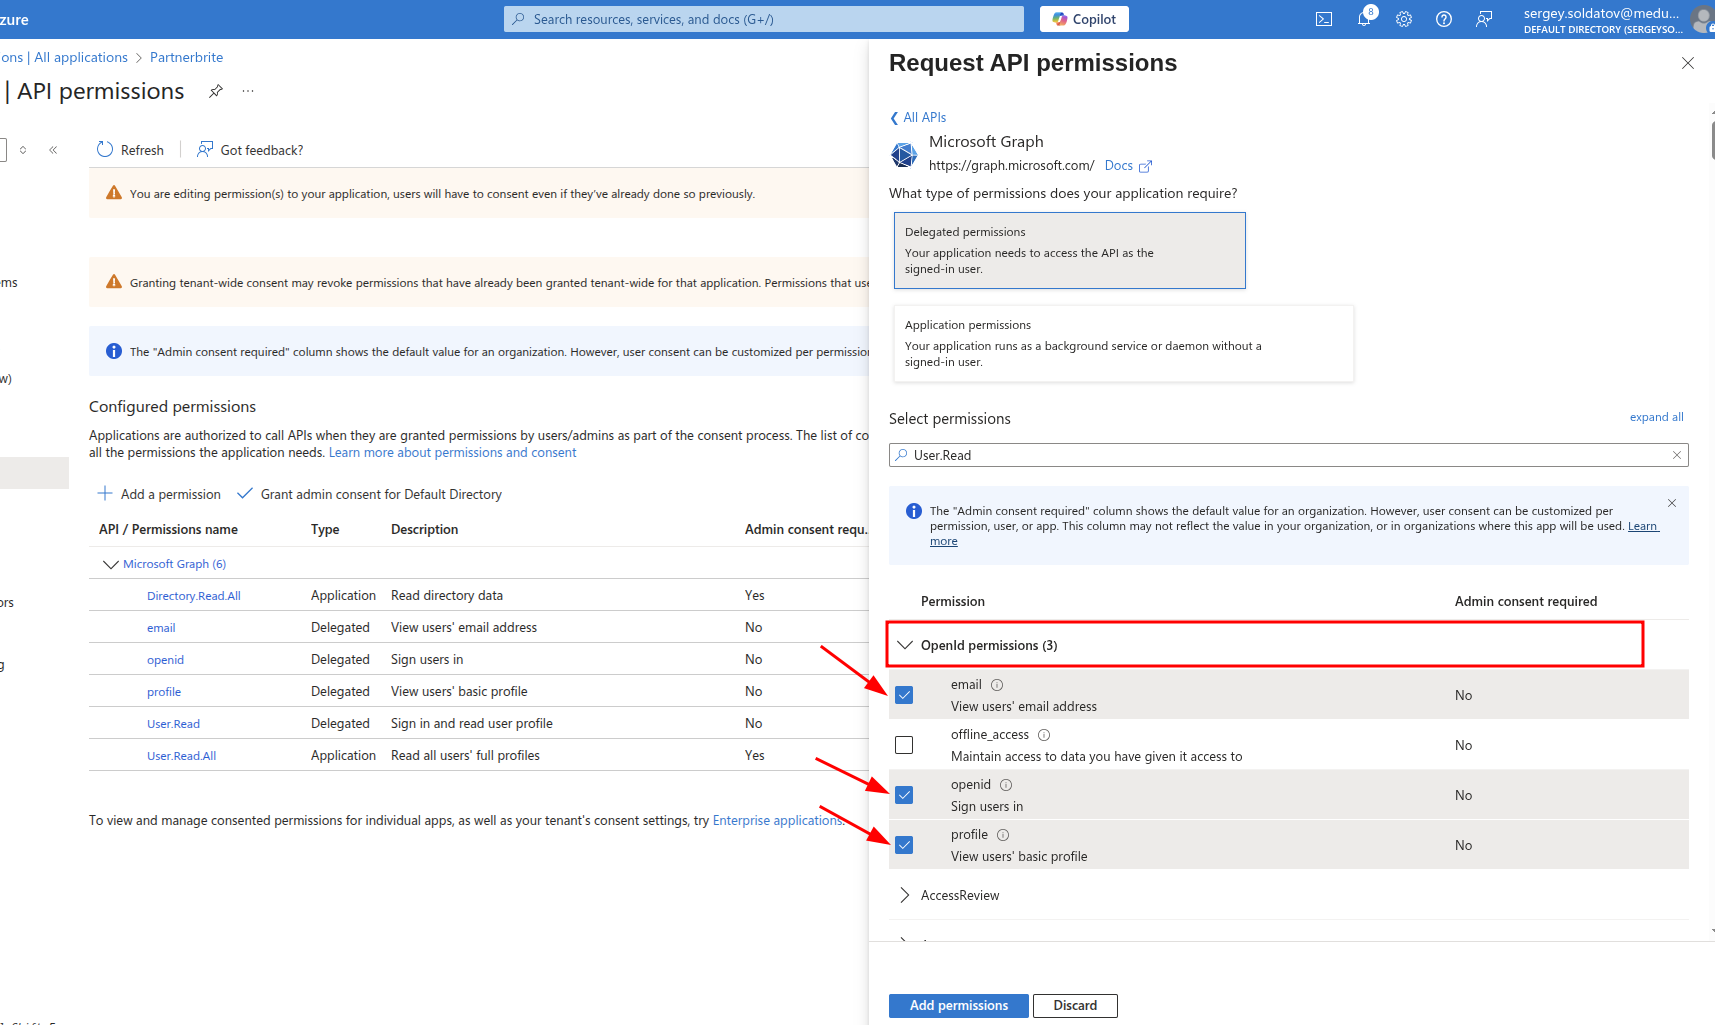
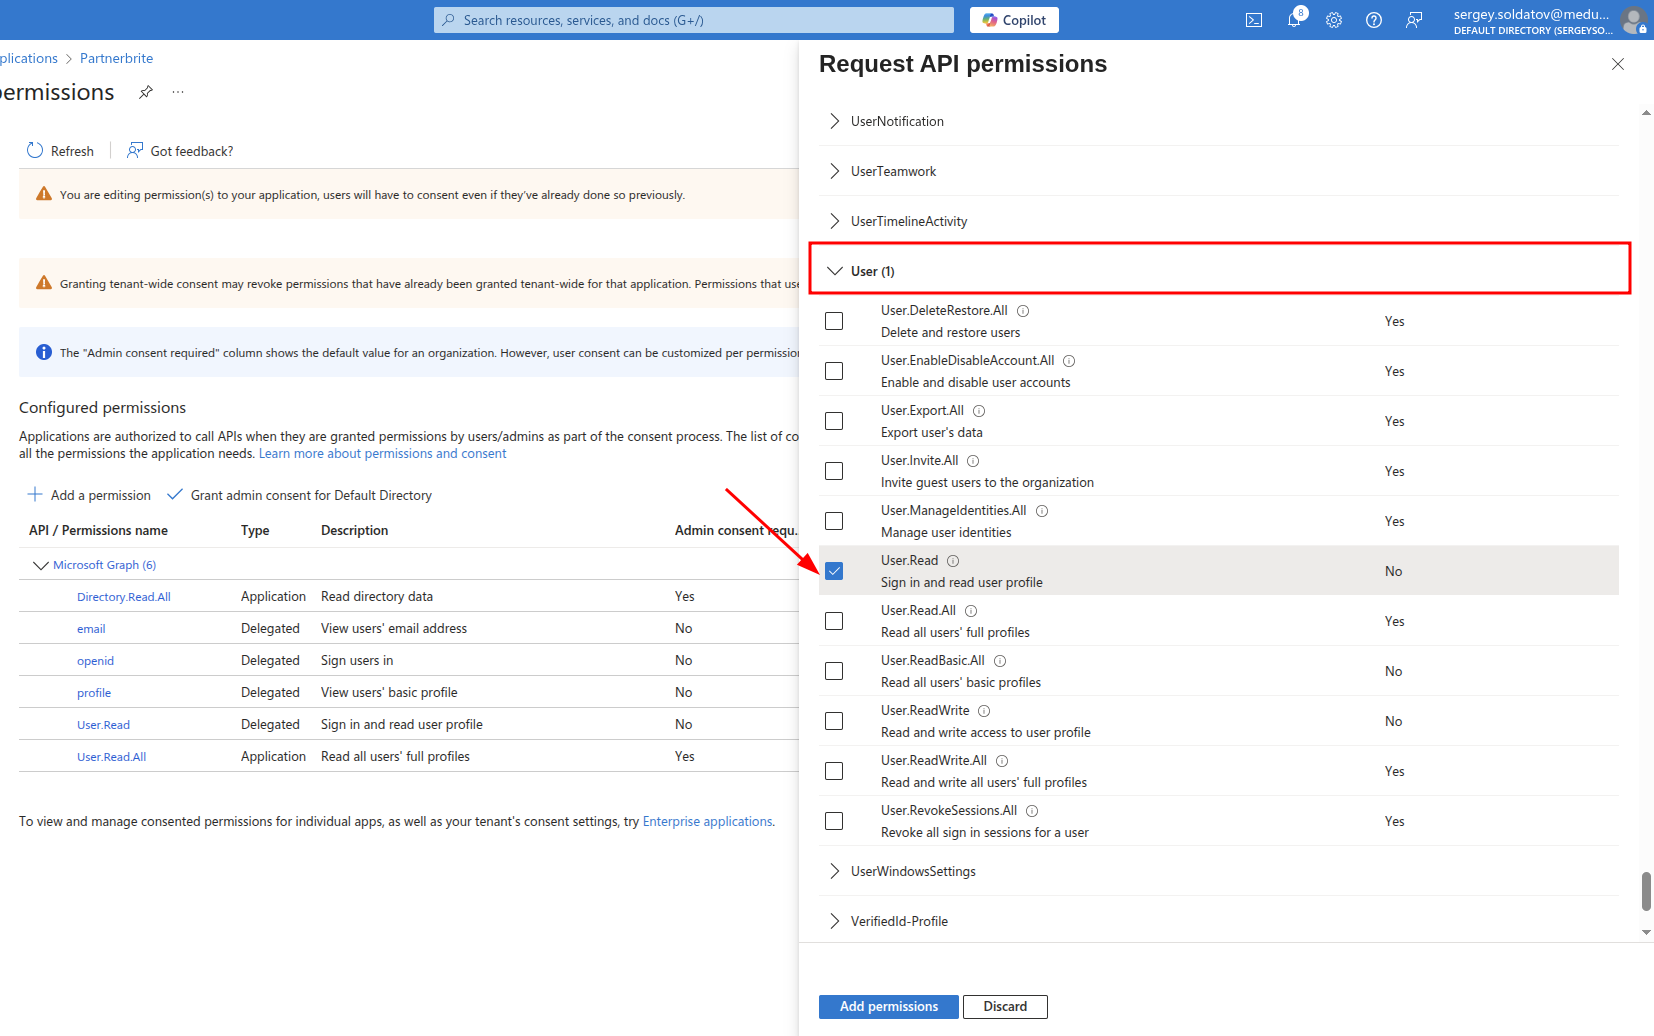
- Choose Delegated permissions, then enable: email, openid, profile, User.Read.
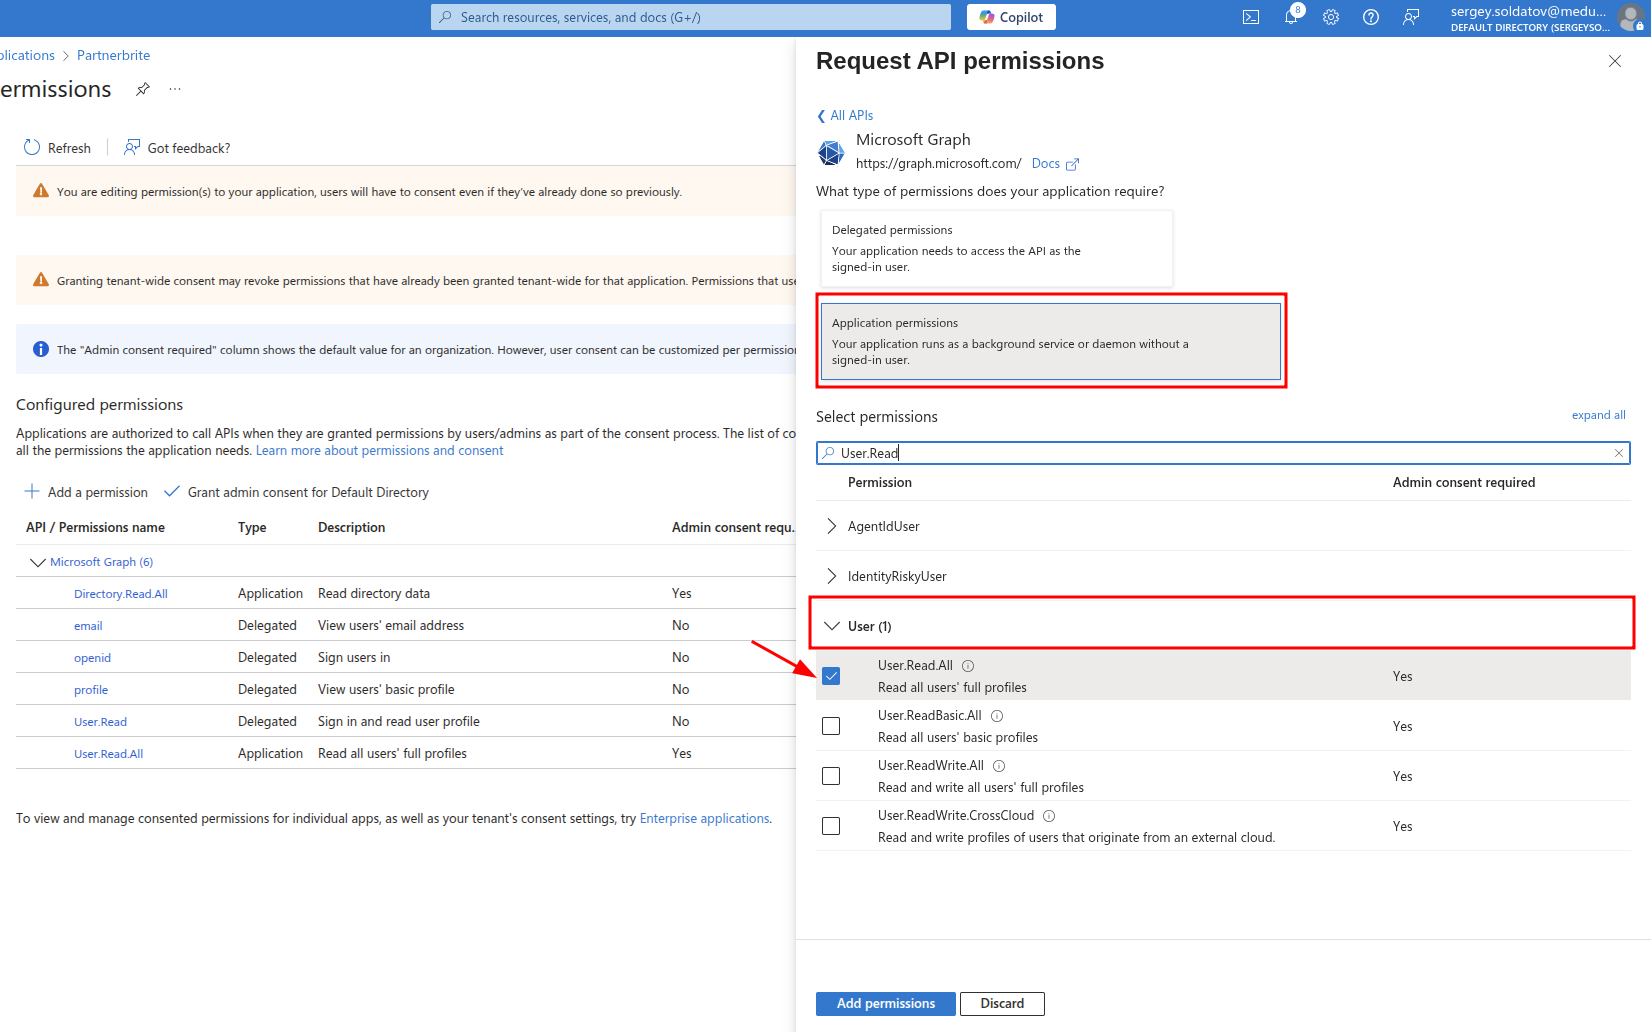
- Choose Application permissions, then enable: Directory.Read.All and User.ReadAll. Then Click on the Add permissions button.
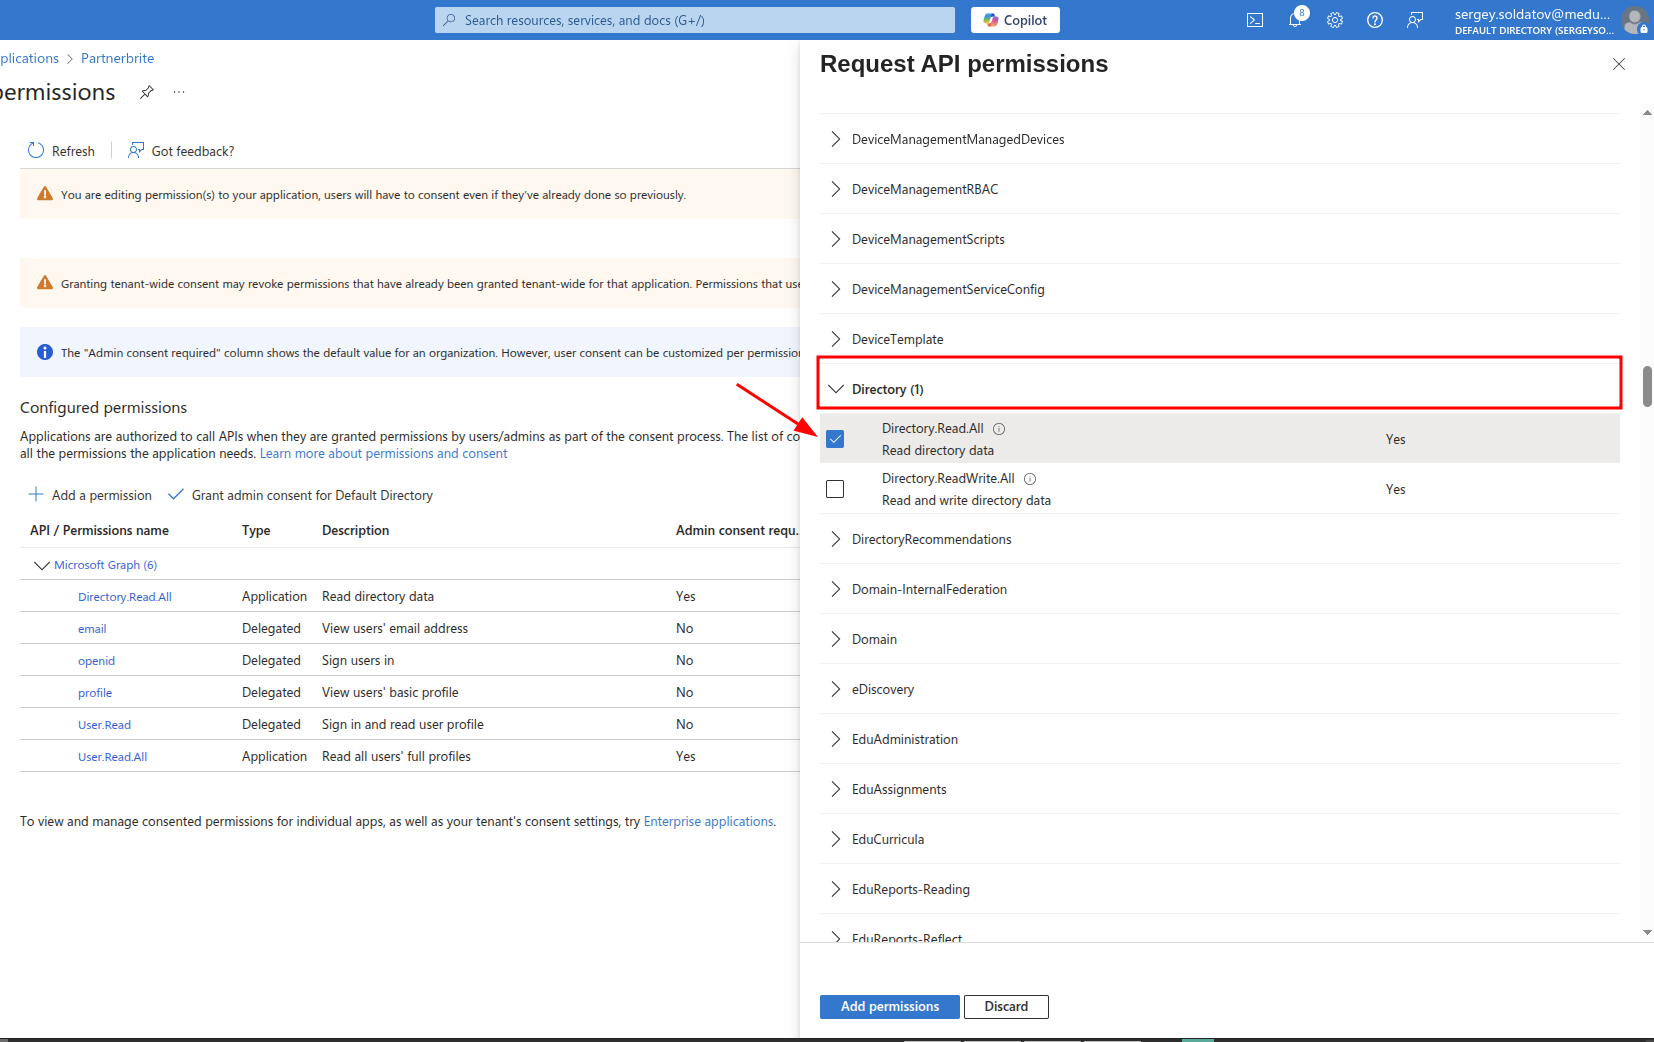
This is what the correct configuration should look like:

Creating roles
In Azure Active Directory (AAD), we can define roles for users to manage permissions within our application. These roles determine the level of access a user has, such as admin, manager, etc.
In the Azure Active Directory we should create roles for users.
Step 1: Access the Manifest
To create roles, we need to edit the application's Manifest, which is a JSON file defining the application's configuration.
- Navigate to:
Your Azure Active Directory instance -> App registrations -> < YourApp > -> Manifest
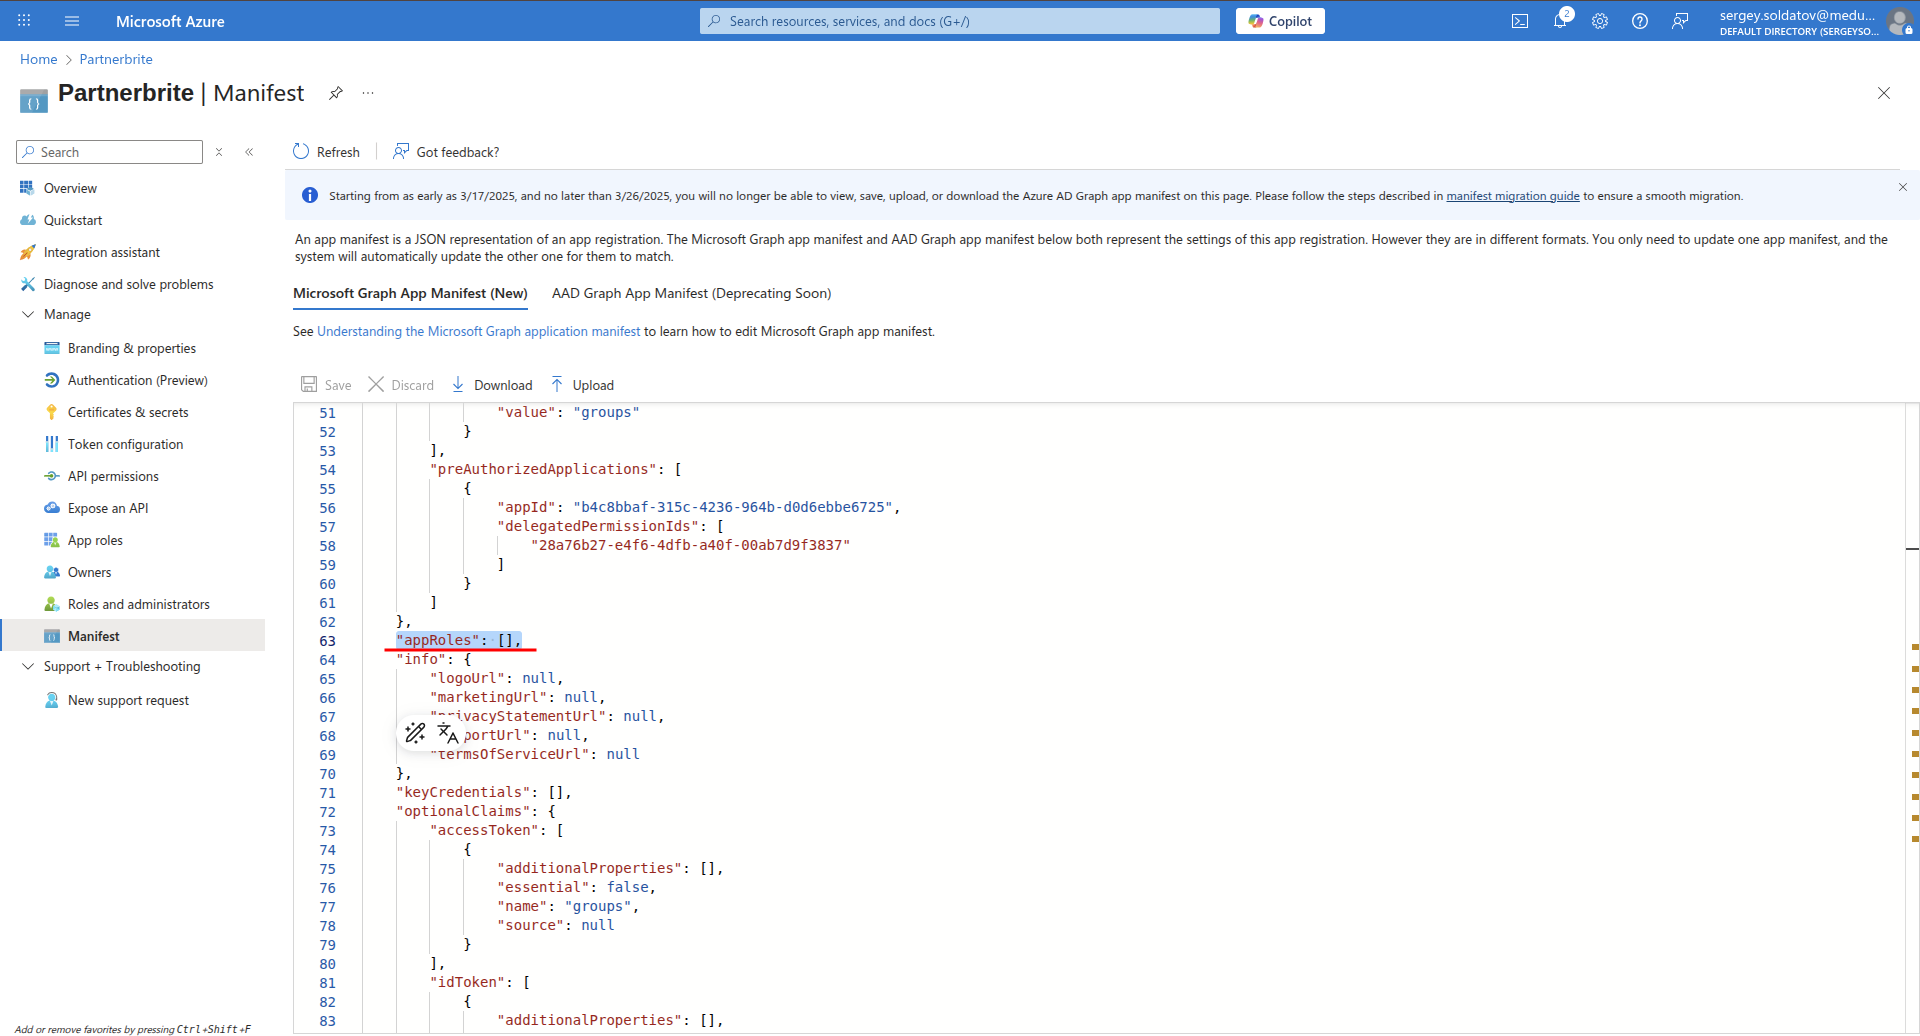
In the Manifest, you will find a section for role definitions. If you haven't created any roles yet, this section will be empty (highlighted in red in the screenshot).
Example of one role:
{
    "allowedMemberTypes": [
        "User"
    ],
    "description": "Administrators can manage resources.",
    "displayName": "Admin",
    "id": "a1234567-89ab-cdef-0123-456789abcdea",
    "isEnabled": true,
    "origin": "Application",
    "value": "admin"
}
Important:
Each role must have a unique ID.
Use a GUID generator to create unique IDs. You can use this free tool:
👉GUID Generator
Step 2: Add All Required Roles
For convenience, you can copy and paste the pre-defined role objects into your Manifest.
Copy the prepared role definitions.
Replace the role IDs with newly generated GUIDs.
Press the "Save" button to apply the changes.
Once saved, your roles should appear correctly in the Manifest.
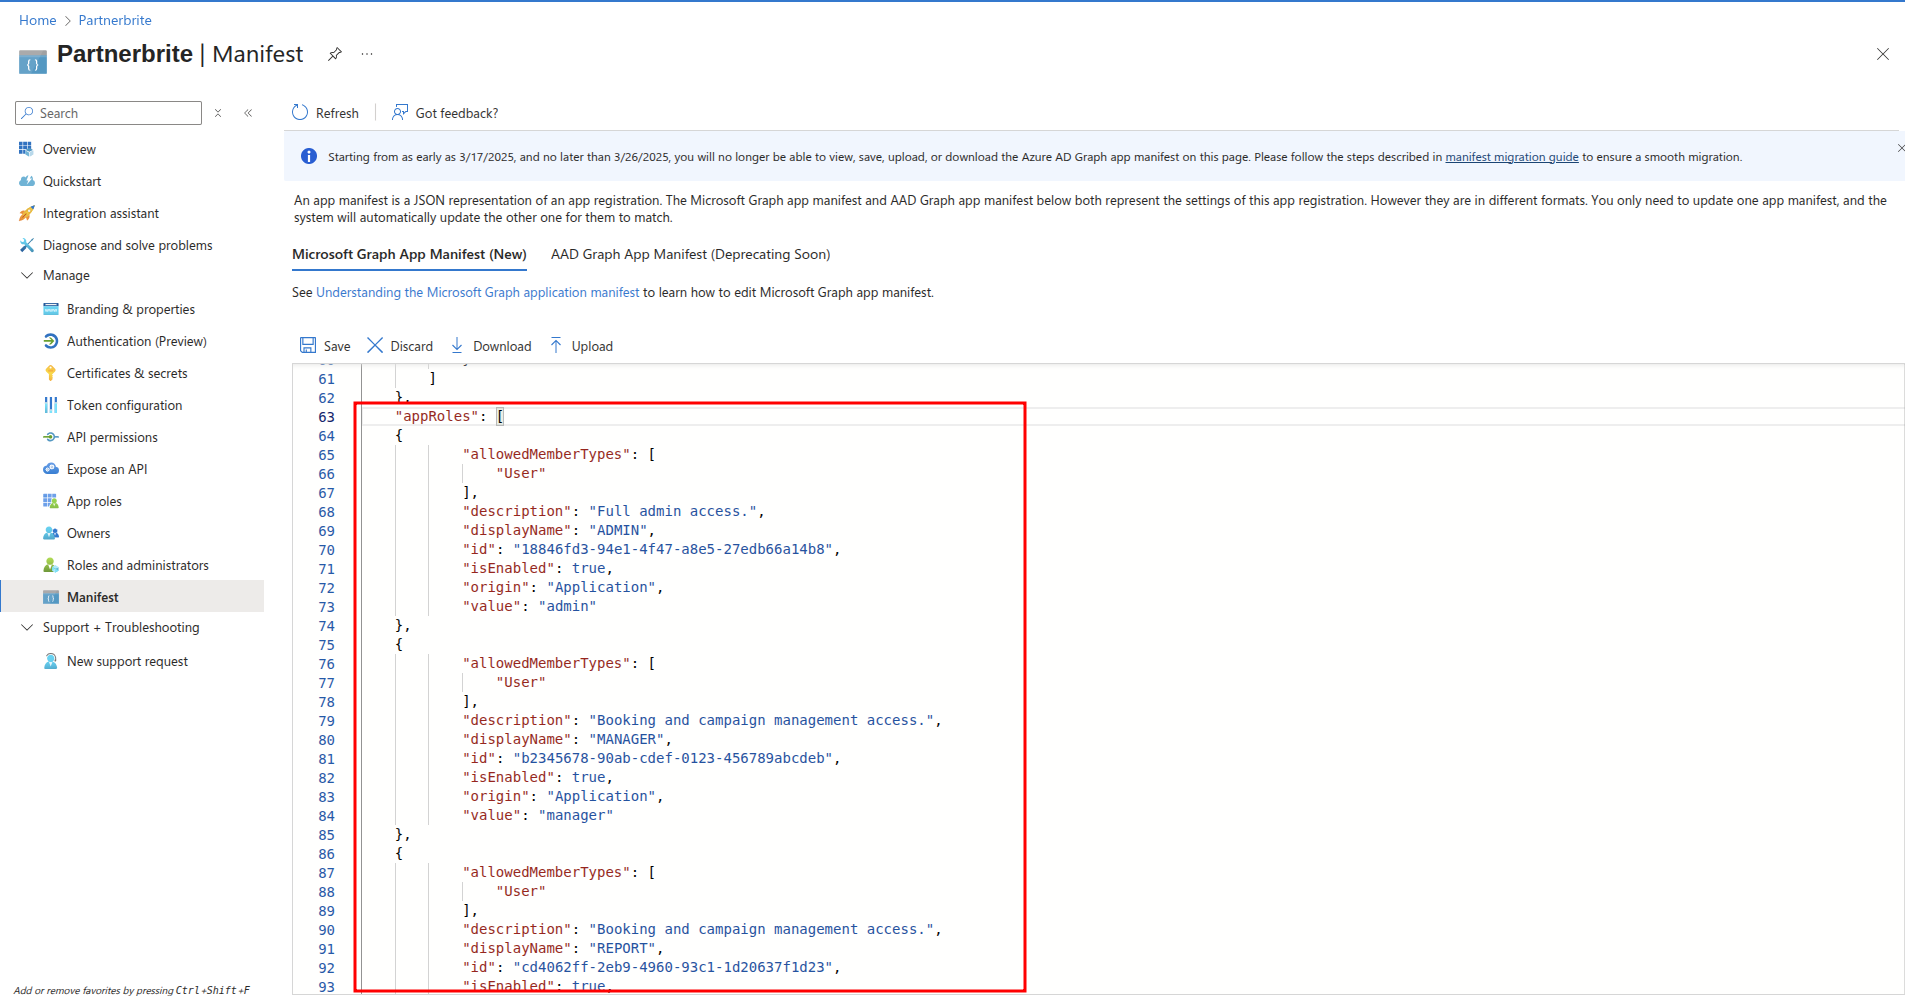
Here's prepared user roles, you can just copy-paste the whole object, BUT do not forget to use your own ids by using GUID, after pasting press "Save" button:
"appRoles": [
    {
        "allowedMemberTypes": [
            "User"
        ],
        "description": "Full admin access.",
        "displayName": "ADMIN",
        "id": "18846fd3-94e1-4f47-a8e5-27edb66a14b8",
        "isEnabled": true,
        "origin": "Application",
        "value": "admin"
    },
    {
        "allowedMemberTypes": [
            "User"
        ],
        "description": "Booking and campaign management access.",
        "displayName": "MANAGER",
        "id": "b2345678-90ab-cdef-0123-456789abcdeb",
        "isEnabled": true,
        "origin": "Application",
        "value": "manager"
    },
    {
        "allowedMemberTypes": [
            "User"
        ],
        "description": "Booking and campaign management access.",
        "displayName": "REPORT",
        "id": "cd4062ff-2eb9-4960-93c1-1d20637f1d23",
        "isEnabled": true,
        "origin": "Application",
        "value": "report"
    },
]
Here's how it should look like:
Creating groups
In Azure Active Directory (AAD), we can define groups for users to manage permissions within our application. Groups allow us to control which users have access to the app. A user must be assigned to the appropriate group in order to sign in.
!Note: If a user is not a member of the group, they will not be able to access your application.
Step 1: Navigate to groups
To create groups:
Navigate to:
Your Azure Active Directory instance -> Groups ManifestYou should see a screen similar to the one below:
Click the "New group" button.
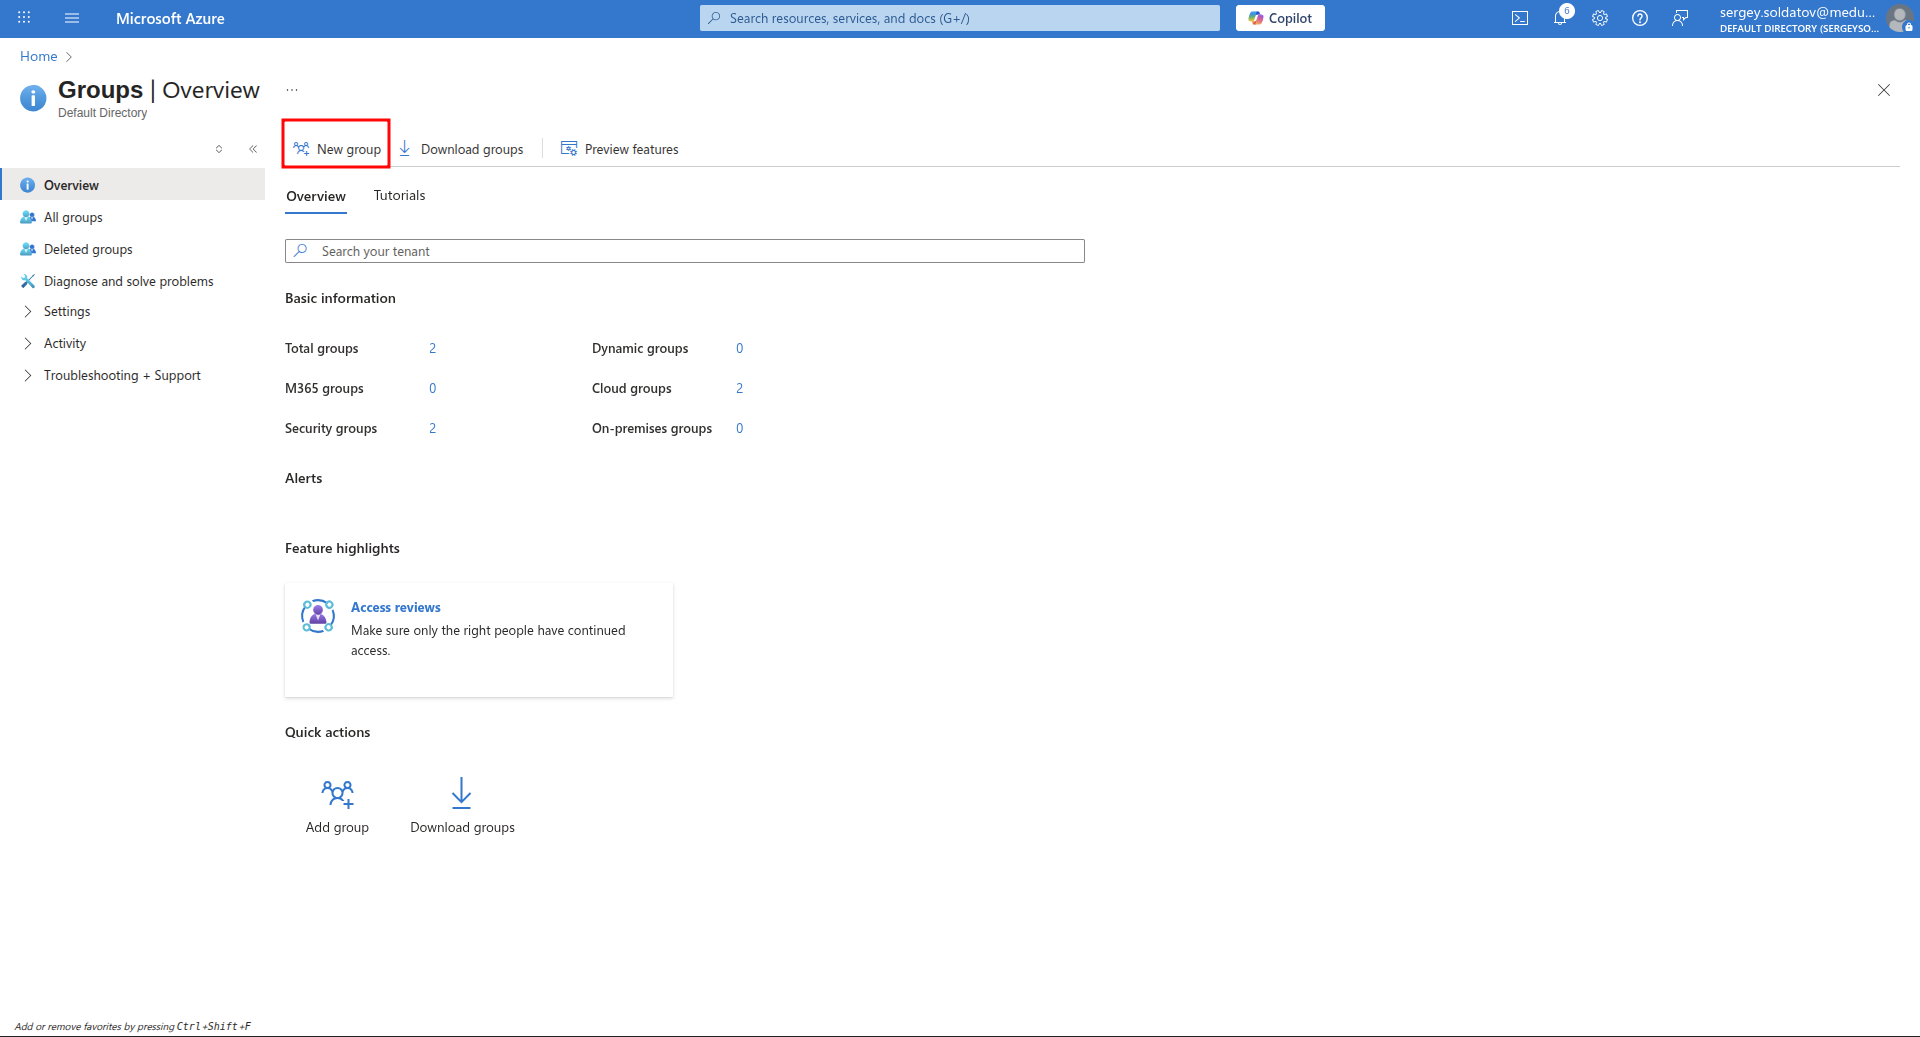
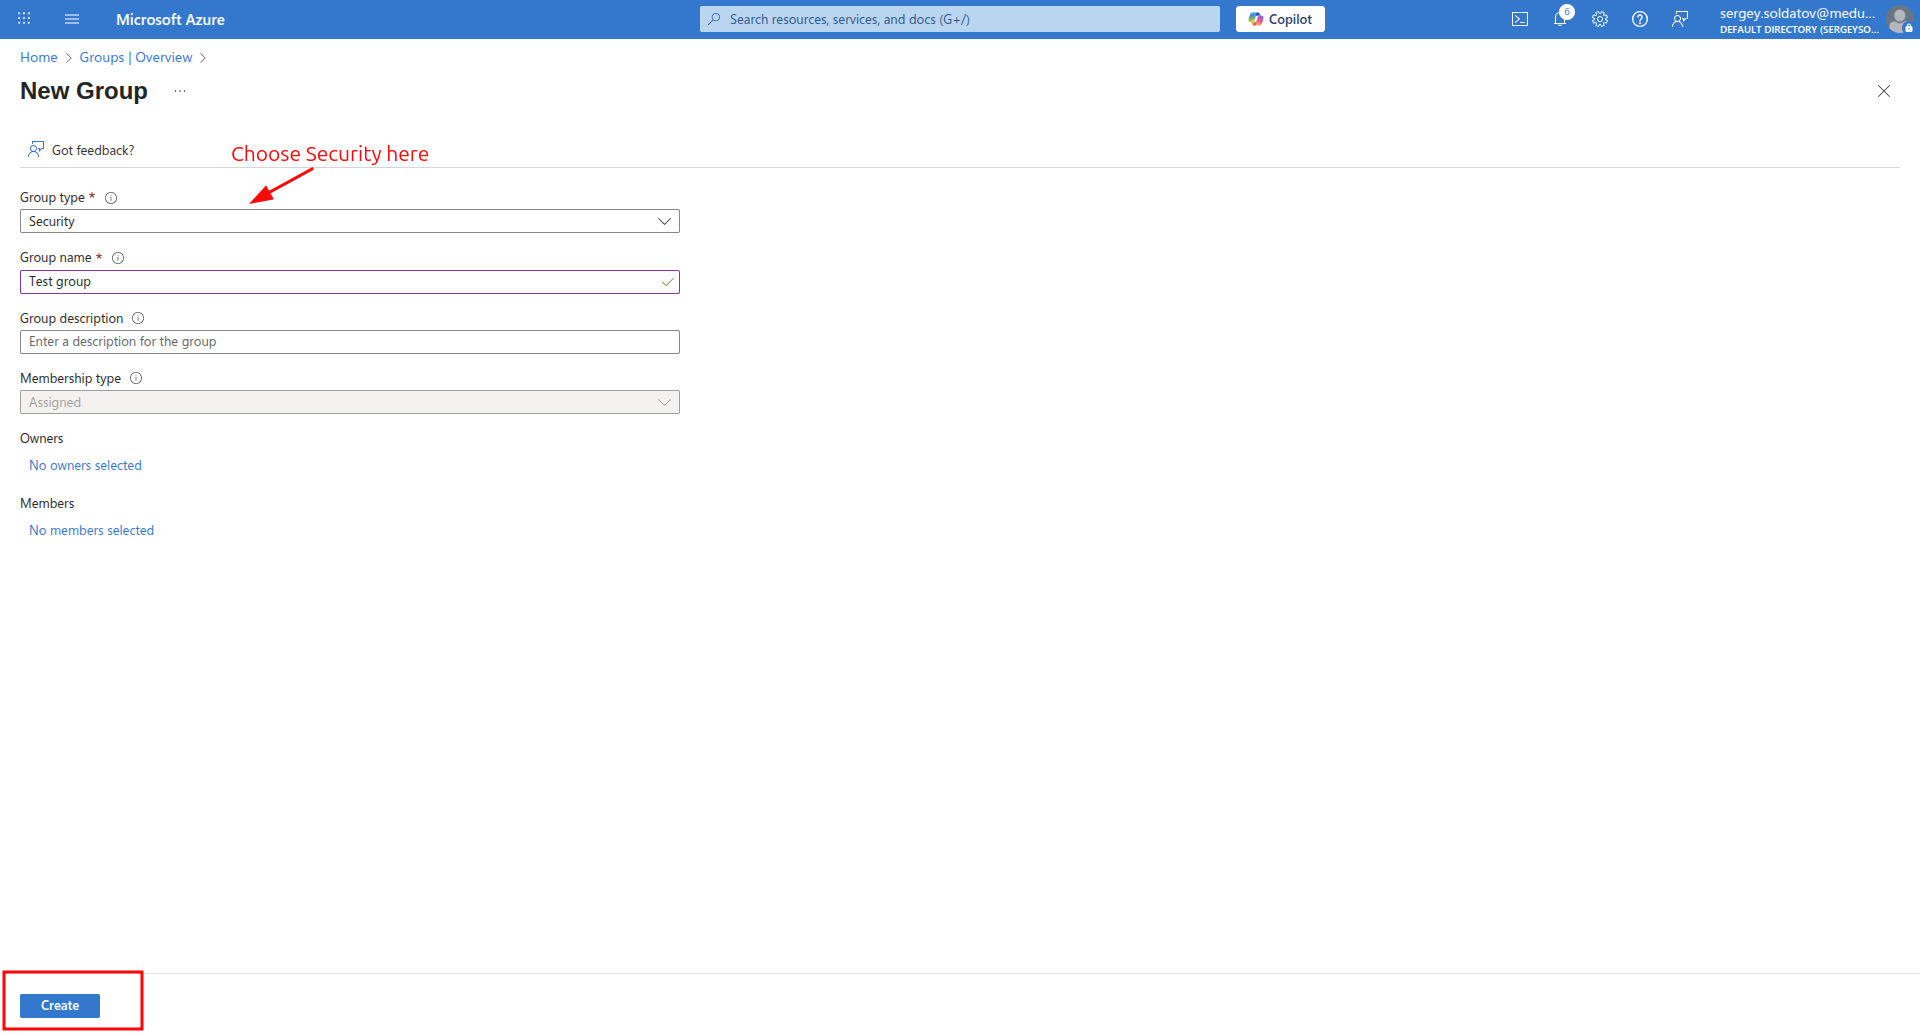
Step 2: Create Group
To create groups:
Choose Security type in Group type input
Fill other fields
Click the "Create" button. And Security group will be created
Step 3: Assign users to group
To assign users to group, follow these steps:
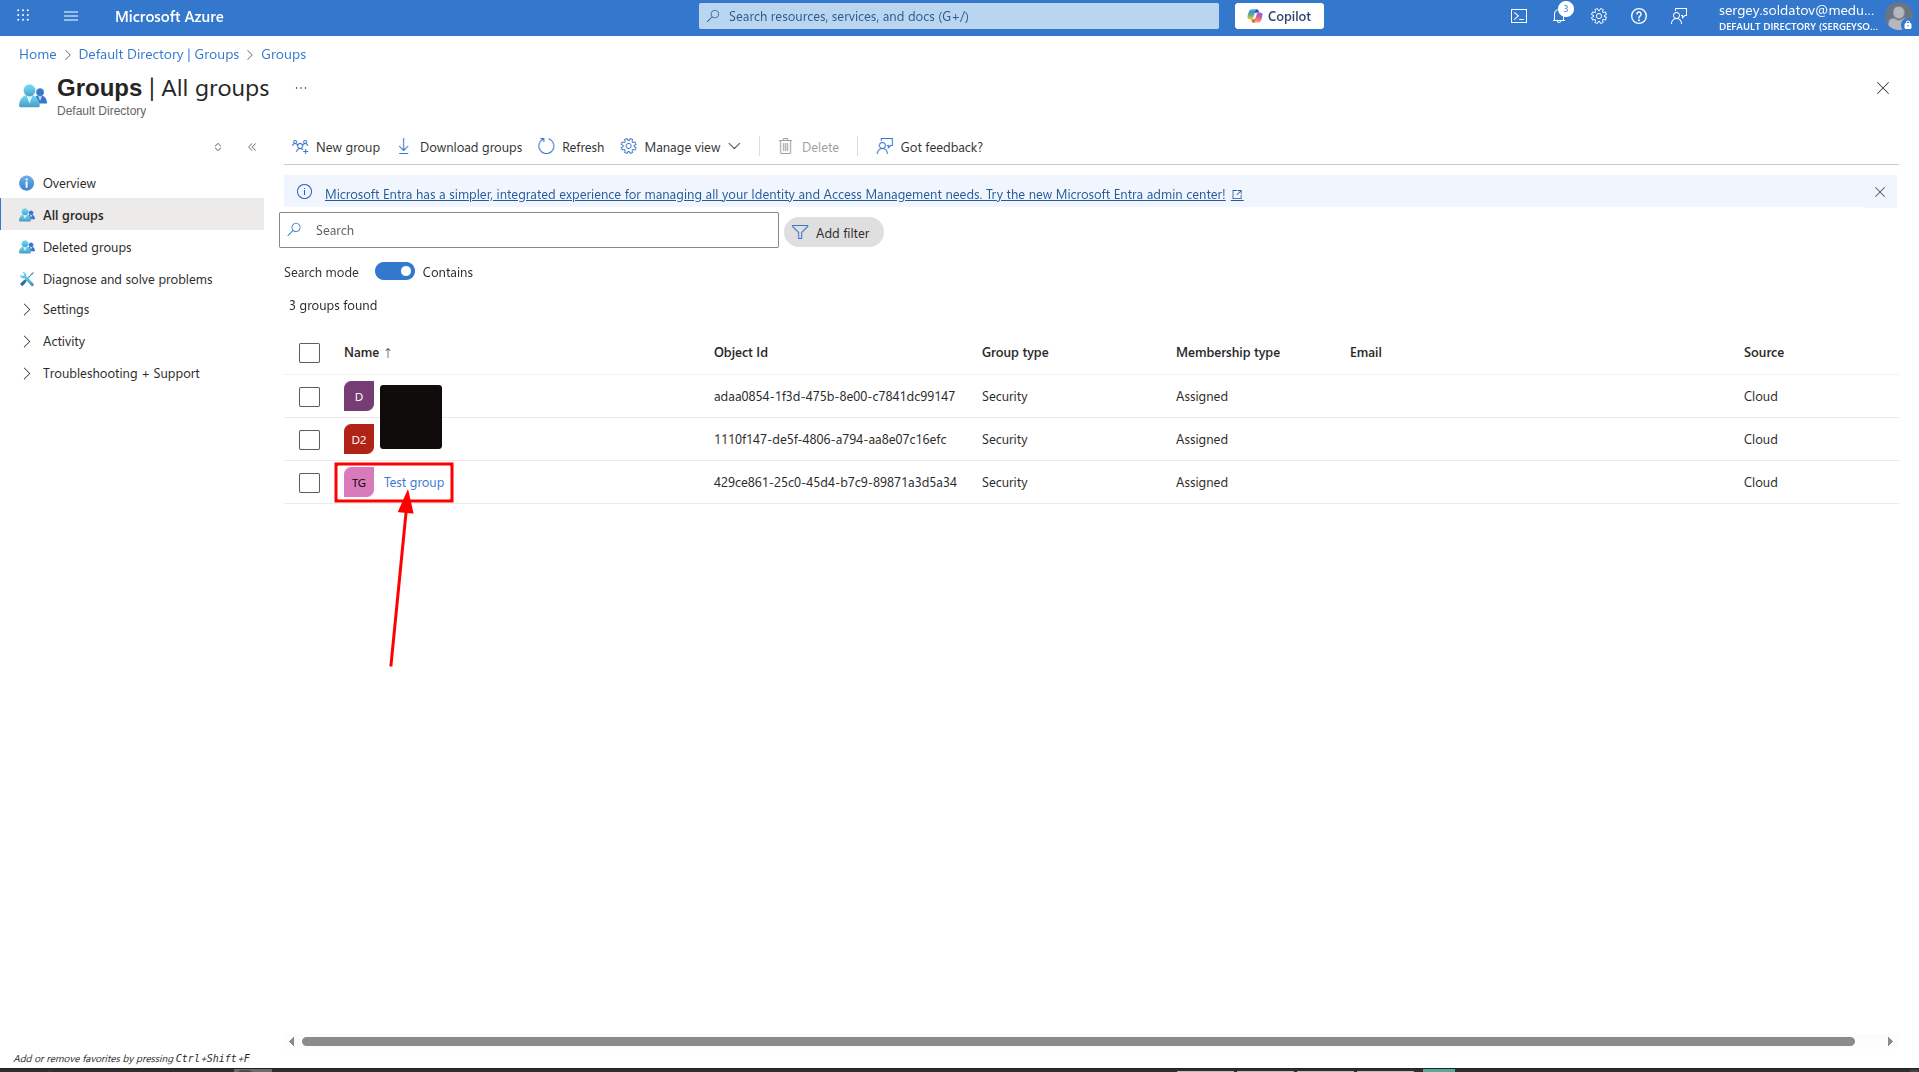
Step 1: Navigate to Group
Go to:
Your Azure Active Directory instance -> Groups -> All groupsClick on the Group to which you want to add users.
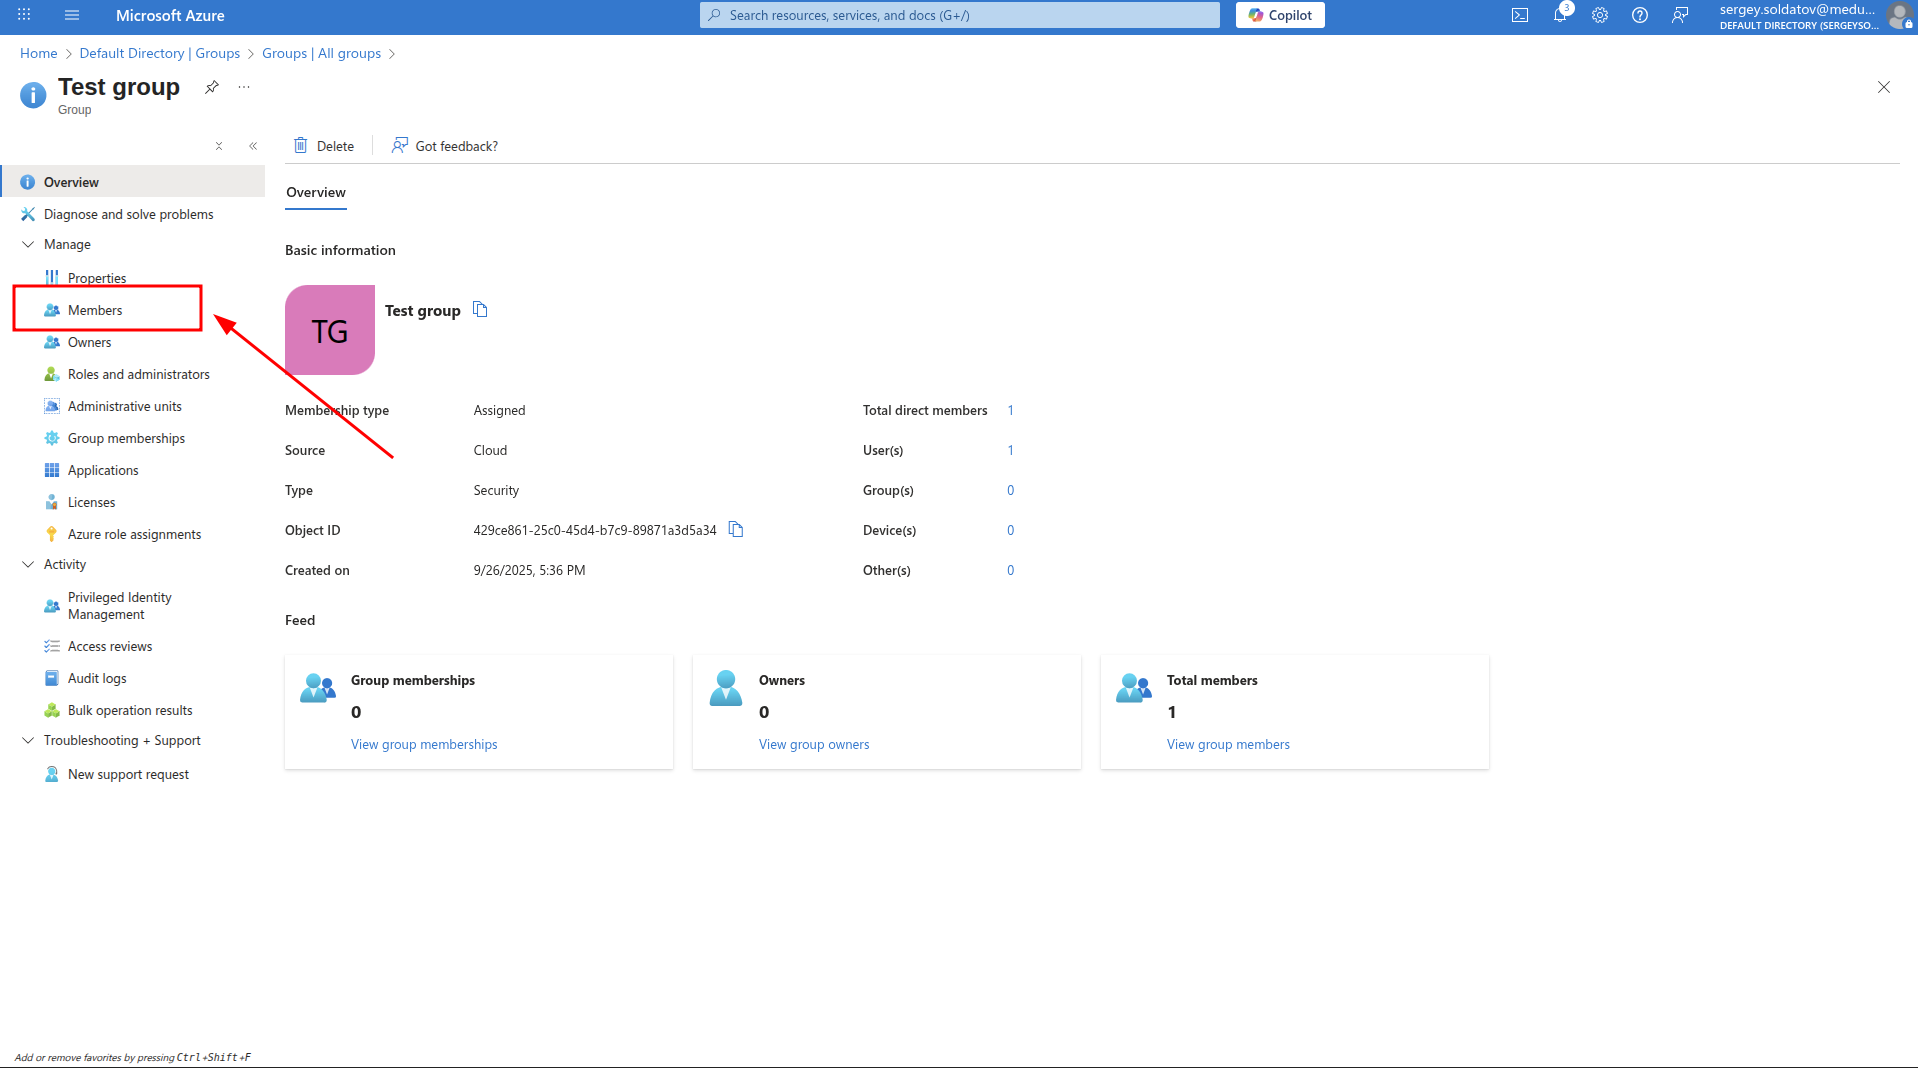
Step 2: Navigate to Members tab
- Click the "Members" button on the sidebar.
Step 3: Add members to the Groups
Click Add members
Select the users you want to add to the group as on the screenshot below.
After you select all users you want to add to the group. Click Select

Assigning user roles
To assign roles to users, follow these steps:
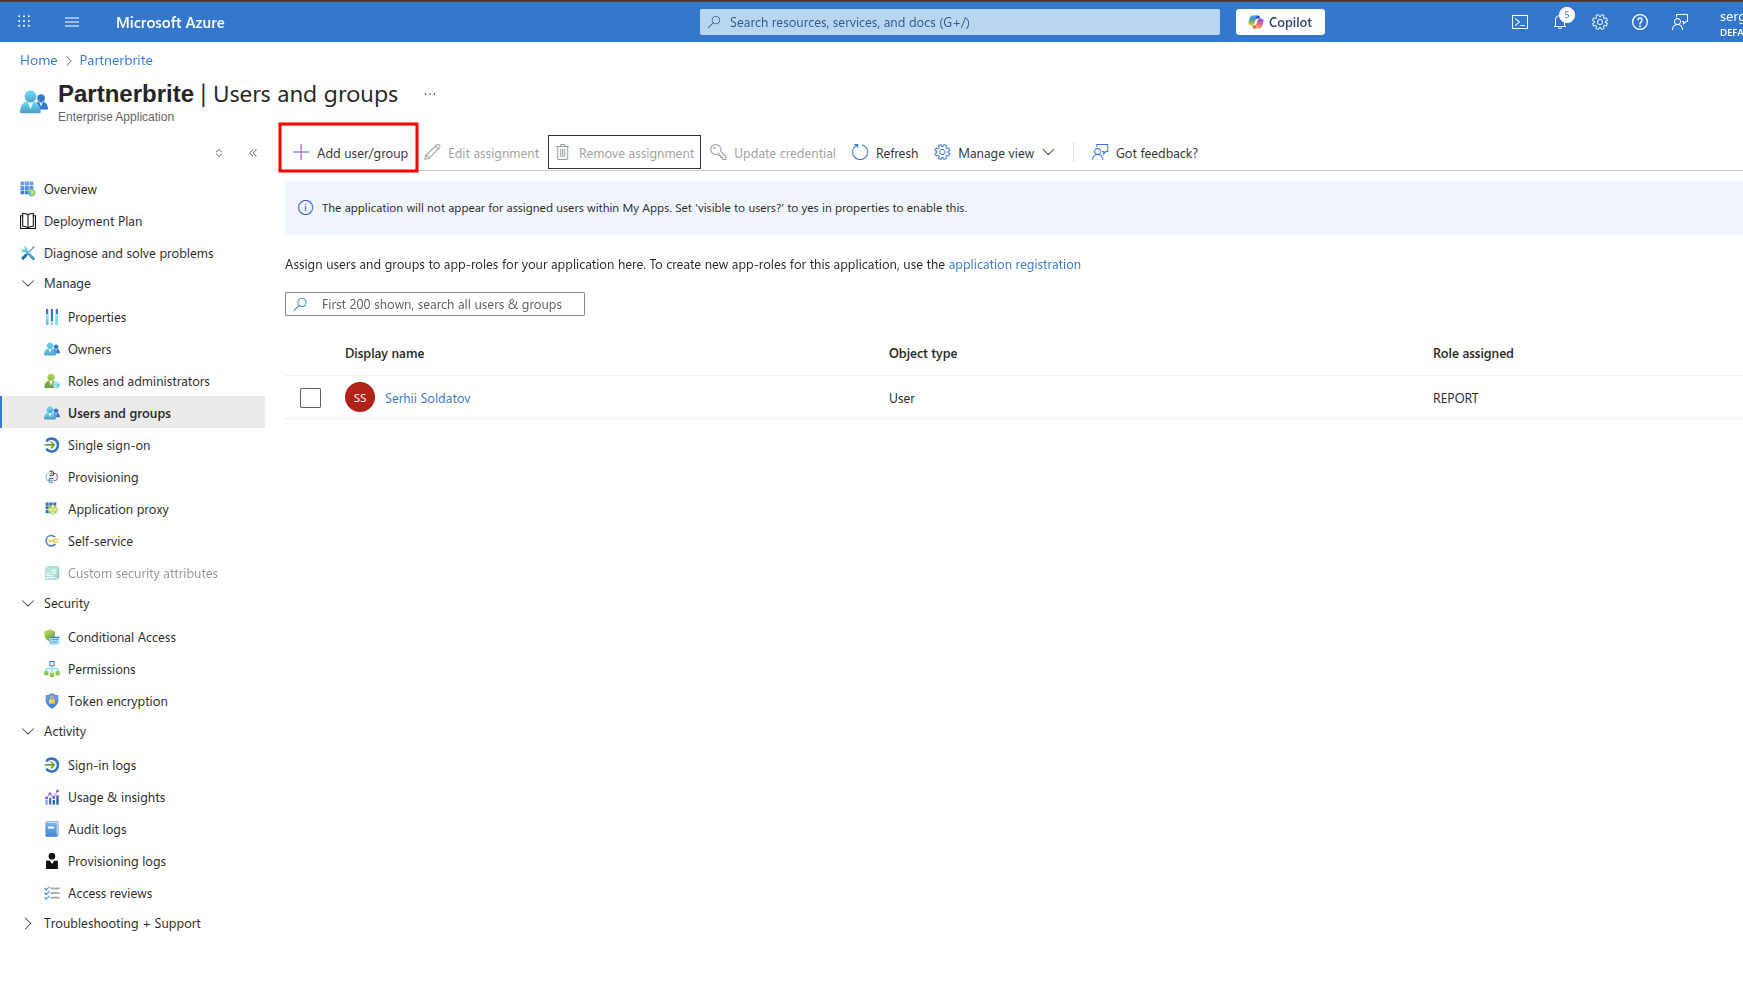
Step 1: Navigate to User Role Assignment
Go to:
Your Azure Active Directory instance -> Enterprise applications -> < YourApp > -> Users and groupsClick the "Add user" button.
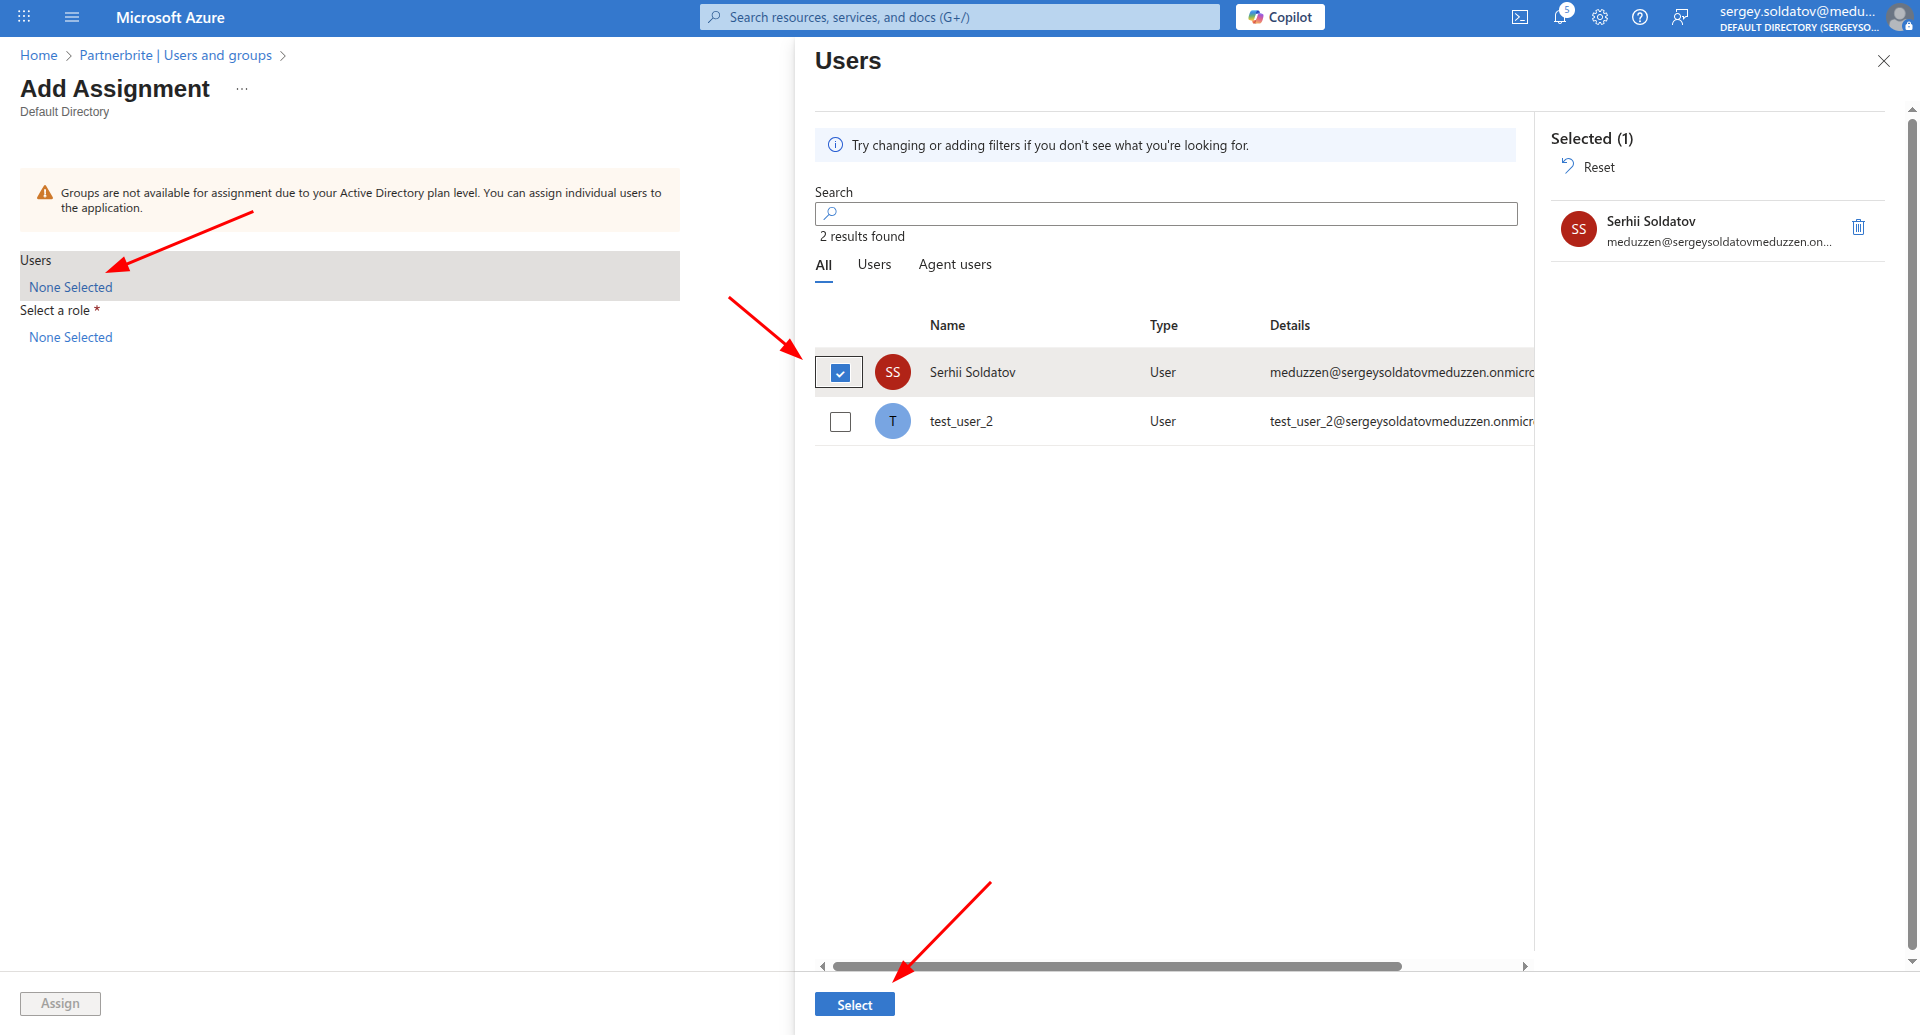
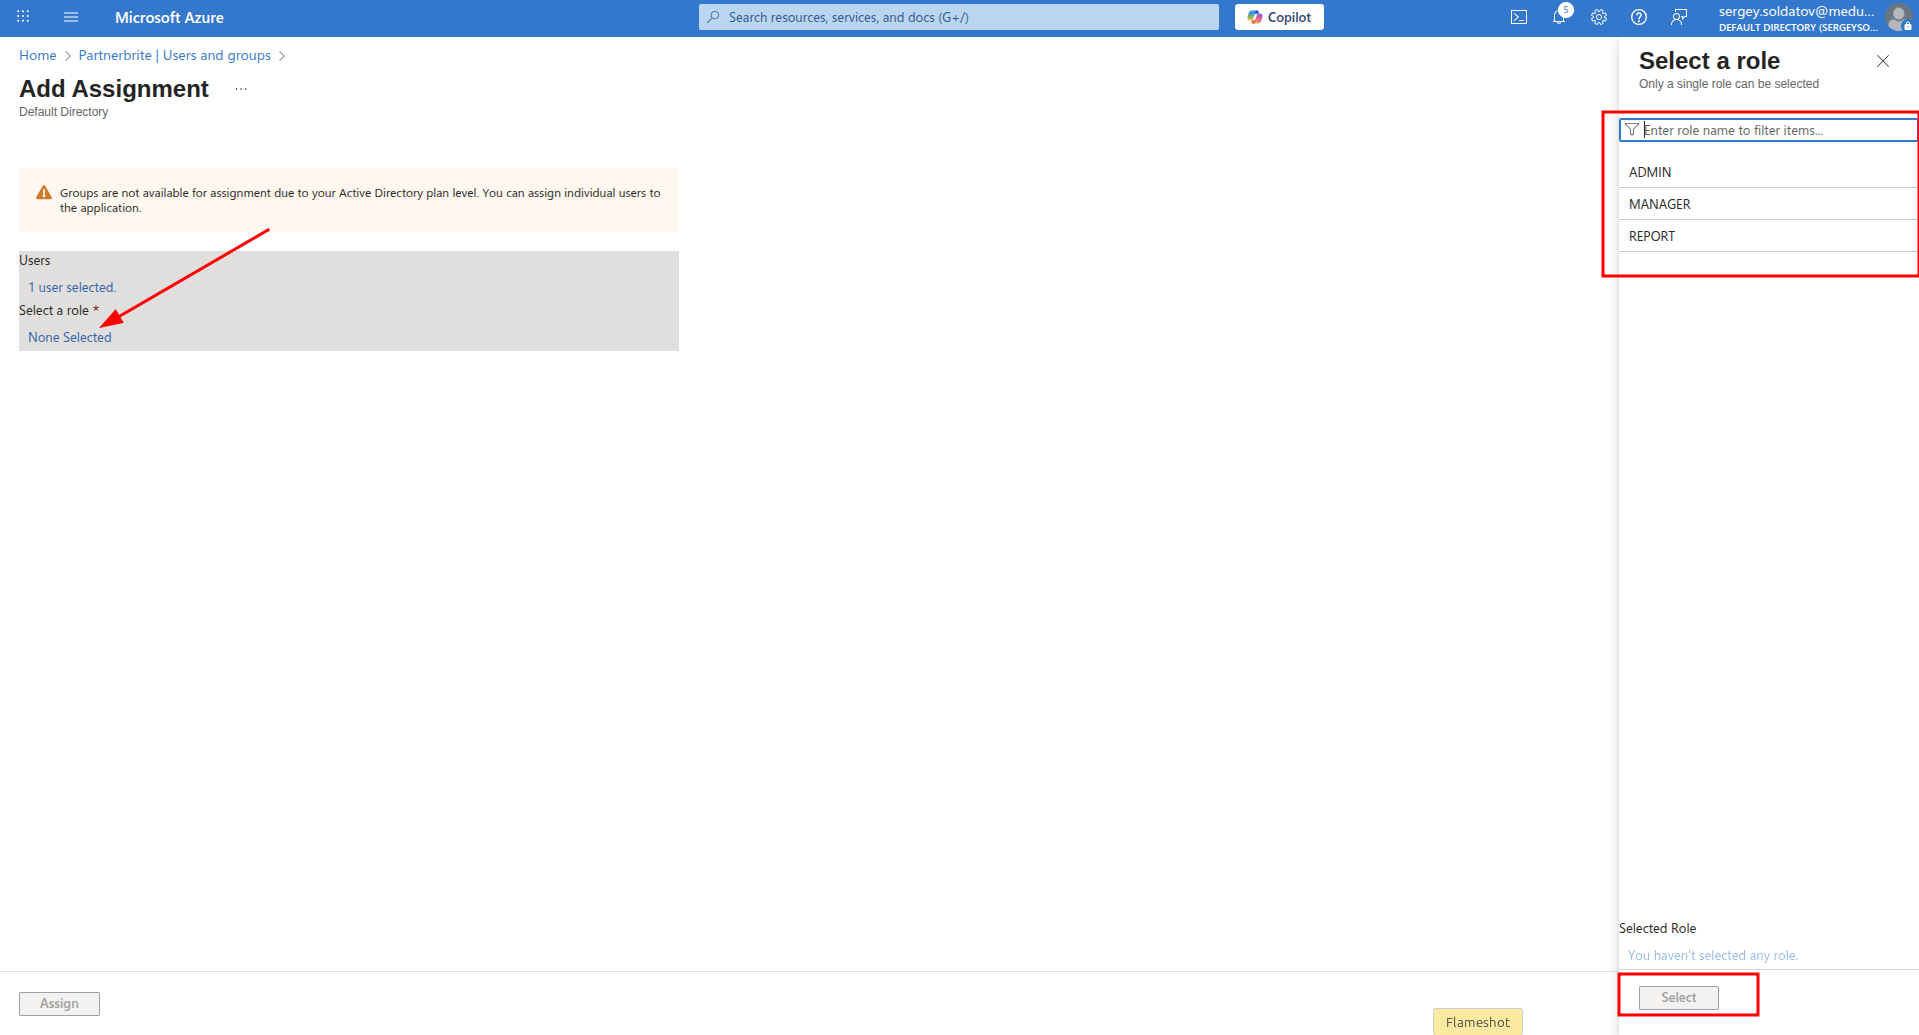
Step 2: Select Users and Assign Roles
First, select the users you want to assign roles to.
(See Screenshot below)On the next screen, choose the appropriate role for the user.
Click Assign button
For production environments, it's not recommended to assign roles to individual users. Instead, assign roles to groups to simplify user management and reduce maintenance efforts.
Step 3: Confirm Role Assignment
Click the "Assign" button to finalize the role assignment.
You will be redirected to the Users and groups view, where you can see the assigned roles.
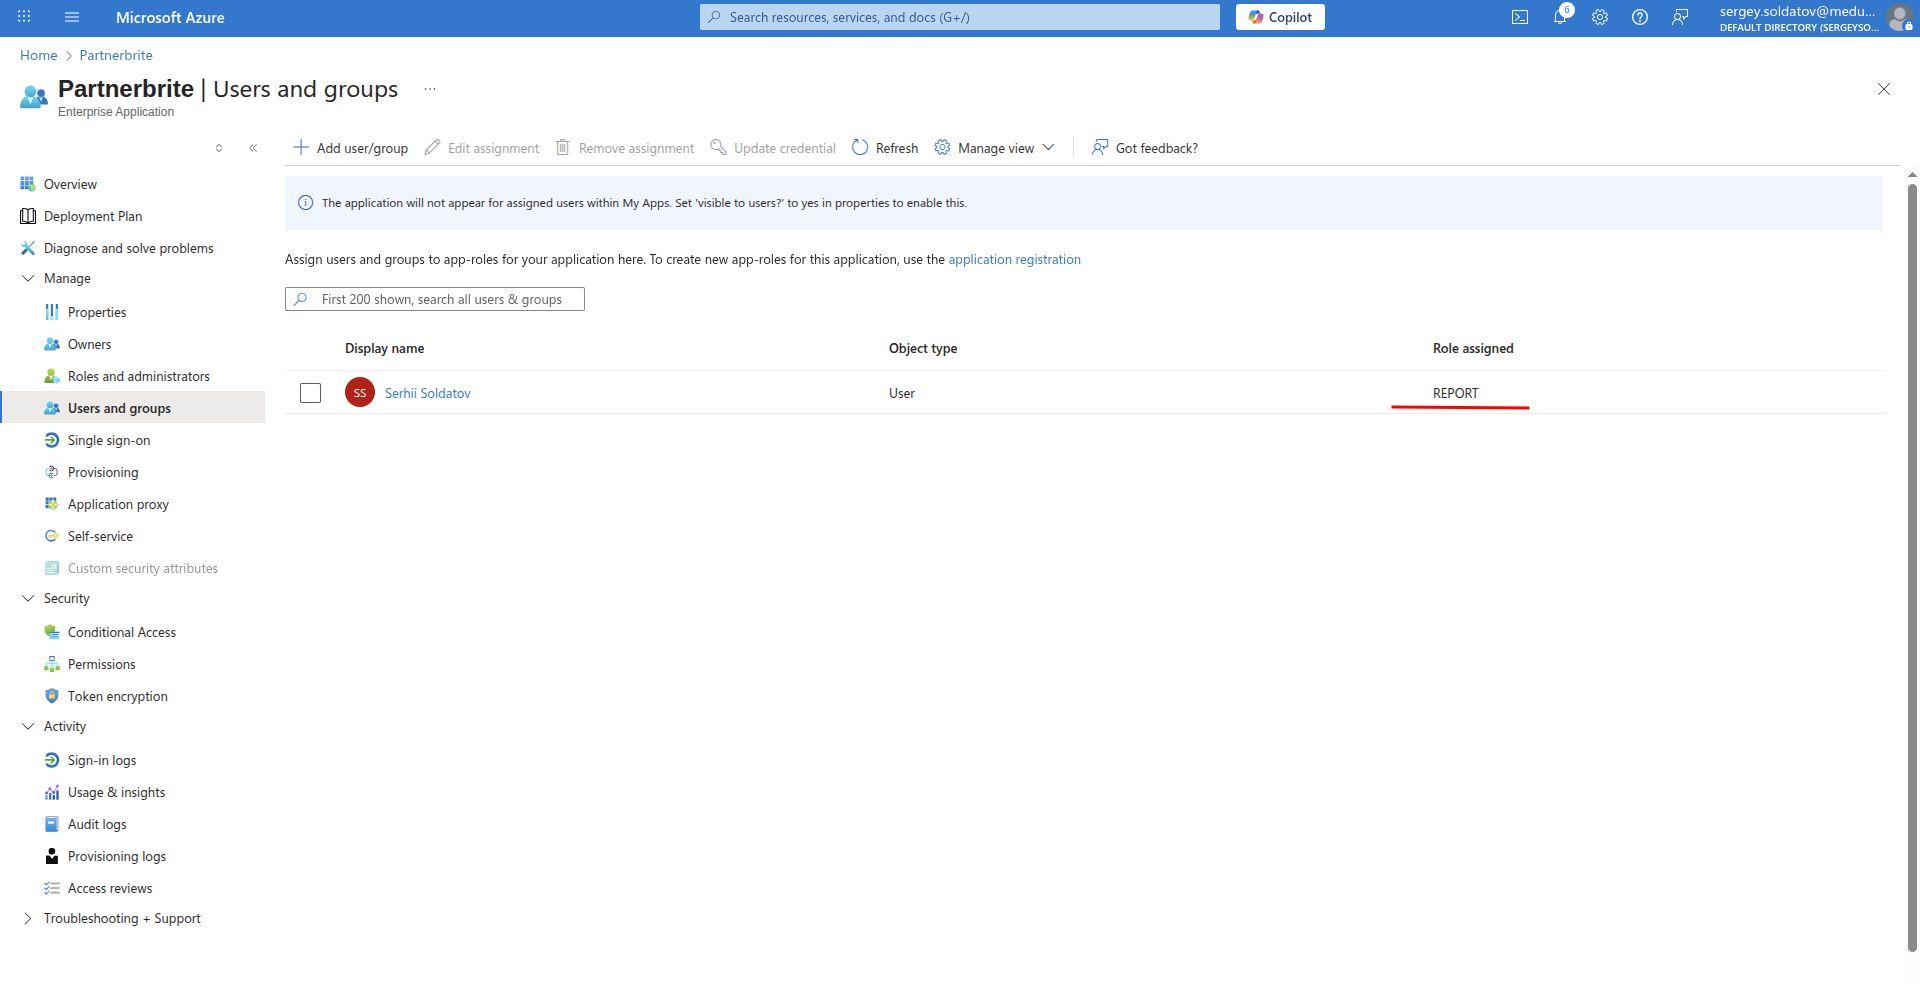
That's it! The Role assignment is now complete.
Now you have completed all preparation steps and your application is ready to use Azure SSO.
Deleting users
To trigger a soft-delete of a user in your application, you need to either remove the user from an Azure group or fully delete the user from Azure IAM.
Delete user from group:
To soft-delete a user from all rights holders where the user was, you need to remove the user from the corresponding Azure AD group (the group with the objectId defined in your SSO Client Provider).
Step 1: Navigate to Group
Go to:
Your Azure Active Directory instance -> Groups -> All groupsClick on the Group to which you want to delete users.

Step 2: Navigate to Members tab
- Click the "Members" button on the sidebar.

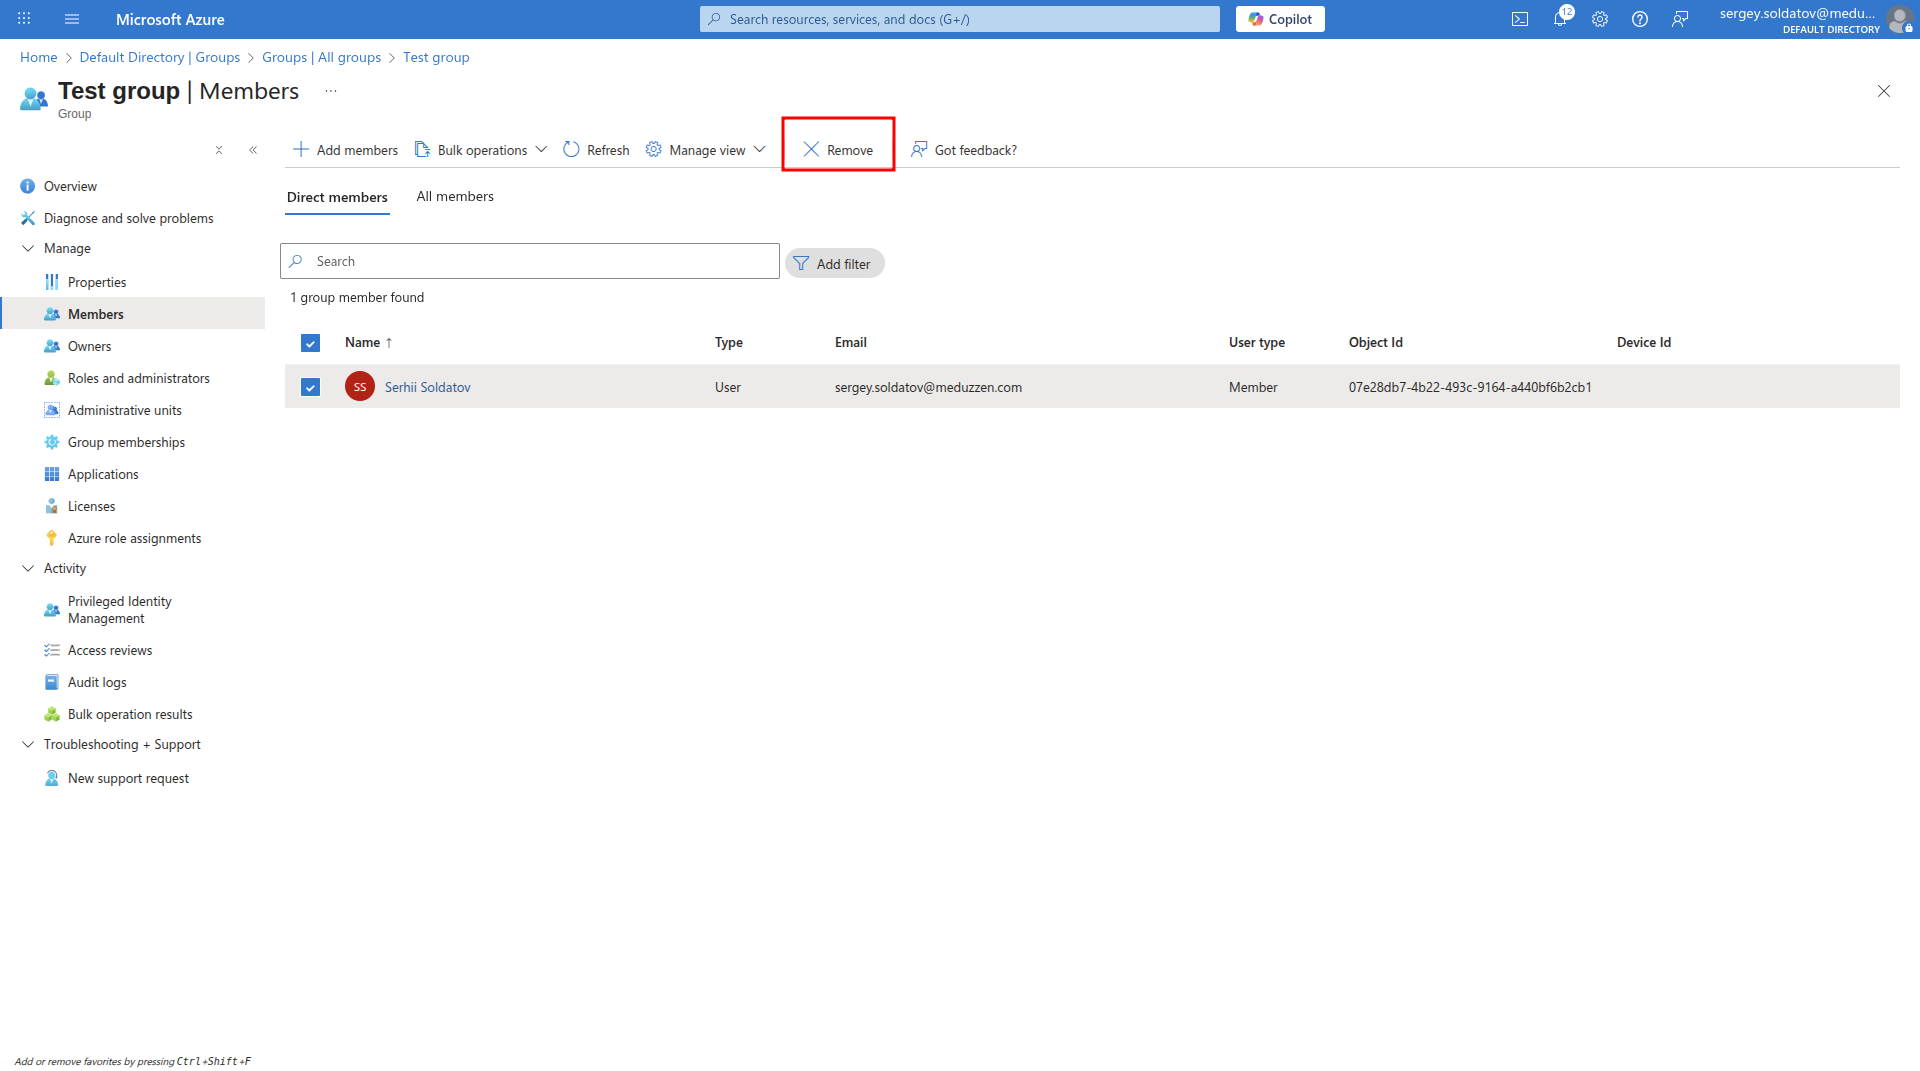
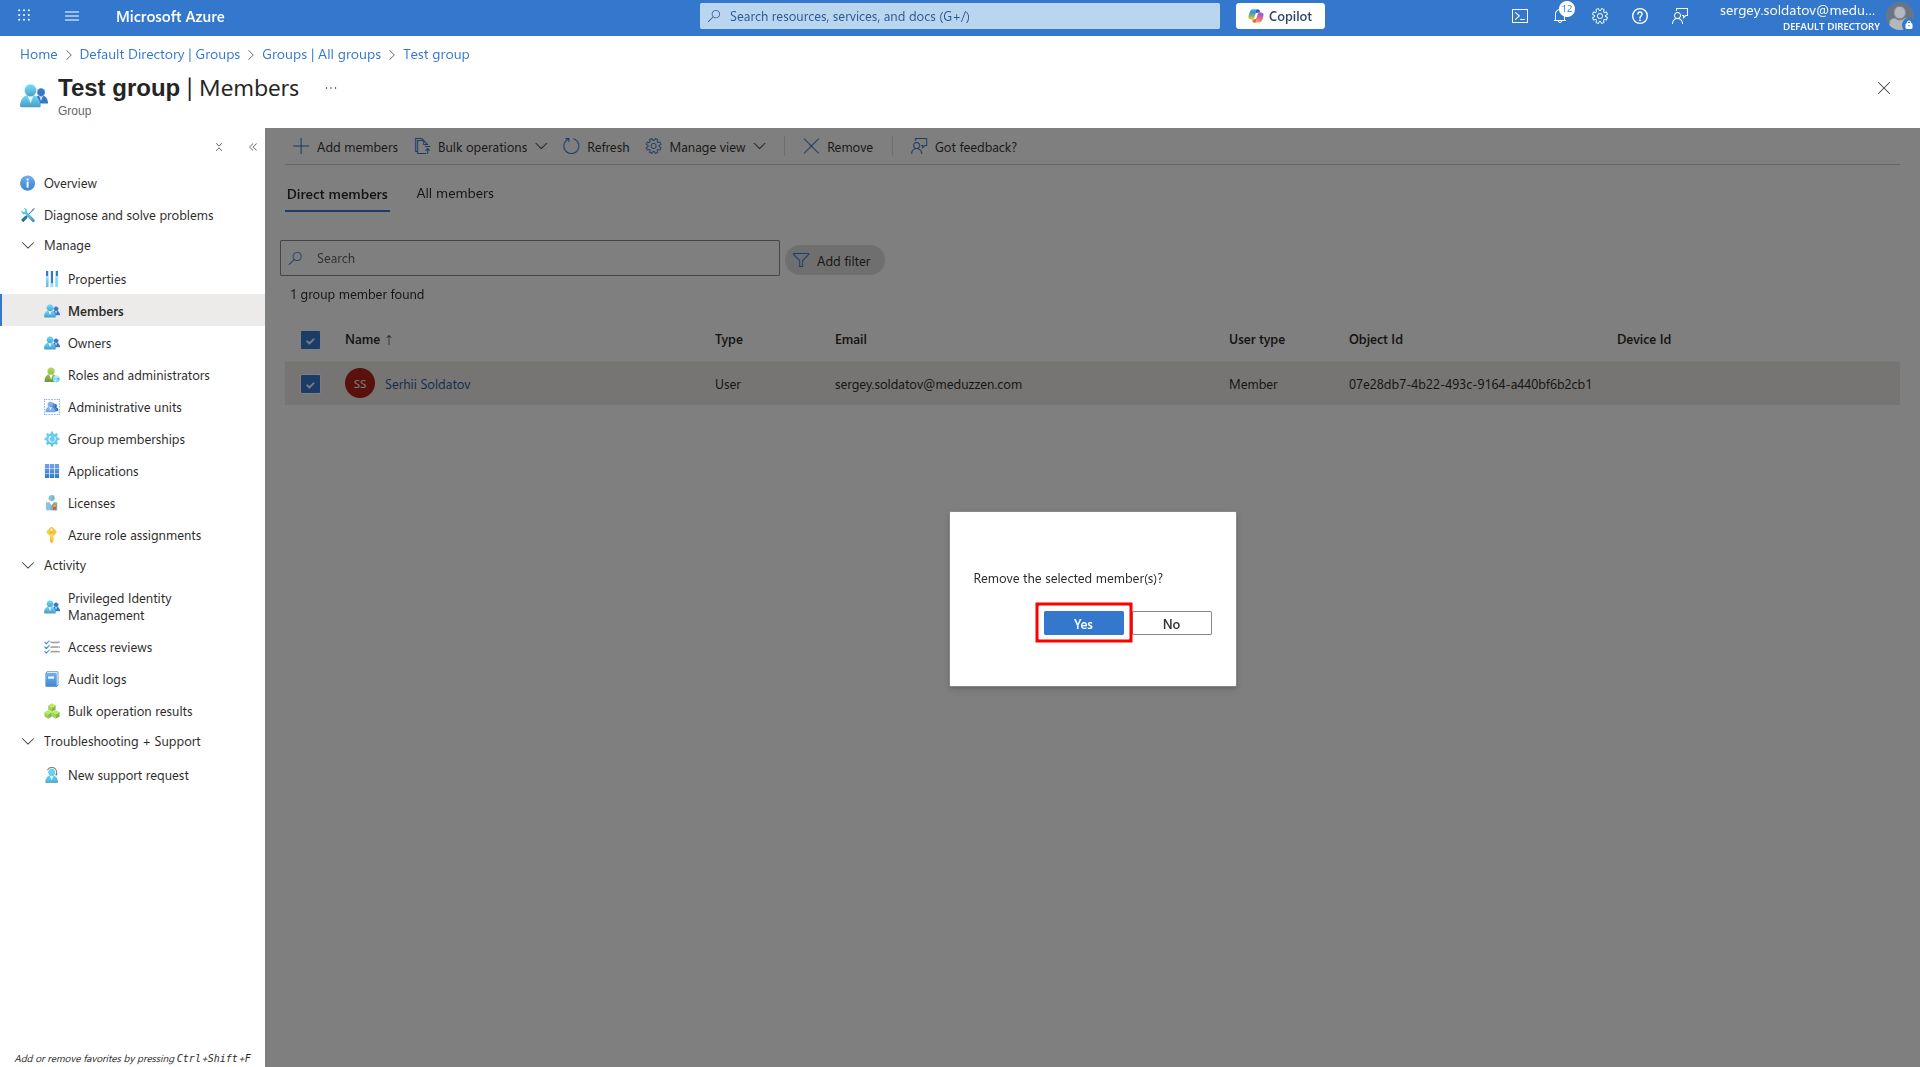
Step 3: Remove members from the Groups
Select the users you want to remove from the group.
After you select all users you want to delete from the group. Click Remove.
A modal window will appear with the configuration form. Click Yes
After this, if a member with this ObjectID exists in your application, the system will soft-delete the user.
Delete user from IAM:
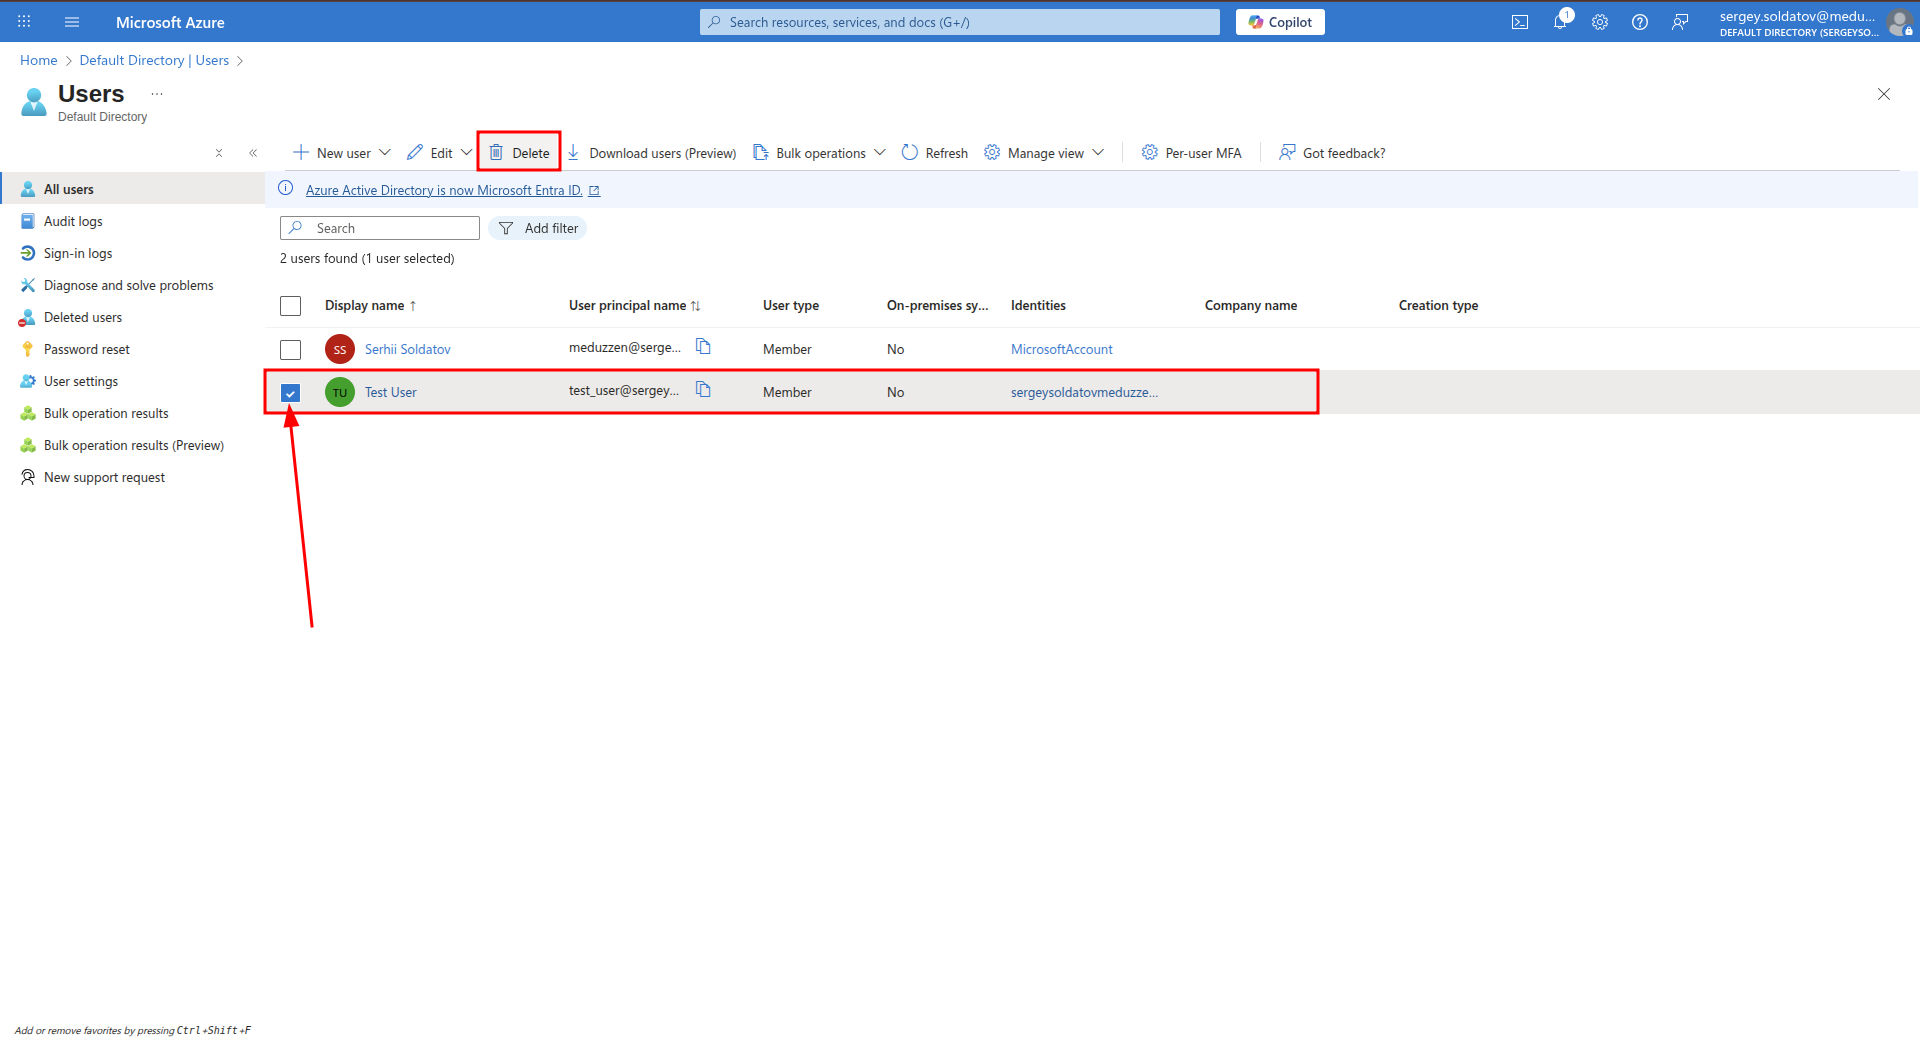
Step 1: Navigate to Users Page
Go to:
Your Azure Active Directory instance -> UsersSelect the users you want to delete.
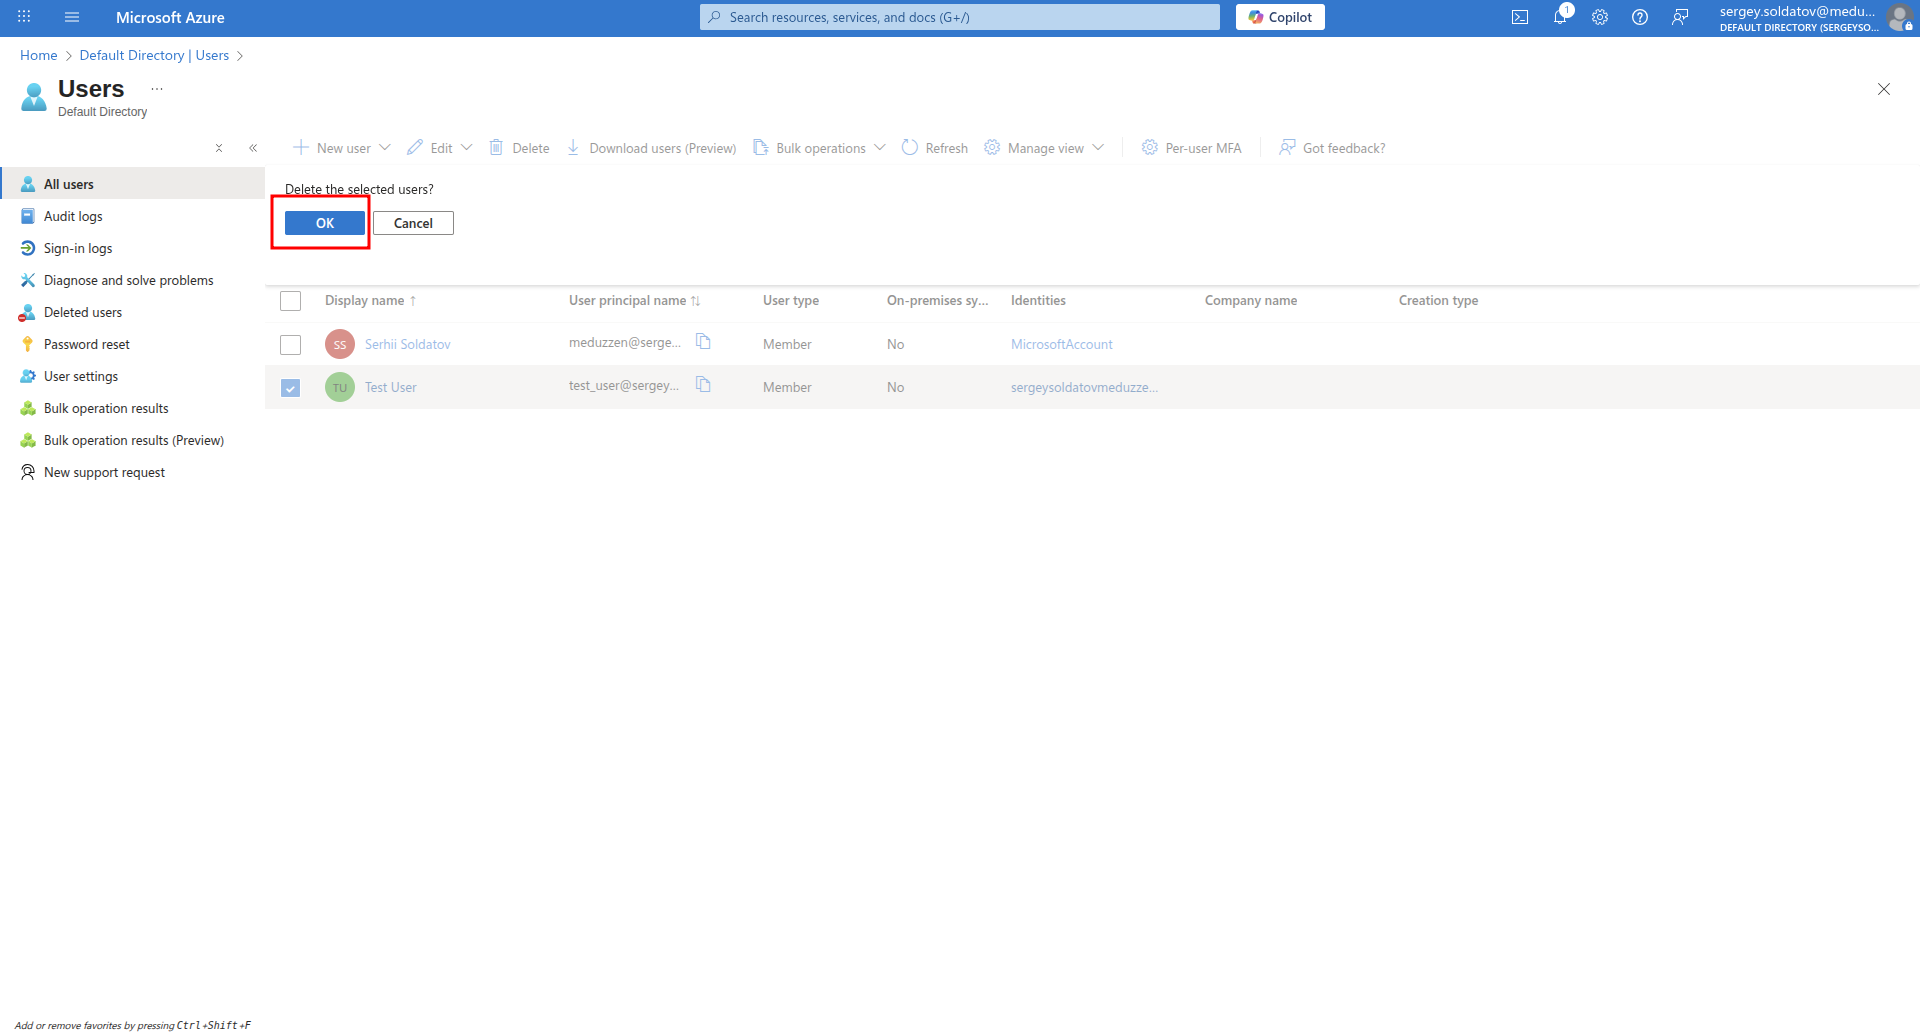
Click the "Delete" button, then confirm by clicking "Ok" in the modal window.
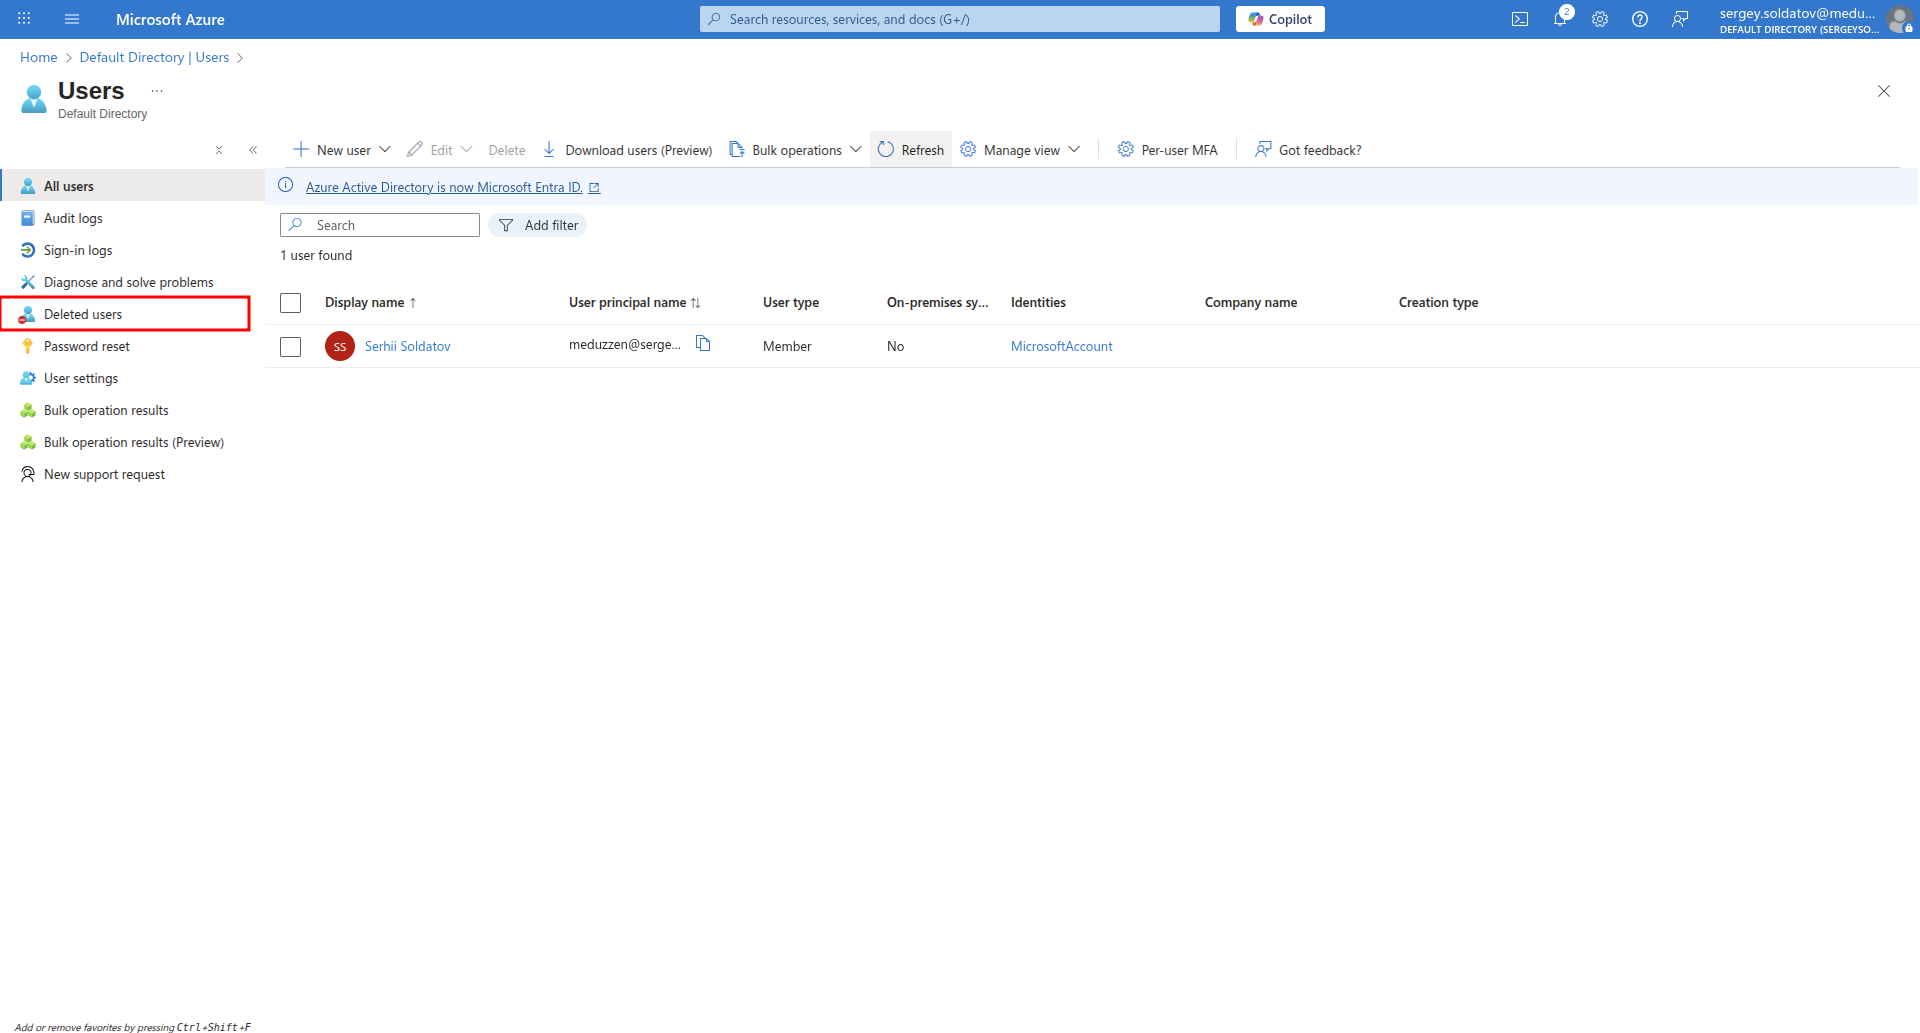
Step 2: Navigate to Deleted users tab
- Click the "Deleted users" button on the sidebar.
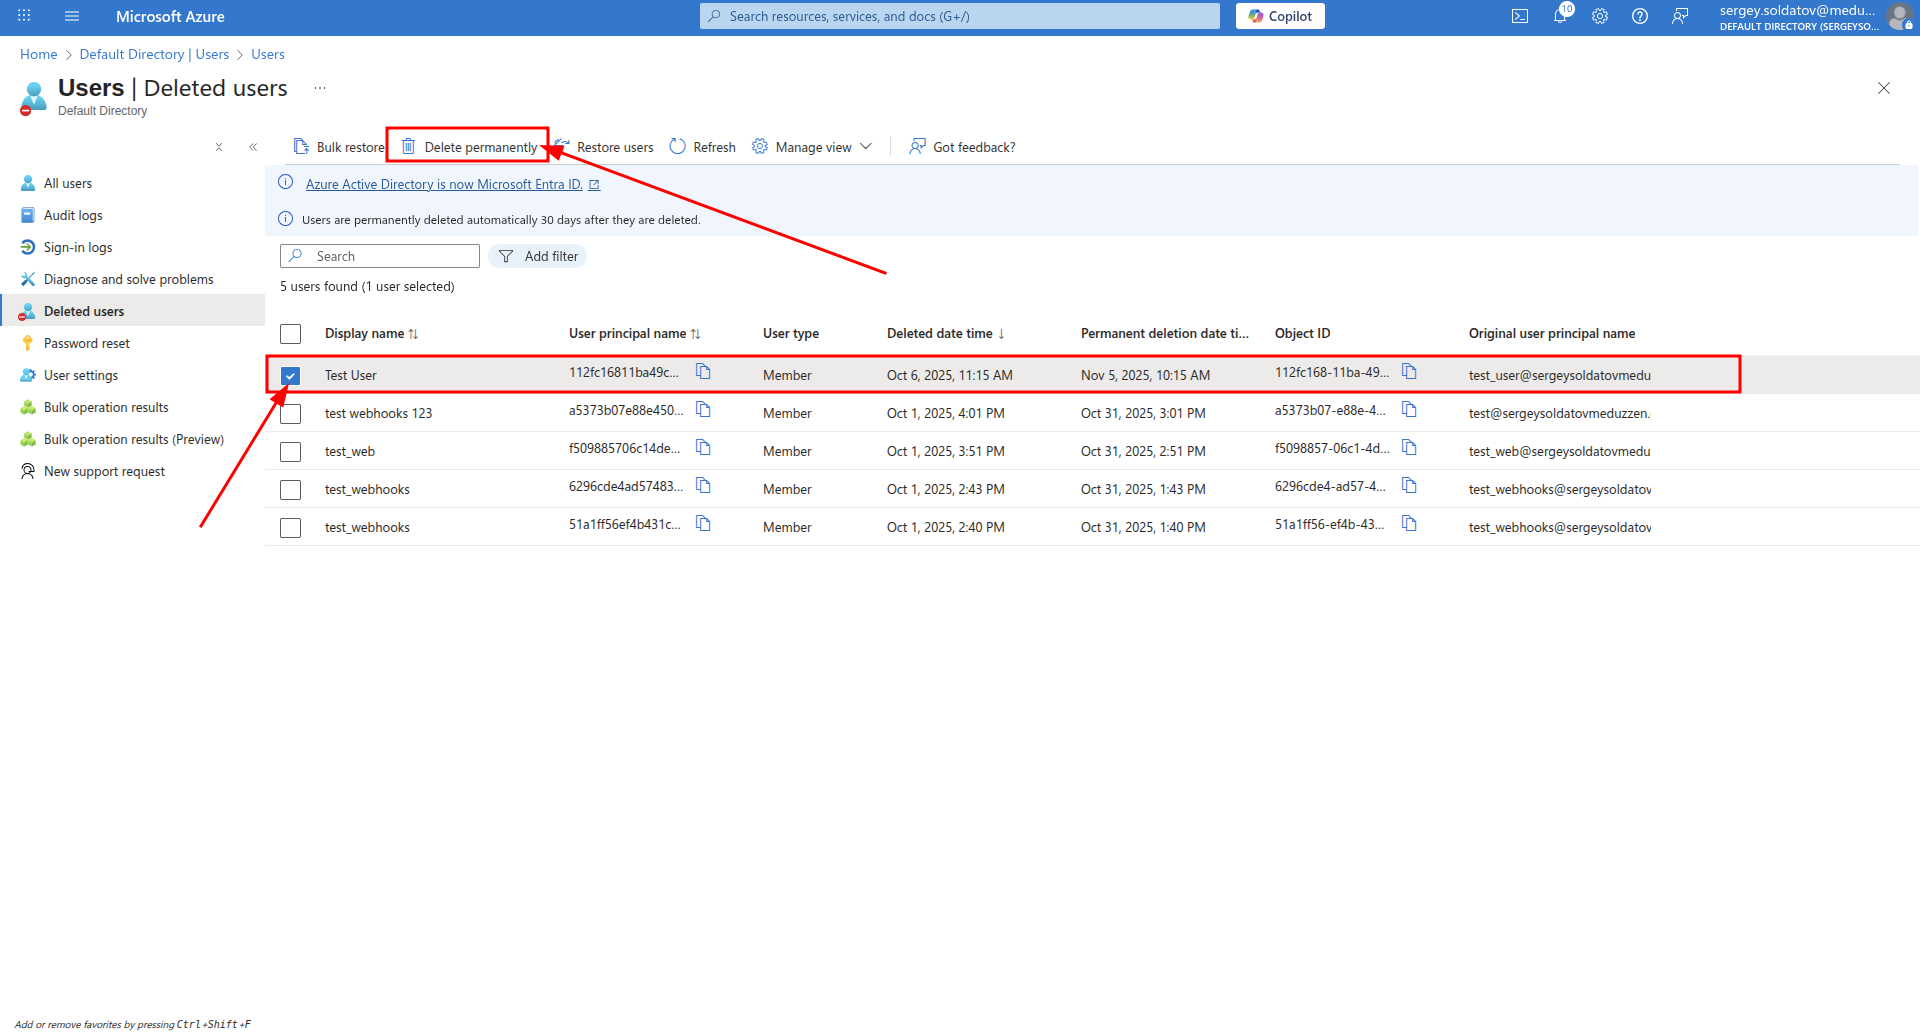
Step 3: Permanently delete the User
Select the user you delete in Step 1 or you want to delete.
Click "Delete permanently", then confirm by clicking "Ok" in the modal window.
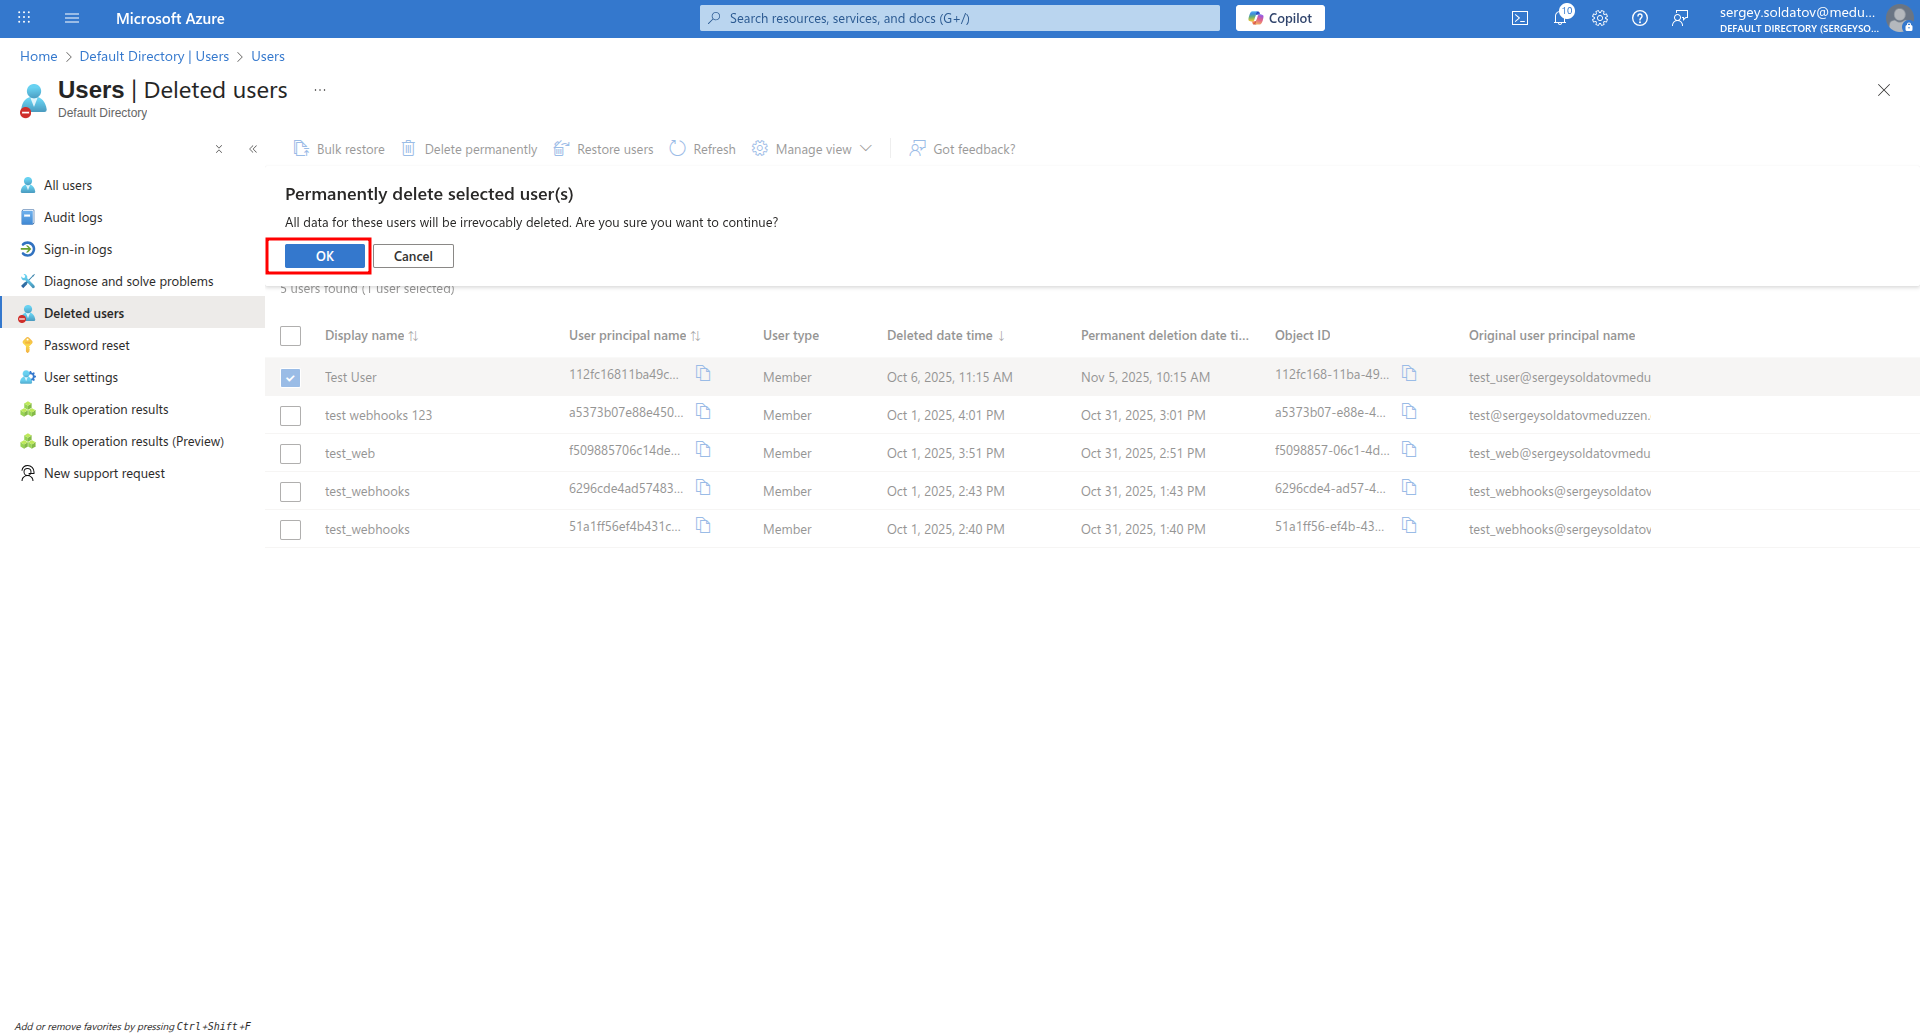
After this, the selected users will be completely deleted from Azure IAM.
If a user with the same User ObjectID exists in your application, that user will also be soft-deleted.
Note: The User ObjectID is linked to a user in your application only after the user logs in via the Azure SSO Provider.
(Optional) Multi Factor Authentication
Multi-Factor Authentication (MFA) adds an additional layer of security to user login. When enabled, users must verify their identity using a second factor, such as the Microsoft Authenticator app, in addition to their password.
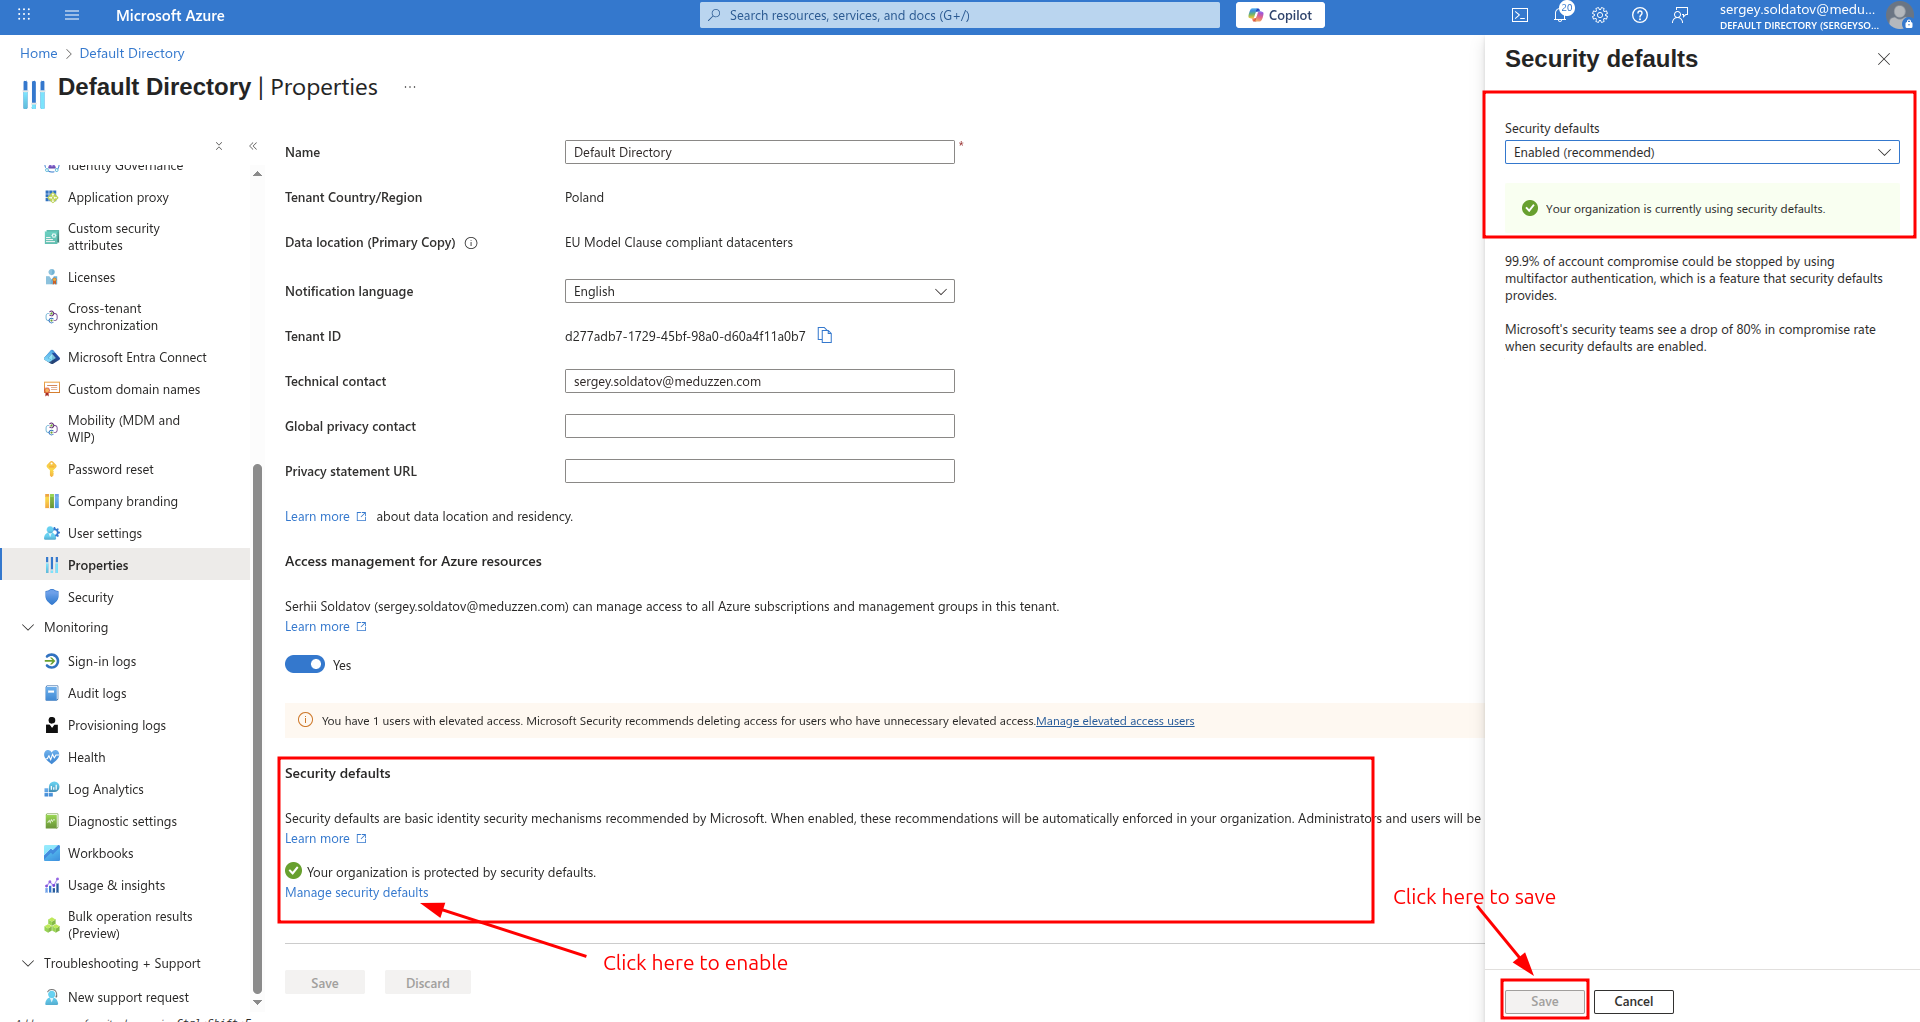
Step 1:
Navigate to:
Your Azure Active Directory instance -> PropertiesMake sure that Security Defaults are enabled. if not - enable it.
After enabling Security Defaults, when a user from your organization attempts to log in, they will be prompted for MFA.
The user will need to use the Microsoft Authenticator app (or another supported MFA method) to complete the login.
A screen similar to the one below will appear, guiding the user through the MFA verification process:
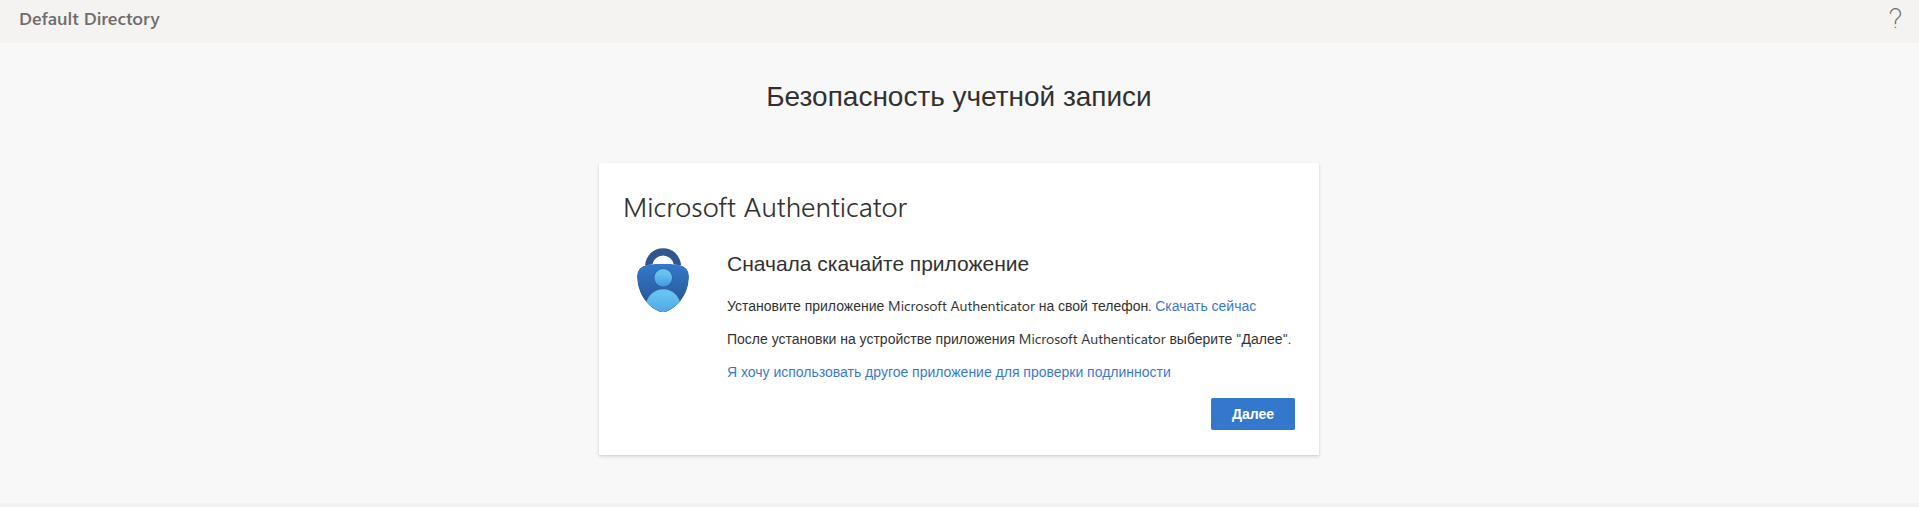
On next login attempts, the user will be required to complete MFA using the Microsoft Authenticator app.
How to connect your application
To enable Azure login for your users, you need to retrieve the following three parameters:
Client ID
Client Secret
Tenant ID
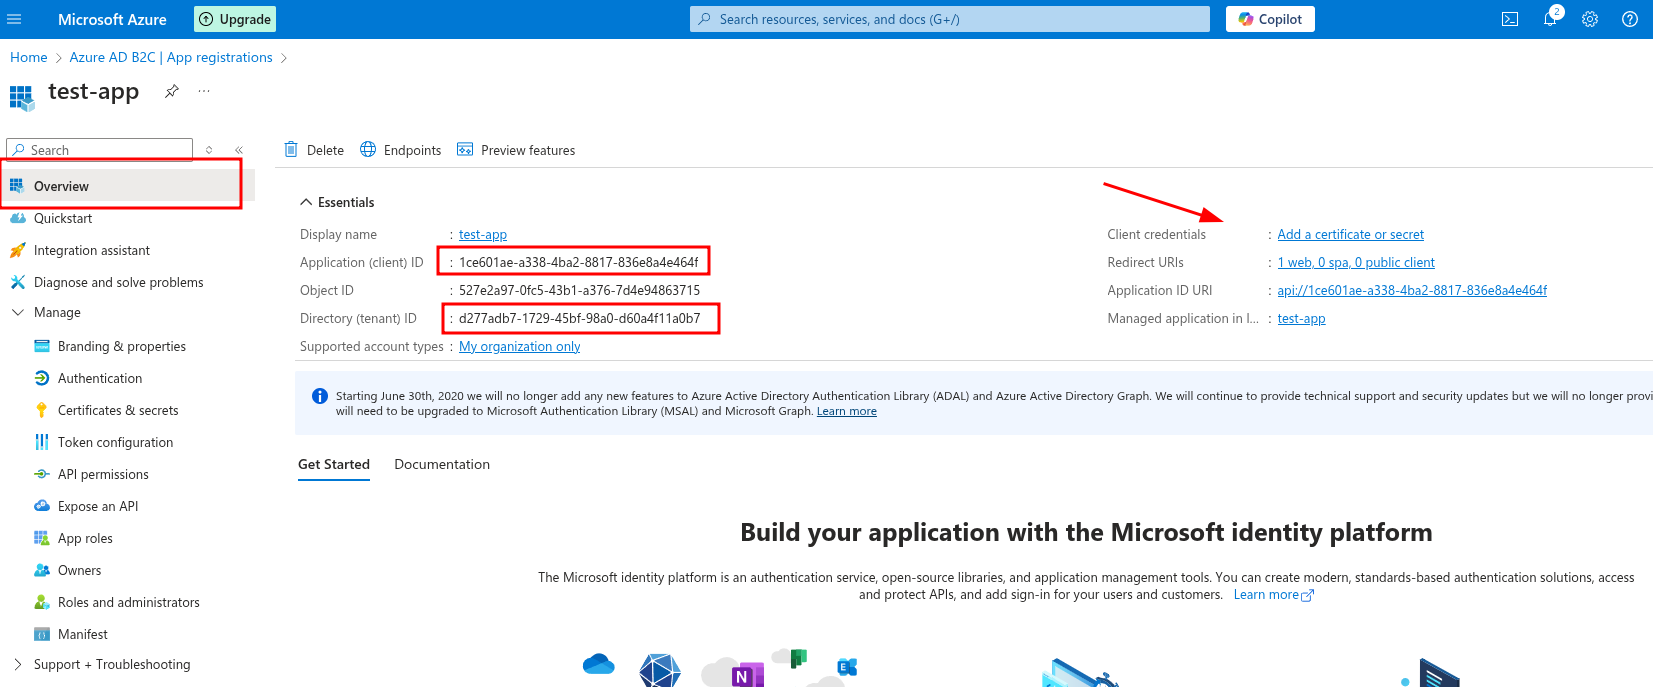
Step 1: Retrieve Client ID & Tenant ID
Navigate to:
Your Azure Active Directory instance -> App registrations -> < YourApp >Locate the Client ID and Tenant ID in the App Overview section.
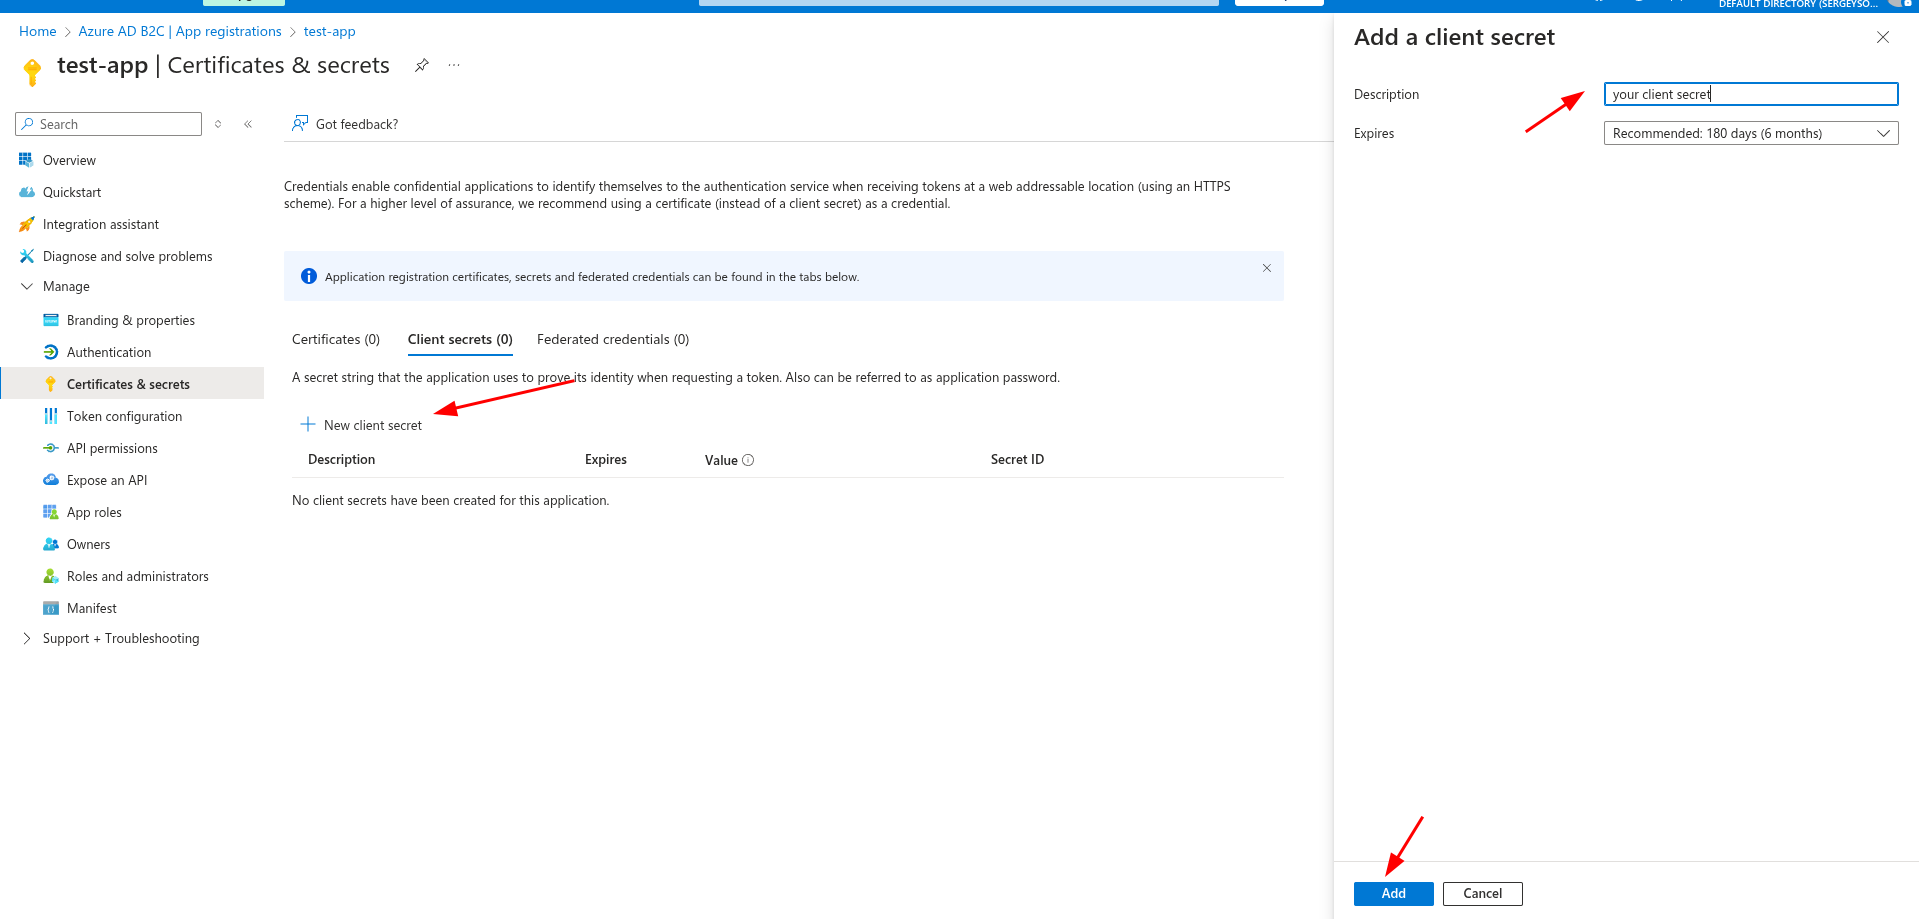
Step 2: Generate Client Secret
Click on Client credentials (as shown in Screenshot above).
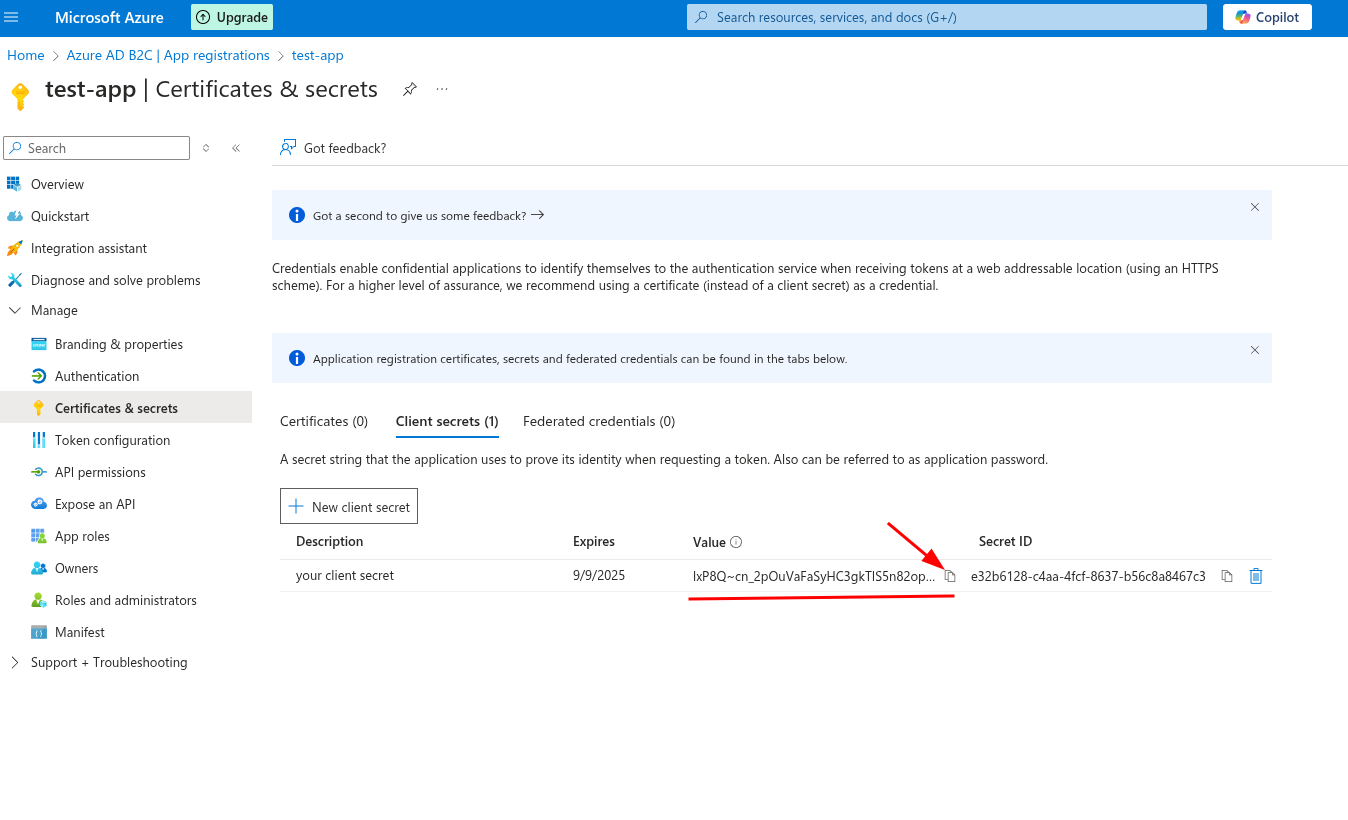
Create a new Client Secret.
(See Screenshot below)After creating the secret, copy the "Value" immediately, as it will no longer be visible once you refresh or leave the page.
After creation you should copy Value
Note! after updating page it won't be visible anymore
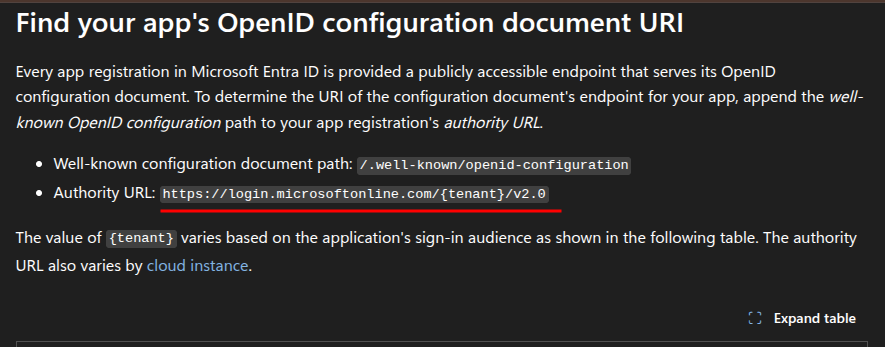
Copy a issuer URL
To obtain the Issuer URL for your application, copy: https://login.microsoftonline.com/{tenant}/v2.0 and replace {tenant} with your application's tenant ID.
✅ Now you have all the required credentials to configure Azure SSO for your application!
